


This recipe for Whole Wheat Apple Muffins came from one of the most popular cooking blogs I've discovered called SmittenKitchen.com. Deb is a freelance writer, photographer AND home chef extraordinaire - pretty much the poster-child for cooking bloggers actually. She has posted HUNDREDS of recipes and honestly, I want to try every single one of them. (Probably a testament to her amazing photography skills.) This first recipe did not let me down...

The recipe is relatively simple so I made them fresh one weekday morning for a meeting. I left my stick of butter and egg out on the counter over night to come to room temperature. I followed the recipe just as she's posted it, adding approx 1/3 cup of walnut pieces to the mix as well. I used fuji apples which I peeled and diced as the very last step before folding them into the batter.
I'll go ahead and admit here that I actually made this recipe twice in the very same week! My sister was in town for the weekend and I love to bake something fresh for guests. The second go round came out a little bit better because I a) let my buttermilk sit out an hour or two to come to room temperature and b) I diced my apples a little bit smaller. I found that the cold buttermilk made my batter curdle a little bit first with the first attempt and the smaller apples were slightly more tender.

At first I was skeptical that I'd used too much apple because the batter seemed like it was almost entirely apple as I spooned it into the muffin tin- however they came out just right. The whole wheat gives them a hearty richness (healthy too!), the sprinkle of brown sugar on the top gives them the perfect crunch and the apple chunks really are a wonderful change from your average blueberry or banana muffin. I particularly like that they aren't overly sweet either.

A few important tips/tricks that I've learned from years of muffin baking:
1. Don't overmix the batter once you've added your dry ingredients or your muffins will be tough
2. Always let your butter and eggs come completely to room temperature
3. Look for recipes containing buttermilk, they are usually delicious
4. Butter AND flour your muffin tin to avoid sticking, I don't like paper liners
5. When the muffins are done baking, let cool in the pan 5 minutes, no longer or they'll be harder to get out of the pan
I might try some different variations to this basic recipe too:
*Add a struesel topping
*Add reconstituted dried cranberries or raisins
*Add or sub a mashed banana and a handful of oatmeal
*Substitute blueberries for apples and add some lemon zest
*Substitute fresh halved cranberries and add some orange zest
Yumm... can't wait to sample another recipe from SK.com!


 It looks puffy like a souffle when you take it out of the oven, but then it falls down to create a crackly crunchy crust on top of a fudgy, brownie like center. Served just barely warm- you definitely need a scoop of good quality vanilla ice cream on top of this... a glass of red wine really kicks it up as well. The only change I made was substituting Kahlua for the
  If you're looking for an alternative to a molten chocolate cake or souffle that has to be prepared at the last minute yet something slightly more exciting than your standard brownie recipe, this is absolutely perfect.

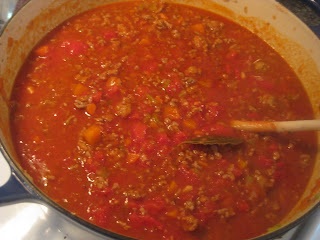
 I decided to try a new take on bolognese. I've historically been a big fan of
 The sauce cooks for a couple of hours which gives it a richness that you just can't get from a quick recipe like the Michael Chiarello one- and the longer it sits, the better it gets. I also really like the addition of the veggies in here too, both for the flavor and the texture.
 Next we tackled the fresh pasta... For this I used a


 At that point I combine the warm egg mixture with one container of mascarpone cheese and whisk until combined. I like to this right away, the heat helps the cheese incorporate faster. I immediately place this mixture in the refrigerator.
 I clean out my mixer bowl and place it in the fridge for a couple of minutes to ensure that its cool before whipping 1 cup of cream with about 2 tablespoons of powdered sugar. Once the custard mixture is cooled to at least room temperature, I very gently fold the whipped cream in until well combined.
 Now for assembly... I use two package of fresh/soft lady fingers for this recipe. (You might have a couple left over.) You can normally find these in the bakery section of your grocery store. The hard lady finger cookies will also work but you'll need to let the tiramisu set up overnight to ensure they have time to soften.
I mix approximately 2/3 cup of strong coffee with 1/3 cup Kahlua-dunking each lady finger lightly and layering into the bottom and/or up the sides of a dish. I've found that a large bowl or even a 9x13 glass baking dish works well. I've also made individual ones before in ramekins or parfait glasses. In this instance I used a souffle dish which was also great.
Now for assembly... I use two package of fresh/soft lady fingers for this recipe. (You might have a couple left over.) You can normally find these in the bakery section of your grocery store. The hard lady finger cookies will also work but you'll need to let the tiramisu set up overnight to ensure they have time to soften.
I mix approximately 2/3 cup of strong coffee with 1/3 cup Kahlua-dunking each lady finger lightly and layering into the bottom and/or up the sides of a dish. I've found that a large bowl or even a 9x13 glass baking dish works well. I've also made individual ones before in ramekins or parfait glasses. In this instance I used a souffle dish which was also great.
 I then scooped half of the custard-cream mixture into the bowl and topped with another layer of dunked lady fingers.

 POP QUIZ: What does "Tiramisu" mean (roughly) in Italian?? Leave a comment!

 Hoppin' John...
Next/as the collards were simmering, I started on my hoppin' john. For those of you unfamiliar, hoppin' john is essentially black eyed peas and rice. (Its the black eyed peas that are supposed to bring you luck in the new year...they don't have to be in hoppin' john form) Seeing as I was feeling a bit on the lazy side- this rendition is not truly authentic. I used a recipe from the Boathouse restaurant here in Charleston as a base- they have a fantastic cookbook. In a dutch oven, I rendered the fat from another 6 slices of bacon. I then sauteed one diced carrot, one diced celery stalk, one finely diced jalapeno, and half of a large sweet onion, diced. Once the vegetables were tender (10 minutes or so) I added two cans of black eyed peas (rinsed and drained) and seasoned well with salt and pepper.
This is where I cheated... I'm fairly confident that most self-respecting southern cooks wouldn't be caught dead using canned beans, but oh well... The Boathouse actually uses fresh peas which I'm not sure many people could actually find in the store anyway and they use the carrot, celery and onion to flavor the beans as they cook slowly in water. I thought adding the veggies to the dish would add some extra color and crunch as well as flavor in this case. I removed the bean/vegetable mixture from the dutch oven and set aside. I then cooked two cups of basmati rice per the package directions in the same pot, using half chicken stock in place of half the water. Once the rice was finished, I tossed the beans and vegetables back in. Finally, I finished it with the juice from 1.5 lemons, one bunch of chopped green onions- green and white parts- and a handful of chopped fresh parsley. This step really added some freshness and brightness to the flavors. I also crumbled some of the crispy bacon back in as well.
Hoppin' John...
Next/as the collards were simmering, I started on my hoppin' john. For those of you unfamiliar, hoppin' john is essentially black eyed peas and rice. (Its the black eyed peas that are supposed to bring you luck in the new year...they don't have to be in hoppin' john form) Seeing as I was feeling a bit on the lazy side- this rendition is not truly authentic. I used a recipe from the Boathouse restaurant here in Charleston as a base- they have a fantastic cookbook. In a dutch oven, I rendered the fat from another 6 slices of bacon. I then sauteed one diced carrot, one diced celery stalk, one finely diced jalapeno, and half of a large sweet onion, diced. Once the vegetables were tender (10 minutes or so) I added two cans of black eyed peas (rinsed and drained) and seasoned well with salt and pepper.
This is where I cheated... I'm fairly confident that most self-respecting southern cooks wouldn't be caught dead using canned beans, but oh well... The Boathouse actually uses fresh peas which I'm not sure many people could actually find in the store anyway and they use the carrot, celery and onion to flavor the beans as they cook slowly in water. I thought adding the veggies to the dish would add some extra color and crunch as well as flavor in this case. I removed the bean/vegetable mixture from the dutch oven and set aside. I then cooked two cups of basmati rice per the package directions in the same pot, using half chicken stock in place of half the water. Once the rice was finished, I tossed the beans and vegetables back in. Finally, I finished it with the juice from 1.5 lemons, one bunch of chopped green onions- green and white parts- and a handful of chopped fresh parsley. This step really added some freshness and brightness to the flavors. I also crumbled some of the crispy bacon back in as well. 
 I crisped the Public fried chicken pieces in the oven at 300 degrees and served with our collards and hoppin' john, a little Texas Pete on the side. Happy 2010!!!!


 John and I traveled home to be with my family in Harrodsburg, KY for Christmas. My sister Annie and her husband Greg were there, as was my Mom's brother, my Uncle Bill and his wife Suellen. As I've mentioned before, we all love to cook and most all family gatherings are centered around food. Christmas this year was of course no exception.
The menu for Christmas Dinner 2009 was as follows:
*Uncle Bill's Caesar Salad (now Annie's specialty)
*
John and I traveled home to be with my family in Harrodsburg, KY for Christmas. My sister Annie and her husband Greg were there, as was my Mom's brother, my Uncle Bill and his wife Suellen. As I've mentioned before, we all love to cook and most all family gatherings are centered around food. Christmas this year was of course no exception.
The menu for Christmas Dinner 2009 was as follows:
*Uncle Bill's Caesar Salad (now Annie's specialty)
* It was much fun to have everybody in the kitchen cooking together. Between my Mom, Uncle Bill (the only one of us with formal culinary training and restaurant experience), Annie and myself, we were able to pull together an amazing meal in a jiffy.
Uncle Bill's Caesar salad recipe is legendary. Quite frankly, I don't have the actual recipe written down. I can tell you that it is the.real.deal . It is a mixture of anchovy paste, fresh garlic, a raw egg, lemon juice, red wine vinegar, olive oil, parmesan cheese and a hit of Tabasco. It is finished with some parmesan cheese as well. Tossed with crisp romaine lettuce, a few fresh croutons and shaved parmesan cheese, it is spicy, tart, briny, savory... there is really nothing like it in this world.
It was much fun to have everybody in the kitchen cooking together. Between my Mom, Uncle Bill (the only one of us with formal culinary training and restaurant experience), Annie and myself, we were able to pull together an amazing meal in a jiffy.
Uncle Bill's Caesar salad recipe is legendary. Quite frankly, I don't have the actual recipe written down. I can tell you that it is the.real.deal . It is a mixture of anchovy paste, fresh garlic, a raw egg, lemon juice, red wine vinegar, olive oil, parmesan cheese and a hit of Tabasco. It is finished with some parmesan cheese as well. Tossed with crisp romaine lettuce, a few fresh croutons and shaved parmesan cheese, it is spicy, tart, briny, savory... there is really nothing like it in this world.

 The risotto was a recipe that Annie found on Epicurious. It was absolutely delicious, creamy and just al dente. My secret to perfect risotto is constant stirring-adding just a very tiny ladle of broth at a time- also I thin it with some extra broth right at the very end. The rice continues to absorb the liquid all the way to the table and you need the extra liquid to avoid a gluey-ness as it sets up.
 Uncle Bill and Mom studded the beef tenderloin with shards of fresh garlic and seasoned simply with salt and pepper. They seared it quickly in a roasting pan over a hot grill and then placed it in the oven at 400 degrees. After 10 minutes, they turn the oven off. DO NOT OPEN THE DOOR. My grandmother's secret was to let the residual heat gradually cook the meat evenly through. Roasting in a hot oven tends to cook the outer meat much more quickly than the middle. I think we left it in for another 20 minutes or so until the thermometer read approx 125 degrees. Meanwhile, Mom whisked together some prepared horseradish, sour cream and a touch of dijon for a quick but delectable accompaniment.
 All in all it was an outstanding meal. We managed to leave a little room for a smattering of mom's classic Christmas cookies too.
 What did your family have for Christmas dinner this year??? Leave a comment and let me know!


