Wednesday, July 18, 2012

Lemon Blueberry Scones

Another great breakfast, brunch or snack recipe to share...  This was my very first scone baking experience and I must say they are surprisingly simple, fast, and delicious.  Scones are essentially lightly sweetened biscuits as far as how they are made.  You can jazz them up with your favorite flavors or mix-ins.  I particularly loved the tangy-sweet lemon glaze on these.  This is a Tyler Florence Recipe courtesy of footv.com. 
Makes somewhere between 10 and 24 scones depending on your shape/size preference

Scones:

2 cups flour (I used white-wheat)
1 tablespoon baking powder
1/2 teaspoon salt
2 tablespoons sugar
5 tablespoons unsalted butter, COLD, cut into small chunks
1 cup fresh blueberries
1 cup heavy cream, plus more for brushing the scones

Preheat oven to 400 degrees.  Combine dry ingredients in a bowl.  Add the cubed butter and work into the flour mixture using a pastry cutter or two forks.  A pastry cutter makes this super easy- I highly reccomend you pick one up at Walmart for $3 if you don't have one.


Once the butter has been cut up into tiny pieces and incorporated- you're done.  The mixture should resemble course sand.  Next gently fold in the blueberries with a spoon- taking care not to mash them up much or you'll have purple scones. 

Lastly- make a well in the center and add the heavy cream.  Stir gently to combine.  Turn the dough out onto a clean countertop or cutting board dusted with flour and form the dough into a rectangle about 1 inch thick x 2-3 inches wide. 


At this point you can use a dough scraper or large knife to cut the scone into any shape you like.  I made 3 x 3 inch squares and then cut them in half at a diagonal to make mini triangles.  This is a bit tricky and I found I ended up slicing through the blueberries but as long as you use a large, sharp knife, its not too messy.

Note: You want to work fairly quickly- don't overhandle the dough. The key to super flaky scones is making sure the butter is still cold when they hit the oven.

Place the scones on an ungreased cookie sheet and brush the tops with more heavy cream.  If you want to forego the glaze- a healthy dusting of raw or turninado sugar over the top would be a great alternative.

Bake the scones for 15-20 minues until lightly golden brown.  Meanwhile, you can prepare the glaze.


Lemon Glaze:
1/2 cup freshly squeezed lemon juice
2 cups confectioners' sugar, sifted
1 tablespoon unsalted butter
1 lemon, zest finely grated

I did the glaze in the microwave but a double boiler works too.. Combine the all ingredients in a glass bowl and stir to combine.  Microwave for 30 seconds- then whisk again until smooth.  The glaze will thicken as it sits.  I have found that the thicker it is when you coat the scones- the better.  It should almost be difficult to spread over the top so it barely slides over the edges to coat the scone.  If its too thin- you'll lose most of it as it drains right off the sides.
 
Let the scones cool completely - at least 20-30 minutes - before glazing.  I set them on a cooling rack over a foil lined baking sheet to catch the run off glaze.  Yon can either dunk the tops right into the glaze or spoon the glaze over the scones- whichever you prefer. 


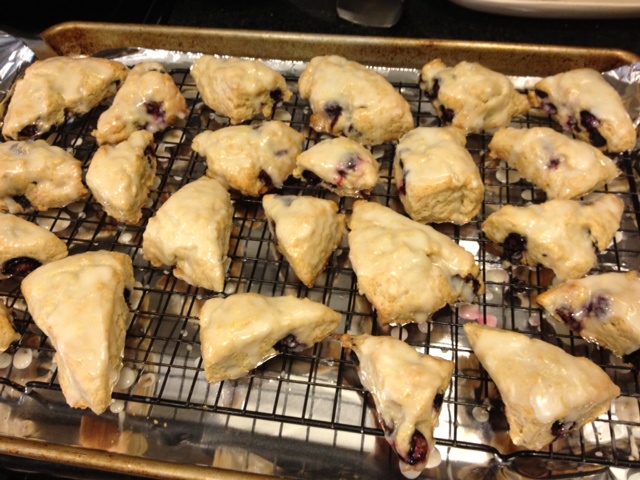
Let the scones set for 45 minutes or so for the glaze to harden.  I think these are best served the day of while the edges are still crisp and the insides light and fluffy.  Placing them in an airtight container caused them to soften a bit under the glaze.
 
These would be delicous with any fresh summer berry or substitute dried fruit year round.  Spice them up with cinnamon, nuts or even chocolate chips.
 

Spinach, Chicken Sausage and Cheese Strata

Brunch is one of my favorite ways to entertain.   It scales easily to feed any number of people, you can make it casual or fancy, you can prepare most items in advance and... its a great excuse to drink champagne early in the day.  I recently hosted a casual baby shower brunch for a group of ladies and the menu was as follows:

Spinach, Chicken Sausage and Gruyere Strata
Mini Brie, Almond, Apricot Tarts
Fresh Fruit
Lemon Blueberry Scones
Carrot Cake

I'll share some of the other recipes in subsequent posts however the main event was the strata which turned out great.  I love this strata recipe because you can make about a 100 different variations once you have the basic idea down and it can be assembled the night before.  You simply toss it in the oven an hour before your guests arrive.  This was inspired by  a recipe I found on a favorite food blog, www.smittenkitchen.com.


Ingredients:   serves 8

3  Chicken Italian Sausage links (I used sweet versus hot)
10-20 ounces of frozen chopped spinach, thawed and squeezed dry (I used closer to 20 I think)
3-4 cups of shredded cheese, I used a mix of Gruyere, Fontina and a bit of Parmesan
8 cups of cubed day old soft french bread
9  eggs
2 3/4 cups whole milk
1 tablespoon of dried mustard
1/4 teaspoon pf nutmeg
1 teaspoon kosher salt
black pepper


Remove the sausage from the casings and brown in a bit of olive oil over medium-high heat until golden and cooked through.  I break it up as best I can while its cooking but I find its easier to crumble it up even more once its fully cooked and cooled.

Butter/spray a 3 quart baking dish.  I like mine a bit thicker so I use a smaller/deeper dish.  Layer the bread, sausage, spinach and cheese in that order.  You'll have two layers of each and you'll end with a layer of toasty bubbly cheese on the top.


Next, whisk the remaining ingredients together in a large bowl and pour evenly over the layers into the baking dish.  You can cover and refrigerate overnight at this point.  Its best to let it set for at least one hour before baking to ensure the bread soaks up all of the custard.

When ready to bake- leave the strata at room temperature for 30 minutes and then bake at 350 degrees for 45-55 minutes until puffy and golden brown on top.  Stick a knife in the center to ensure there is no liquid- this means its cooked all the way through.


Serve hot.  Can be reheated if need be but its best served immediately.

A few other flavor combinations:

- Andouille sausage, bell peppers and goat cheese
- Leeks, asparagus and wild mushrooms
- Bacon/lardons and gruyere
- Chorizo, roasted poblano peppers and cherry tomatoes and monterey jack
- Sun dried tomatoes, mozzarella and basil (could add pancetta as well)
Consider adding your favorite fresh herbs to kick things up as well...

You can also make mini versions of this in larger ramekins/mini souffle dishes for a different spin on the presentation or if you have a need to bake them off at different times.

Sunday, June 3, 2012

Scallops and Tomatoes with Lemon Herb Butter Sauce

SIMPLE, summer-y and delicious, this impressive scallop dish was the first course of our five year Anniversary dinner at home this year.  The real celebration was a week on the beach in Charleston with family- where we were married- the week prior but we were home Sunday evening May 20th for our actual anniversary.  We enjoyed a toast of our favorite champagne and made dinner together, it was perfect...

Serves 2

6-8 large sea scallops
1 cup assorted cherry/grape/colorful tomatoes, halved or quartered
1 small shallot, minced
1/3 cup white wine
juice and zest of 1large lemon- meyer if you can get it
2 tablespoons of butter
2 teaspoons chopped fresh herbs (dill, thyme, parsley, chives, etc.)
2 generous handfuls of baby arugula

Heat a generous drizzle of olive oil in a skillet over medium-high heat.  Sear the scallops until golden brown, roughly 2 minutes per side.  Do not disturb the scallops once you place them in the pan.  Moving them around prevents the caramelizing sugar from forming the golden crust on the scallops.

Cut one scallop in half to ensure they are cooked though (should not be translucent in the center).  When done- remove the scallops from the pan and set aside.

Wipe the skillet clean with a paper towel and add another small drizzle of olive oil and the shallots.  Cook over medium-high heat until tender but not yet brown- 2 minutes.  Add the white wine.  Zest the lemon into the pan and squeeze most but not all of the juice in as well.  Save a squeeze or so of lemon juice to dress the greens. 

Cook the sauce for 1 minute until reduced a bit and then add the tomatoes- cooking another 2 minutes longer.  Remove from the heat and add the butter, herbs, a pinch of salt and some black pepper- swirling the pan to melt the butter into the sauce.

Toss the arugula in a separate bowl with a drizzle of olive oil, the remaining meyer lemon juice, salt and pepper. 

Plate the scallops next to the greens- spoon the tomatoes and sauce over top of the scallops.  Serve warm (doesn't have to be piping hot) with a crisp white wine or champagne.


Looks even better on our beautiful wedding china!

Wednesday, May 9, 2012

Grown-Up Grilled Cheese (and baby kale salad)

While we're on the theme of grown-up-versions-of-kid-favorites... I just finished my second meal of this grilled cheese in two days so I thought I'd share.  This one was actually inspired by a recent episode of "The Best Thing I Ever Ate" on Food TV.  Someone was raving about a bacon sandwich and orange marmalade on pumpernickel bread from Prune restaurant in NYC.  The sweet+salty combo sounded fantastic (and right up a pregnant girl's alley.)  I added a few other ingredients to make this a truly dinner-worthy sandwich...

Makes 1 sandwich

2 slices of pumpernickel bread
2 slices of gruyere cheese
2 slices of bacon, cooked until crispy and broken in half
2 super thin slices of pink lady/fuji/gala apple
dijon mustard
orange Marmalade
butter for the bread

Heat a medium nonstick skillet over medium-low heat.  Butter the bread slices and put them butter side down in the skillet.  Spread marmalade on the inside of one slice and dijon mustard on the inside of the other. 


Place a slice of cheese on each piece of bread.  Toast until the cheese is melty and bread is golden brown (a bit hard to see on the pumpernickle so watch closely). 

Lay the apples and bacon on top of one bread slice and top with the other.  Remove from the skillet, slice in half and ENJOY IMMEDIATELY.  The melty cheese, toasty bread, crispy apples, sweet marmalade and salty bacon is scrumptious. 


I enjoyed my sandwich with a new favorite baby kale salad inspired by a local restaurant.   You can find baby kale in the salad section of some specialty groceries (or your local farmer's market).  It has a heartier texture than most salad greens so I actually like to slice it up so its easier to eat.  (I stole this idea from the restaurant.)  I take a handful and roll it up and then slice it chiffonade style with a large knife.


Toss the baby kale with dried berries (I like cherries and blueberries) and grated parmesan cheese.  Dress with a simple lemon vinaigrette and toss together.  Its another great sweet-salty-tangy combination.. AND the baby kale packs a powerful nutritional punch.

Sunday, April 29, 2012

Grown-Up Smokey Joes

As I've mentioned before, my mom is an amazing cook.  I grew up with homemade-all-the-way breakfast, lunch and dinner every day of the week.  (We actually got to go home for lunch all the way through 9th grade.)  I'm not exactly sure where I'd tried them- but I got on a Manwich kick somewhere along the line.  In middle school- I used to sneak cans of it into the grocery cart at the store with mom.  Its not that she would have had a problem with the Manwich mix per se, but semi-home-made cooking-from-a-can wasn't really her style.  Thus it was one of the dishes I mastered for myself early on.

I recently saw Iron Chef Michael Symon make a grown-up version of a sloppy joe slider (sans canned mix) on the Cooking Channel and it brought back some memories.  This Southwest-style version kicked up with savory veggies and smokey chipotle peppers resembled a hearty chili in a way.  The sandwiches were delicious served with easy chile baked sweet potato chips on the side.


Makes 6 sandwichess

1 1/2 pounds ground beef  (I used ground round, Chef Symon used pork, turkey would be great too)
1 bell pepper
1 medium sweet onion
2 canned chipotle peppers in adobo, finely chopped
3 cloves of garlic
1 13 oz can tomato sauce
1/2 teaspoon cumin
1/4 teaspoon corriander
1/3 cup water
salt and pepper

fresh cilantro and avocado slices for garnish
6- soft sesame rolls or hamburger buns (or slider size rolls if you prefer)

Start by browning the ground beef/pork/turkey over medium high heat in a large skillet with a drizzle of olive oil. 

Meanwhile, roughly chop the onion, bell pepper and garlic and place in a food processor.  Pulse until everything resembles a fine dice. (Or finely dice everything by hand if you prefer.)


Saute the veggies in another drizzle of olive oil in a second skillet over medium heat for 5-6 minutes or until everything is tender.  Season lightly with salt and pepper.

Once the meat is golden brown, spoon off any unwanted grease in the bottom of the skillet and reduce the heat to medium-low.  Add the vegetable saute, the chipotle peppers, cumin, corriander, tomato sauce and water to the large skillet with the meat.  Season with more kosher salt and pepper to taste.


Cook everything together for 8-10 minutes to let all of the flavors marry together.  If it gets too thick, add more water to loosen it up.  Serve a generous scoop of the filling on slightly toasted buns. (You still want the bread to be very soft to avoid losing all of your filling out one side when you take a bite.)  Garnish with fresh cilantro and avocado slices if desired.

If you're interested to make the oven chips- I would actually get them in the oven before you start on the smokey joe filling because they take 30 minutes or so to bake...

Baked Sweet Potato Chips:   NOTE: this recipe serves 2 people generously

1 large sweet potato, peeled thinly sliced**
2 teaspoons olive oil
1/2 teaspoon chili powder
1/4 teaspoon cumin
kosher salt and pepper

Preheat the oven to 400 degrees.

**To slice the potatoes: I used my food processor's slicing blade since it was already out, a mandolin or slicing with a super sharp knife by hand would work too.  You want the slices to be no thicker than 1/8 inch in order to get them crispy.

Toss the potato slices in a bowl with olive oil, spices, salt and pepper so that they are evenly coated.  Then spread them into a single layer on two cookie sheets (lined with foil for easy clean up).  Use some non stick spray on either the pan or foil to ensure you can easily peel the chips off later.


Bake for 25-30 minutes, rotating the pans half way through to ensure they bake evenly.  They should be crispy with a few brown spots.  Watch closely toward the end, they can get too brown rather quickly. Taste to be sure you have enough salt.  Serve immediately.


Friday, April 27, 2012

Penne with Chicken Sausage, Broccoli and Arugula


I'm back!  For those of you paying attention- I took a brief hiatus from the blogosphere, from the kitchen in general for the most part.  The bad news is that I haven't been feeling much like cooking (or eating much other than cereal, toast and baked potatoes)... the good news is that it's because we're expecting a Baby Lacy October 8!!

Now 17 weeks along and cruising nicely into the second trimester, I'm feeling much better, my appetite is back and the Accidental Syrup kitchen has reopened for business.

I'm trying when possible to pack lots of nutrient rich foods into my diet to be sure the little one is getting everything she needs.  (Don't get me wrong, there has been plenty of mint chocolate chip ice crem and many a powdered sugar donut as well.)  This recipe offers whole grains from the pasta, low fat protein in the form of chicken Italian sausage and broccoli- a pregnancy super food- is a good source Calcium, Iron, Dietary Fiber, Vitamin A, Vitamin C, Vitamin B6, Folate, and Potassium.

Serves 2.5 people with left overs

2-3 chicken Italian sausage links, casings removed
1/2 pound whole wheat penne pasta
1 small broccoli crown- cut into bite size pieces (approx 2 cups)
3-4 cups of baby arugula
1 large shallot, diced
3 cloves of garlic, minced/grated
1/3 cup white wine
1/3 cup chicken stock
zest and juice of one lemon
Parmesan cheese for garnish

First I put a pot of water seasoned generously with kosher salt on to boil for the pasta.  Next I browned the sausage in a skillet over medium high heat with a drizzle of olive oil until it was brown and cooked through.  (Breaking it up with a wooden spoon into as it cooked.) I transfered the sausage to a bowl lined with a papertowel to drain.  The chicken sausage doesn't have much fat yet the juices left in the pan have lots of flavor so I reserved the same skillet for the sauce.

Once the pasta water was boiling- I first blanched the broccoli for 2 minutes. (It was tender but still had a little crunch to it.)  When done, I fished it out with a slotted spoon into a colander tucked into a bowl of ice water.  The cold water stops the broccoli from cooking any further and locks in the bright green color- the colander makes it easy to pull the broccoli out and drain it before adding it to the pasta.

I cooked the pasta in the same pot of boiling water per the package instructions and then strained it- reserving 1 cup of the pasta water for later- and put the pasta back in the empty pot, adding the broccoli and the sausage.

Lastly, I made a quick pan sauce to tie it all together.  I gently sauteed the shallot and garlic in the skillet (over medium heat) until softened- 3-4 minutes max.  I added the wine, stock, lemon juice, zest and some salt and pepper before increasing the heat to medium-high.  After about 5 minutes at a gentle boil, the sauce had reduced and thickened nicely.

I tossed the arugula into the pot with the pasta and then poured the sauce over top. As I tossed it all together, I found I needed a bit more liquid to make a silky sauce so I added 1/3 cup or so of the pasta cooking liquid as well.  The heat of the sauce gently wilts the arugula and its ready to serve!

Of course no pasta is complete withouth a healthy sprinkle of good parmesan cheese over the top...


Friday, March 9, 2012

Tropical Fruit Smoothie

One of my favorite healthy weekday snacks is a yogurt-fruit smoothie.  Smoothies are a great way to pack a bunch of nutrition into a one-cup, portable package.  I use Greek yogurt as a base to maximize protein and then jazz it up with whatever combination of fruits or juices that I have on hand.  Whenever I have berries or bananas that are on the verge of super ripe-about-to-go-bad, I throw them in the "smoothie drawer" of the freezer for later.  (Peel the bananas and slice into chunks before freezing.)


Tropical Fruit Smoothie- serves 1-2

1/2 cup plain Greek yogurt- I like Fage, fat free
half of a banana- in this case I used frozen pieces
1/3 cup frozen blueberries
1/3 cup frozen mango (I buy this already frozen- they make great popsicle-like snacks)
1/3 cup fresh pineapple chunks
1/2 cup orange juice (almond milk works well too)

Combine all ingredients in the blender and process until smooth and pourable. 


You might need to adjust the liquid amount to get the right consistency.  If its too thick, add more juice/milk.  If its too thin, add a few ice cubes or more frozen fruit.


In my experience, you can keep the smoothie in the fridge for a day.  It melts down and/or starts to separate a bit but you can reblend with some ice before serving to revive it.

You can experiment with all kinds of fresh or frozen fruits, juices or even veggies.   You can throw fresh spinach or kale in for a huge boost of healthy without altering the flavor.  (You will end up with a green beverage though.)  Peanut-butter, banana and almond milk is also a stellar combo.

Monday, March 5, 2012

Chicken Tacos with Pineapple Salsa

As the countdown to Spring begins - I'm already looking forward to warmer temps and grilling season thus my taste buds were craving something light, fresh and tropical this past week.  The secret to a great taco in my opinion is three fold:

1) a super flavorful marinade or spice rub
2) a buttery-toasty warm tortilla
3) lots of texture in the toppings

In this case I concocted a chile-garlic-citrus marinade, slicing the chicken breasts in half lengthwise to maximize the flavor and to reduce marinading time.  I warmed delicious organic corn tortillas in a buttered skillet just before filling them and I topped the tacos with a crunchy pineapple salsa and creamy avocado slices... so in my opinion they met all requirements.

Serves 4

3 boneless, skinless chicken breasts (Organic!), halved lengthwise so they are half their original thickness
10-12 small Corn or flour tortillas
2 ripe avocados, sliced and spritzed with lime juice to avoid browning
Fresh lime for garnish

Marinade:
1/4 cup olive oil
2 cloves of garlic, grated
zest and juice of 1 lime
juice of half an orange
1/2 teaspoon chile powder
1/2 teaspoon cumin
1/4 teaspoon ground coriander
1/2 teaspoon cayenne
1 tablespoon soy sauce
1 teaspoon brown sugar
1 heaping tablespoon of fresh cilantro, chopped

Combine all of the ingredients in a bowl.  Pour the marinade over the chicken in a ziplock bag.  Seal the bag well and massage the chicken so that it is evenly coated with the marinade.  Place in the fridge to marinade for at least 1 hour, up to 3 hours.  (This would also be great with shrimp!  Reduce the marinade time to 30-45 minutes max to avoid making ceviche out of them.)

Grill the chicken or as I did here- cook the chicken in a skillet over medium high heat until browned and cooked through- approx 3 minutes per side.  Let rest for 10 minutes before slicing thinly.


Salsa:
2/3 cup fresh pineapple, diced
1/4 cup bell pepper, diced
1/4 cup red onion, diced
1/2 a fresh jalepeno pepper, minced (more if you like it hot!)
2 tablespoons of cilantro, chopped
juice of half a lime
pinch of salt

Combine all of the ingredients in a bowl- cover and chill until ready to use.  Can be made a day before.


Using a griddle or a large skillet- melt some butter or vegetable oil over medium heat.  Toast the tortillas on one side for 1-2 minutes.  If using corn tortillas (my preference) the fat softens them, making them less likely to split apart when you pick them up.  If they are thin, I also recommend doubling them up to avoid breakage.


Fill the tortillas with a few strips of chicken, a tablespoon or so of salsa and a few slices of avocado.  Serve with additional lime wedges and hot sauce.  I like to serve black beans and rice on the side.  This time I actually made brown rice and lentils spiced with cumin and topped with caramelized onions which was a yummy (and healthy) compliment. 

Graham Cracker Toffee

This is a super easy and delicious snack that I stumbled upon when searching for "graham cracker" recipes online.  I had a mega-size box of graham crackers left over from a smores party and was looking for a fun way to use them. 

While it takes all of 15 minutes to prepare, it makes for a fun and festive treat for teachers, neighbors or to keep on hand in your freezer for those late night choco-cravings.

Ingredients:

16 graham crackers
1 cup (2 sticks) butter
1/2 cup brown sugar
1/4 cup white sugar
pinch of salt
1 teaspoon vanilla
2 cups semi sweet chocolate, chopped or chips
1 cup of pecans, chopped

First- Preheat oven to 250 and then line a 15 x 10 x 1 inch baking sheet or jelly roll pan with foil.  Arrange the graham crackers in the bottom of the pan.


Second- combine the butter and sugars in a sauce pan.  Cook over medium heat until the butter is melted and the mixture is just bubbly- reduce the heat to low and let cook for 4 minutes.  Remove from heat and stir in the vanilla and a pinch of salt before pouring the caramel mixture over the graham crackers.  Have a spatula handy to help spread the mixture evenly before it starts to set.  Bake the crackers with the toffee for 10 minutes.

Meanwhile, chop the pecans and the chocolate if using a bar.


When the pan comes out of the oven, sprinkle the chocolate over the warm toffee and let sit for a minute or two until the chocolate is melted.  Spread the chocolate with a spatula and then sprinkle the pecans over the chocolate, pressing gently to help them sink in.


Place the pan in the fridge (or outside if you've had cooler temps like us) for 10 minutes or until the chocolate has cooled and it is completely set.  Break the toffee into pieces and enjoy!  Store in an airtight container.  Again also freezes well. 


You could play around with various toppings.  You could add chopped pretzels, peanuts, M&M's, Reece's Pieces, etc. The same recipe using saltine crackers in place of graham crackers is also delicious!  The salty contract and thin crispiness also works well.

Wednesday, February 29, 2012

Broccoli Quiche

To some, quiche might sound frou frou and girly, but a quiche done properly is actually decadent and rather hearty.  I love it because it is so versatile.  It works for breakfast, lunch or dinner, its an easy weeknight meal or a dish to impress company for brunch, and you can jazz it up with an infinite combination of mix-ins.  It is perfect for vegetarians or meatless Mondays.  Plus almost anything that comes in or on a buttery, flaky pastry crust is a winner in my book.

This broccoli variation has a nice savory little kick to it thus was great for dinner served with an arugula salad.


Ingredients:

3 cups of broccoli florets
1 garlic clove, thinly sliced
1/3 cup bell pepper, diced
pinch of red pepper flakes
8 eggs
1/2 cup half and half
1/2 cup creme fraiche (or sour cream)
1/2 cup (generous) good parmesan cheese
salt and pepper
1 pie crust (I used a store bought one that you simply unroll into the pie plate)

Preheat the oven to 400 degrees.

First- I lined a deep dish, 9 inch pie plate with the pie crust.  (You might need a 10 inch plate based on the volume if its shallow.)  I pressed the dough into the bottom and up the sides and then pricked it all over with a fork.  You can bake it as is although it tends to shrink and puff up a bit.  To get around that, I lined the dough with foil and then filled the shell with my "pie weights" which are actually dried beans that I keep in a jar for such purpose.  I baked the shell for 10 minutes with the weights and then another 10 minutes after removing the foil and the weights.  The shell looked cooked but not yet golden brown- it continues to cook once you fill it.  When the pie crust is done, turn the oven down to 365 degrees.  Yes that's right- half way between 350 and 375. 


Second- I prepared the veggies.  I warmed 1 tablespoon of olive oil over medium heat and then added the garlic to the pan- cooking for one minute until just barely looking golden around the edges.  Next I added a pinch of red pepper flakes and the diced bell pepper and cooked 1 minute before adding the broccoli. 


I tossed it all together to coat the vegetables with the garlic infused oil.  The broccoli turns bright green after about 1 minute- at which point I added 2 tablespoons of water to the pan and then covered it with a lid.  I let the broccoli steam for about 2 minutes- or until it was barely tender and still bright green.  It will continue to cook through in the oven.  I let this mixture cool for a few minutes.


Lastly-  I whisked together the egg mixture.  I combined the eggs, half and half, creme fraiche, a pinch of salt and a few grinds of pepper in a large bowl.  I then mixed in the cooled veggie mixture and the parmesan cheese before pouring it all into the prepared pie shell.


The quiche bakes for 30-35 minutes depending on the size of your dish.  You are aiming for the point when the filling barely jiggles when you move the pan and a knife inserted in the center comes out pretty clean.   Catching it when its JUST set ensures its light and custardy and perfect.


Serve the quiche warm or at room temperature.  It can be reheated in a 275 degree oven if need be.  I would say this quiche should serve 6-8 people however I should warn you, my husband ate a solid third of it himself in one sitting which I suppose means he liked it!   I know I did...

Saturday, February 11, 2012

Apple Crumble

Blogger.com and I have been quarreling about vertically oriented photos all morning so you might want to put your sideways glasses on before reading...

My mom always made apple crumble (or as some say apple crisp) when I was growing up.  While I love apple desserts of almost any variety- a crispy oatmeal streusel crust atop perfectly spicy-sweet-tangy tender apples can't be beat.  I typically have all of the ingredients for this recipe on hand at any given time so it is often the perfect answer to weeknight sweet tooth attack or an impromptu dinner party.

This recipe serves 4.  Preheat oven to 350 degrees.

Apple Filling:

3 large apples (I like honeycrisp or granny smith)
1/3 cup brown sugar
1 teaspoon cinnamon
scant 1/2 teaspoon nutmeg
zest of an orange (only use half)
zest of a lemon (only use half)
juice of a lemon

Peel and slice the apples.  I slice the apples as thinly as possible to ensure they get nice and tender while baking.  Toss the apple slices in a large bowl with all other ingredients until the apples are evenly coated. 


Transfer the apples to a medium size BUTTERED baking dish.  A 9 x9 square dish would work, I like an oval dish because that's what my mom always used.


Crumble Topping:

3/4 cup flour
1/2 cup oatmeal
1/2 cup of brown sugar
1/4 cup white sugar
pinch of salt
1 stick of cold butter, diced
**I actually added 1 tablespoon of ground flax seed as well which packs a mega nutritional punch of omega threes. You won't even notice its there.

The easiest way in my experience is to measure all ingredients into a standing mixer fitted with the paddle attachment.  Mix on medium speed until the mixture starts to come together into large crumbs.  This could take 1-2 minutes.  If you let it go too far, it will come together like a cookie dough which is hard to spread over the apples- so keep an eye on it.

If you don't have a standing mixer- you can use your hands to work the ingredients together, rubbing the mixture between your fingers to break down the butter into crumbs.

Spread the topping over the apples- you might have a bit more topping than you need, but I like a nice thick crunchy layer on mine so I pack on as much as I can...It's my favorite part.

I set the dish on top of a cookie sheet lined with foil to catch any crumble pieces that try to escape and then bake for 1 hour.  The top should be golden brown and you'll see caramely bubbles all around the edges.


Let cool on a wire rack for 20 minutes (the wait can be excruciating, sorry) and then serve warm with vanilla ice cream.


The soft apples literally melt in your mouth while you get a hearty crunch from the topping.  The balance of flavors from the citrus and warm spices is wonderful.  It really gives it that special something.

More of my favorite fruit crumble combinations:
*Peaches and raspberries or blackberries
*Strawberry-rhubarb
*Pear-cranberry
*Cherry-almond

Thursday, January 26, 2012

Peanut Butter Banana Oatmeal

So this recipe might not seem blog worthy at first but I'm telling you- this little trick shared with me by a friend has changed my life for the better.  I can't help but think this would be a big hit with the kids too.  I've always loved oatmeal but I tend to steer clear of the sickeningly sweet stuff that comes in a little packet.  I'm a big fan of the classic Quaker Old Fashioned Oats in the cardboard container.

Bob's Red Mill has a great Gluten Free Rolled Oats variety and a Steel Cut Oat option that I really like as well.  (Likely in the health foods section of your grocery store.)  Both are going to take longer (10-15 mins) to cook however.


1)  Prepare the oats per the package instructions using water versus milk.  I don't like the gumminess that results from boiling them in milk.  Don't worry- we'll add ample "creaminess" here in a minute. 

2)  Remove the oats from the heat and add 1 tablespoon of your favorite peanut butter (almond butter is delicious as well) per serving of oats prepared.  Stir the the peanut butter into the oats as it melts, resulting in a luxuriously smooth and creamy concoction.

3)  Transfer the oatmeal to a bowl and top with your favorite combination of the following:

* Sliced fresh banana
* Clover Honey (Go Local!!)
* Dark Brown Sugar
* Cinnamon
* Toasted pecans, walnuts or almond slices
* Semi sweet chocolate chips  Toss them on while warm and they melt into the oatmeal- this tastes more like dessert than breakfast!
* A splash of milk


I'm telling you this is the true breakfast of champions.  The boost of protein from the nut butter helps keep you full longer and gives you a huge flavor boost without the need for a bunch of sugar.

I also promise you that if you use the standard old fashioned oats (cook time is 3 minutes)- the entire process, start to finish takes 5 or 6 minutes max.  I know its hard to get motivated to cook a weekday breakfast but there is something about starting the day with a warm, hearty meal  (and a great cup of coffee) to get things off on the right foot.


Sunday, January 22, 2012

Provencal Vegetable Soup with Pistou

An indulgent Holiday season followed by a work trip to food mecca Charleston, SC and then a three day weekend of excess in Las Vegas means that we have officially arrived at pocket-book-and-waistline-friendly-recipe month on Accidental Syrup.  I hesitate to preface this post this way because the recipe honestly is scrumptious.  While low fat and low cal its packed with hearty beans and vegetables and the bright flavors of garlic and herbs.  I googled "hearty soups" and stumbled across a fantastic sampling from Saveur magazine.  I thought a mix of vegetables would be particularly light and healthy (and as we know I lean French these days) so I jumped on the Soupe au Pistou.  (Note: pistou is in essence the French equivalent of pesto.)

The great thing about this recipe is that you could easily use whatever mix of veggies strikes your fancy.  I took a few liberties from Saveur's original recipe.

Ingredients for the soup:

2 ounces of pancetta or bacon, diced
1 large onion, chopped
2 large stalks of celery including the tops, diced
3 carrots, peeled and diced
3 garlic cloves, grated or minced
5 sprigs of fresh thyme, chopped
1/2 teaspoon red pepper flakes
2 bay leaves
1 zucchini, diced
1/2 a small head of green cabbage- halved again, cored and sliced into quarter inch strips (approx 4 generous cups total)
1- 28 oz can of diced tomatoes with juices (reserve one tablespoon of chunks for the pistou)
8-9 cups (or 2 cartons) chicken stock
2- 15 oz cans of cannellini beans, drained and rinsed

**Omit the pancetta/bacon and swap out vegetable stock for the chicken stock to make this vegetarian friendly.

Heat a large heavy bottom pot with a tablespoon of olive oil over medium heat. Add the pancetta/bacon and cook until crispy and golden brown.  Remove the bits from the pot with a slotted spoon (drain on a papertowel to the side) and add one more tablespoon of olive oil to the pot with the renderings.  Next add the onion, carrot and celery and cook for 5-7 minutes until the onions are soft but not brown.  Stir in the garlic, thyme, and red pepper flakes and cook one minute more.

Then add the cabbage, diced tomatoes, chicken stock and bay leaves.  Cook everything together over medium heat for 15-20 minutes.  Reduce the heat to medium-low, add the zucchini and beans and cook for another 15-20 minutes or until the cabbage is tender.  (I let mine simmer on low-low heat for a while longer until we were ready to eat.)

Meanwhile, you can make the pistou.  Measure all of the below ingredients directly into a food processor fitted with a metal blade (or a blender would work too.)

2 cups of fresh basil
1/2 cup of parmesan cheese (I used pecorino)  
3 tablespoons of olive oil
1 large clove of garlic
1/2 teaspoon salt
1/2 of a roma tomato, diced or a few of the diced tomatoes reserved from the soup

Pulse or blend until almost smooth (like a pesto).  Set aside.


Garnish each bowl of soup with a scant teaspoon of the pistou on the top (and a few of the crispy pancetta bits if you want to splurge a little.)  The smell of the garlic and the fresh basil wafts up at you as the pistou melts into the soup.  It really kicks what at first seems like a basic veggie soup up to another level.


I personally appreciate soup first and foremost as the perfect excuse for bread.  I made a delicious iteration of my Brown Butter Soda Bread from last year to accompany the soup.  I substituted fresh thyme for the rosemary and 1/2 cup of grated pecorino romano cheese for the black pepper.  I also used plain melted butter versus browned and dusted the tops of the dough with additional cheese after I brushed them with the egg wash. 


A big bowl of steamy soup and a warm slice of fresh bread is the perfect weeknight winter meal.  I froze two servings for a rainy day and we enthusiastically enjoyed left overs all week. 

Thursday, January 19, 2012

Ile Flottante (or Floating Island)

By now you're onto my small obsession with all things French.  2011's trip to Paris might have stoked the flame but truly its been there for quite some time.  My first recollection of being smitten with la cuisine francaise was actually in middle school.  Living abroad in Saudi Arabia, our close friends were the closest thing to family therefore we spent many a holiday and holiday meal together.  Our friend Susan Elving made Coq au Vin one year for New Year's Eve and she made Ile Flottante or Floating Island the next year I believe it was for Christmas Eve.  I remember both meals very distinctly to this day and these French classic dishes remain a few of my favorites.  If you're not familiar with Floating Island, it is delicate, light as air meringue literally floating on a puddle of creme anglaise (or custard sauce) topped with caramel.  It is what I like to think of as "angel food" for a special occasion.

Susan brought the Floating Island dessert to our house. The meringue and custard were made ahead but my little sister and I got to watch her make a fantastic "web" of caramel.  Spoiler alert: I was not able to recreate the net of sugar this go round - I ended up with a soft caramel sauce instead- but I intend to attempt again pending some further research.  Susan cooked sugar down to a caramel (to thread stage I believe) that was then pulled into strands as thin as a spider's web and tangled together to form an avant garde kind of hat atop the meringues.  The sugar then hardened to crispy which added just a slight toasty crunch to the fluffy meringue and silky custard.   As you can imagine for two young, curious cooks in training, this was basically a yummy sugar laden art project and thus a big hit.

I looked at a few pictures online to give you a visual and this was similar to what I remember...


Amazing photo courtesy of http://www.latartinegourmande.com/

I studied a few recipes for the other components and landed on my dear friend Ina Garten's recipe.  My Mom and I made this dessert together on New Year's Eve and for the record, she is the.master of meringue.  I've been aspiring to make mile high meringue as she does on my cream pies for most of my adult hood... to no avail.  She tackled the meringues and I made the creme anglaise.  Note: The recipe serves 8-10 people.  It held up okay for left overs the next day as well.

Creme Anglaise:

4 extra-large egg yolks
1/2 cup sugar
1 teaspoon cornstarch
1 3/4 cups scalded milk
1 teaspoon pure vanilla extract
1 1/2 teaspoons Cognac
Seeds of 1/2 vanilla bean, optional

**Can be made a day or two ahead of serving
Beat the egg yolks and sugar in the bowl of an electric mixer fitted with the paddle attachment on medium-high speed for 3 minutes, or until very thick. Reduce to low speed, and add the cornstarch.


With the mixer still on low, slowly pour the hot milk into the eggs. Pour the custard mixture into a saucepan and cook over low heat, stirring constantly with a wooden spoon, until thickened. The custard will coat the spoon like heavy cream. Don't cook it above 180 degrees F or the eggs will scramble!

Pour the sauce through a fine strainer, add the vanilla extract, Cognac, and vanilla seeds, if using, and chill until ready to serve.


Meringue:   

8 extra-large egg whites, at room temperature
1/8 teaspoon kosher salt
1/4 teaspoon cream of tartar

**You want to make these the day of, especially for company, though a few hours ahead is fine.
Heat the oven to 250 degrees F. Line two sheet pans with parchment paper.

Beat the egg whites, salt, and cream of tartar in the bowl of an electric mixer fitted with the whisk attachment on medium speed until frothy. Turn the mixer on high speed and add the remaining 1 cup of sugar. Beat until the egg whites are very stiff and glossy. Whisk in the remaining teaspoon of vanilla. With dessert spoons place 8-12 mounds  (depending on how big you want the servings to be) of meringue on the parchment paper and bake for 20 minutes, or until a cake tester comes out clean. 

**In studying some other recipes, I learned some people actually cook the meringue in molds.  You can make individual size or a single large meringue in various shapes.  One recipe actually bakes the meringue in a pan lined with caramel sauce almost like a flan.  Here are a few other ideas to consider:

Martha Stewart uses a Tube Pan as a mold
A fellow blogger bakes the meringue in a pan and then scoops out servings into a wine glass
Pipe the meringue for a more polished presentation

For the caramel sauce... as I mentioned, I went with a smooth, soft caramel sauce as is the most common approach.  We actually struggled with Ina's recommendation.  We attempted her caramel method twice unsuccessfully.  I eventually switched gears and the below method was just right.

Caramel Sauce:

1 1/2 cups sugar
1/2 cup heavy cream
1 teaspoon vanilla
1/2 tablespoon butter

Measure the sugar into a dry sauce pan over medium heat.  Cook, swirling gently until the sugar starts to dissolve and turns golden brown.  This takes 4-5 minutes but don't leave it unattended because once it starts to turn to caramel, it goes quickly.  Remove the sugar from the heat and pour in the cream and vanilla.  (It will bubble like crazy and the sugar will seize up a bit.)  Whisk until the sugar dissolves completely.  Lastly, whisk in the butter which I think gives it a nice silkiness.  **This can also be done the day before- gently reheat when ready to serve.


To serve: place 1/3 cup or so of the creme anglaise in your dish of choice. Top with a meringue and drizzle with caramel sauce.  You can garnish with some candied almonds as Ina does though it really doesn't need anything else... 


I'm telling you the delicate meringue with the creamy custard and toasty caramel is to-die-for. Its like eating a fancy, delicious Parisian cloud.


Bon Appetit!