Friday, March 9, 2012

Tropical Fruit Smoothie

One of my favorite healthy weekday snacks is a yogurt-fruit smoothie.  Smoothies are a great way to pack a bunch of nutrition into a one-cup, portable package.  I use Greek yogurt as a base to maximize protein and then jazz it up with whatever combination of fruits or juices that I have on hand.  Whenever I have berries or bananas that are on the verge of super ripe-about-to-go-bad, I throw them in the "smoothie drawer" of the freezer for later.  (Peel the bananas and slice into chunks before freezing.)


Tropical Fruit Smoothie- serves 1-2

1/2 cup plain Greek yogurt- I like Fage, fat free
half of a banana- in this case I used frozen pieces
1/3 cup frozen blueberries
1/3 cup frozen mango (I buy this already frozen- they make great popsicle-like snacks)
1/3 cup fresh pineapple chunks
1/2 cup orange juice (almond milk works well too)

Combine all ingredients in the blender and process until smooth and pourable. 


You might need to adjust the liquid amount to get the right consistency.  If its too thick, add more juice/milk.  If its too thin, add a few ice cubes or more frozen fruit.


In my experience, you can keep the smoothie in the fridge for a day.  It melts down and/or starts to separate a bit but you can reblend with some ice before serving to revive it.

You can experiment with all kinds of fresh or frozen fruits, juices or even veggies.   You can throw fresh spinach or kale in for a huge boost of healthy without altering the flavor.  (You will end up with a green beverage though.)  Peanut-butter, banana and almond milk is also a stellar combo.

Monday, March 5, 2012

Chicken Tacos with Pineapple Salsa

As the countdown to Spring begins - I'm already looking forward to warmer temps and grilling season thus my taste buds were craving something light, fresh and tropical this past week.  The secret to a great taco in my opinion is three fold:

1) a super flavorful marinade or spice rub
2) a buttery-toasty warm tortilla
3) lots of texture in the toppings

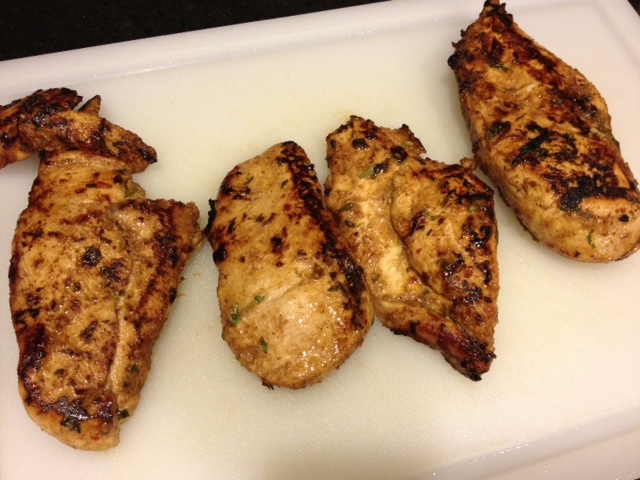
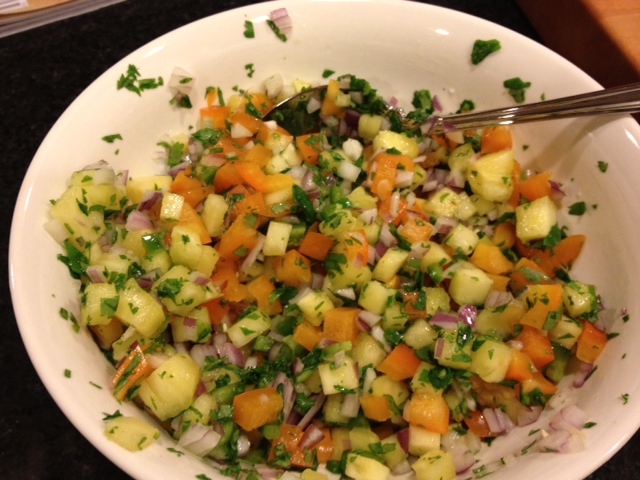
In this case I concocted a chile-garlic-citrus marinade, slicing the chicken breasts in half lengthwise to maximize the flavor and to reduce marinading time.  I warmed delicious organic corn tortillas in a buttered skillet just before filling them and I topped the tacos with a crunchy pineapple salsa and creamy avocado slices... so in my opinion they met all requirements.

Serves 4

3 boneless, skinless chicken breasts (Organic!), halved lengthwise so they are half their original thickness
10-12 small Corn or flour tortillas
2 ripe avocados, sliced and spritzed with lime juice to avoid browning
Fresh lime for garnish

Marinade:
1/4 cup olive oil
2 cloves of garlic, grated
zest and juice of 1 lime
juice of half an orange
1/2 teaspoon chile powder
1/2 teaspoon cumin
1/4 teaspoon ground coriander
1/2 teaspoon cayenne
1 tablespoon soy sauce
1 teaspoon brown sugar
1 heaping tablespoon of fresh cilantro, chopped

Combine all of the ingredients in a bowl.  Pour the marinade over the chicken in a ziplock bag.  Seal the bag well and massage the chicken so that it is evenly coated with the marinade.  Place in the fridge to marinade for at least 1 hour, up to 3 hours.  (This would also be great with shrimp!  Reduce the marinade time to 30-45 minutes max to avoid making ceviche out of them.)

Grill the chicken or as I did here- cook the chicken in a skillet over medium high heat until browned and cooked through- approx 3 minutes per side.  Let rest for 10 minutes before slicing thinly.


Salsa:
2/3 cup fresh pineapple, diced
1/4 cup bell pepper, diced
1/4 cup red onion, diced
1/2 a fresh jalepeno pepper, minced (more if you like it hot!)
2 tablespoons of cilantro, chopped
juice of half a lime
pinch of salt

Combine all of the ingredients in a bowl- cover and chill until ready to use.  Can be made a day before.


Using a griddle or a large skillet- melt some butter or vegetable oil over medium heat.  Toast the tortillas on one side for 1-2 minutes.  If using corn tortillas (my preference) the fat softens them, making them less likely to split apart when you pick them up.  If they are thin, I also recommend doubling them up to avoid breakage.


Fill the tortillas with a few strips of chicken, a tablespoon or so of salsa and a few slices of avocado.  Serve with additional lime wedges and hot sauce.  I like to serve black beans and rice on the side.  This time I actually made brown rice and lentils spiced with cumin and topped with caramelized onions which was a yummy (and healthy) compliment. 

Graham Cracker Toffee

This is a super easy and delicious snack that I stumbled upon when searching for "graham cracker" recipes online.  I had a mega-size box of graham crackers left over from a smores party and was looking for a fun way to use them. 

While it takes all of 15 minutes to prepare, it makes for a fun and festive treat for teachers, neighbors or to keep on hand in your freezer for those late night choco-cravings.

Ingredients:

16 graham crackers
1 cup (2 sticks) butter
1/2 cup brown sugar
1/4 cup white sugar
pinch of salt
1 teaspoon vanilla
2 cups semi sweet chocolate, chopped or chips
1 cup of pecans, chopped

First- Preheat oven to 250 and then line a 15 x 10 x 1 inch baking sheet or jelly roll pan with foil.  Arrange the graham crackers in the bottom of the pan.


Second- combine the butter and sugars in a sauce pan.  Cook over medium heat until the butter is melted and the mixture is just bubbly- reduce the heat to low and let cook for 4 minutes.  Remove from heat and stir in the vanilla and a pinch of salt before pouring the caramel mixture over the graham crackers.  Have a spatula handy to help spread the mixture evenly before it starts to set.  Bake the crackers with the toffee for 10 minutes.

Meanwhile, chop the pecans and the chocolate if using a bar.


When the pan comes out of the oven, sprinkle the chocolate over the warm toffee and let sit for a minute or two until the chocolate is melted.  Spread the chocolate with a spatula and then sprinkle the pecans over the chocolate, pressing gently to help them sink in.


Place the pan in the fridge (or outside if you've had cooler temps like us) for 10 minutes or until the chocolate has cooled and it is completely set.  Break the toffee into pieces and enjoy!  Store in an airtight container.  Again also freezes well. 


You could play around with various toppings.  You could add chopped pretzels, peanuts, M&M's, Reece's Pieces, etc. The same recipe using saltine crackers in place of graham crackers is also delicious!  The salty contract and thin crispiness also works well.

Wednesday, February 29, 2012

Broccoli Quiche

To some, quiche might sound frou frou and girly, but a quiche done properly is actually decadent and rather hearty.  I love it because it is so versatile.  It works for breakfast, lunch or dinner, its an easy weeknight meal or a dish to impress company for brunch, and you can jazz it up with an infinite combination of mix-ins.  It is perfect for vegetarians or meatless Mondays.  Plus almost anything that comes in or on a buttery, flaky pastry crust is a winner in my book.

This broccoli variation has a nice savory little kick to it thus was great for dinner served with an arugula salad.


Ingredients:

3 cups of broccoli florets
1 garlic clove, thinly sliced
1/3 cup bell pepper, diced
pinch of red pepper flakes
8 eggs
1/2 cup half and half
1/2 cup creme fraiche (or sour cream)
1/2 cup (generous) good parmesan cheese
salt and pepper
1 pie crust (I used a store bought one that you simply unroll into the pie plate)

Preheat the oven to 400 degrees.

First- I lined a deep dish, 9 inch pie plate with the pie crust.  (You might need a 10 inch plate based on the volume if its shallow.)  I pressed the dough into the bottom and up the sides and then pricked it all over with a fork.  You can bake it as is although it tends to shrink and puff up a bit.  To get around that, I lined the dough with foil and then filled the shell with my "pie weights" which are actually dried beans that I keep in a jar for such purpose.  I baked the shell for 10 minutes with the weights and then another 10 minutes after removing the foil and the weights.  The shell looked cooked but not yet golden brown- it continues to cook once you fill it.  When the pie crust is done, turn the oven down to 365 degrees.  Yes that's right- half way between 350 and 375. 


Second- I prepared the veggies.  I warmed 1 tablespoon of olive oil over medium heat and then added the garlic to the pan- cooking for one minute until just barely looking golden around the edges.  Next I added a pinch of red pepper flakes and the diced bell pepper and cooked 1 minute before adding the broccoli. 


I tossed it all together to coat the vegetables with the garlic infused oil.  The broccoli turns bright green after about 1 minute- at which point I added 2 tablespoons of water to the pan and then covered it with a lid.  I let the broccoli steam for about 2 minutes- or until it was barely tender and still bright green.  It will continue to cook through in the oven.  I let this mixture cool for a few minutes.


Lastly-  I whisked together the egg mixture.  I combined the eggs, half and half, creme fraiche, a pinch of salt and a few grinds of pepper in a large bowl.  I then mixed in the cooled veggie mixture and the parmesan cheese before pouring it all into the prepared pie shell.


The quiche bakes for 30-35 minutes depending on the size of your dish.  You are aiming for the point when the filling barely jiggles when you move the pan and a knife inserted in the center comes out pretty clean.   Catching it when its JUST set ensures its light and custardy and perfect.


Serve the quiche warm or at room temperature.  It can be reheated in a 275 degree oven if need be.  I would say this quiche should serve 6-8 people however I should warn you, my husband ate a solid third of it himself in one sitting which I suppose means he liked it!   I know I did...

Saturday, February 11, 2012

Apple Crumble

Blogger.com and I have been quarreling about vertically oriented photos all morning so you might want to put your sideways glasses on before reading...

My mom always made apple crumble (or as some say apple crisp) when I was growing up.  While I love apple desserts of almost any variety- a crispy oatmeal streusel crust atop perfectly spicy-sweet-tangy tender apples can't be beat.  I typically have all of the ingredients for this recipe on hand at any given time so it is often the perfect answer to weeknight sweet tooth attack or an impromptu dinner party.

This recipe serves 4.  Preheat oven to 350 degrees.

Apple Filling:

3 large apples (I like honeycrisp or granny smith)
1/3 cup brown sugar
1 teaspoon cinnamon
scant 1/2 teaspoon nutmeg
zest of an orange (only use half)
zest of a lemon (only use half)
juice of a lemon

Peel and slice the apples.  I slice the apples as thinly as possible to ensure they get nice and tender while baking.  Toss the apple slices in a large bowl with all other ingredients until the apples are evenly coated. 


Transfer the apples to a medium size BUTTERED baking dish.  A 9 x9 square dish would work, I like an oval dish because that's what my mom always used.


Crumble Topping:

3/4 cup flour
1/2 cup oatmeal
1/2 cup of brown sugar
1/4 cup white sugar
pinch of salt
1 stick of cold butter, diced
**I actually added 1 tablespoon of ground flax seed as well which packs a mega nutritional punch of omega threes. You won't even notice its there.

The easiest way in my experience is to measure all ingredients into a standing mixer fitted with the paddle attachment.  Mix on medium speed until the mixture starts to come together into large crumbs.  This could take 1-2 minutes.  If you let it go too far, it will come together like a cookie dough which is hard to spread over the apples- so keep an eye on it.

If you don't have a standing mixer- you can use your hands to work the ingredients together, rubbing the mixture between your fingers to break down the butter into crumbs.

Spread the topping over the apples- you might have a bit more topping than you need, but I like a nice thick crunchy layer on mine so I pack on as much as I can...It's my favorite part.

I set the dish on top of a cookie sheet lined with foil to catch any crumble pieces that try to escape and then bake for 1 hour.  The top should be golden brown and you'll see caramely bubbles all around the edges.


Let cool on a wire rack for 20 minutes (the wait can be excruciating, sorry) and then serve warm with vanilla ice cream.


The soft apples literally melt in your mouth while you get a hearty crunch from the topping.  The balance of flavors from the citrus and warm spices is wonderful.  It really gives it that special something.

More of my favorite fruit crumble combinations:
*Peaches and raspberries or blackberries
*Strawberry-rhubarb
*Pear-cranberry
*Cherry-almond

Thursday, January 26, 2012

Peanut Butter Banana Oatmeal

So this recipe might not seem blog worthy at first but I'm telling you- this little trick shared with me by a friend has changed my life for the better.  I can't help but think this would be a big hit with the kids too.  I've always loved oatmeal but I tend to steer clear of the sickeningly sweet stuff that comes in a little packet.  I'm a big fan of the classic Quaker Old Fashioned Oats in the cardboard container.

Bob's Red Mill has a great Gluten Free Rolled Oats variety and a Steel Cut Oat option that I really like as well.  (Likely in the health foods section of your grocery store.)  Both are going to take longer (10-15 mins) to cook however.


1)  Prepare the oats per the package instructions using water versus milk.  I don't like the gumminess that results from boiling them in milk.  Don't worry- we'll add ample "creaminess" here in a minute. 

2)  Remove the oats from the heat and add 1 tablespoon of your favorite peanut butter (almond butter is delicious as well) per serving of oats prepared.  Stir the the peanut butter into the oats as it melts, resulting in a luxuriously smooth and creamy concoction.

3)  Transfer the oatmeal to a bowl and top with your favorite combination of the following:

* Sliced fresh banana
* Clover Honey (Go Local!!)
* Dark Brown Sugar
* Cinnamon
* Toasted pecans, walnuts or almond slices
* Semi sweet chocolate chips  Toss them on while warm and they melt into the oatmeal- this tastes more like dessert than breakfast!
* A splash of milk


I'm telling you this is the true breakfast of champions.  The boost of protein from the nut butter helps keep you full longer and gives you a huge flavor boost without the need for a bunch of sugar.

I also promise you that if you use the standard old fashioned oats (cook time is 3 minutes)- the entire process, start to finish takes 5 or 6 minutes max.  I know its hard to get motivated to cook a weekday breakfast but there is something about starting the day with a warm, hearty meal  (and a great cup of coffee) to get things off on the right foot.


Sunday, January 22, 2012

Provencal Vegetable Soup with Pistou

An indulgent Holiday season followed by a work trip to food mecca Charleston, SC and then a three day weekend of excess in Las Vegas means that we have officially arrived at pocket-book-and-waistline-friendly-recipe month on Accidental Syrup.  I hesitate to preface this post this way because the recipe honestly is scrumptious.  While low fat and low cal its packed with hearty beans and vegetables and the bright flavors of garlic and herbs.  I googled "hearty soups" and stumbled across a fantastic sampling from Saveur magazine.  I thought a mix of vegetables would be particularly light and healthy (and as we know I lean French these days) so I jumped on the Soupe au Pistou.  (Note: pistou is in essence the French equivalent of pesto.)

The great thing about this recipe is that you could easily use whatever mix of veggies strikes your fancy.  I took a few liberties from Saveur's original recipe.

Ingredients for the soup:

2 ounces of pancetta or bacon, diced
1 large onion, chopped
2 large stalks of celery including the tops, diced
3 carrots, peeled and diced
3 garlic cloves, grated or minced
5 sprigs of fresh thyme, chopped
1/2 teaspoon red pepper flakes
2 bay leaves
1 zucchini, diced
1/2 a small head of green cabbage- halved again, cored and sliced into quarter inch strips (approx 4 generous cups total)
1- 28 oz can of diced tomatoes with juices (reserve one tablespoon of chunks for the pistou)
8-9 cups (or 2 cartons) chicken stock
2- 15 oz cans of cannellini beans, drained and rinsed

**Omit the pancetta/bacon and swap out vegetable stock for the chicken stock to make this vegetarian friendly.

Heat a large heavy bottom pot with a tablespoon of olive oil over medium heat. Add the pancetta/bacon and cook until crispy and golden brown.  Remove the bits from the pot with a slotted spoon (drain on a papertowel to the side) and add one more tablespoon of olive oil to the pot with the renderings.  Next add the onion, carrot and celery and cook for 5-7 minutes until the onions are soft but not brown.  Stir in the garlic, thyme, and red pepper flakes and cook one minute more.

Then add the cabbage, diced tomatoes, chicken stock and bay leaves.  Cook everything together over medium heat for 15-20 minutes.  Reduce the heat to medium-low, add the zucchini and beans and cook for another 15-20 minutes or until the cabbage is tender.  (I let mine simmer on low-low heat for a while longer until we were ready to eat.)

Meanwhile, you can make the pistou.  Measure all of the below ingredients directly into a food processor fitted with a metal blade (or a blender would work too.)

2 cups of fresh basil
1/2 cup of parmesan cheese (I used pecorino)  
3 tablespoons of olive oil
1 large clove of garlic
1/2 teaspoon salt
1/2 of a roma tomato, diced or a few of the diced tomatoes reserved from the soup

Pulse or blend until almost smooth (like a pesto).  Set aside.


Garnish each bowl of soup with a scant teaspoon of the pistou on the top (and a few of the crispy pancetta bits if you want to splurge a little.)  The smell of the garlic and the fresh basil wafts up at you as the pistou melts into the soup.  It really kicks what at first seems like a basic veggie soup up to another level.


I personally appreciate soup first and foremost as the perfect excuse for bread.  I made a delicious iteration of my Brown Butter Soda Bread from last year to accompany the soup.  I substituted fresh thyme for the rosemary and 1/2 cup of grated pecorino romano cheese for the black pepper.  I also used plain melted butter versus browned and dusted the tops of the dough with additional cheese after I brushed them with the egg wash. 


A big bowl of steamy soup and a warm slice of fresh bread is the perfect weeknight winter meal.  I froze two servings for a rainy day and we enthusiastically enjoyed left overs all week.