Friday, December 31, 2010

Slow Cooker Pork Tinga Tacos

I'm super excited about a new cookbook that I received as a Christmas gift from my inlaws. Rick Bayless (some of you may know him as the winner of the very first Top Chef Masters on Bravo or by his three famous Chicago eateries) is the guru of authentic Mexican cuisine. His book "Mexican Everyday" is packed with simple yet delectable sounding Mexican food that doesn't require a dozen ingredients you've never heard of before. There will be a ton of mexican food going on at the Lacy house in 2011!
John and I decided to try the Pork "Tinga" tacos in the slow cooker and they were fantastic and super simple to prepare. I tweaked a few minor things. For example we used pork tenderloin instead of boneless pork shoulder which lightened things up a bit. I threw in some sweet potato with the regular potato. We also ended up doing about one and one half times the recipe.
Ingredients:
2 pork tenderloins-just under 3 pounds total- cut into 1 1/2 inch cubes
1 medium size russet potato, peeled and cut into 3/4 inch cubes
1 medium size sweet potato, peeled and cut into 3/4 inch cubes
1- 28oz can and 1-15 oz can of diced tomatoes
5-6 canned chipotle chiles in adobo, chopped
1 large white onion, sliced 1/4 inch thick
5 garlic cloves, minced
1 tablespoon of dried oregano
1 1/2 tablespoons of Worcestershire Sauce
1 teaspoon of kosher salt 1/3 cup chopped fresh cilantro
*The recipe called for 4 teaspoons of chipolte canning sauce which I skipped because I wasn't sure if he meant the adobo sauce or something entirely different...
First you scatter the potatoes in the bottom of the slow cooker. Next layer in the cubed pork and finally, mix the remaining ingredients (minus the cilantro) together in a large bowl and pour over the pork. Cook on a high setting for 6 hours until the meet is falling-apart-tender. I stirred everything up every two hours to be sure it was cooking evenly. Then I kept it on warm for another hour or so until we were ready to serve- adding the cilantro at the very last minute.
I made some fresh guacamole for snaking on before dinner and we used the rest of it to garnish our tacos. With this recipe, I prefer corn tortillas fried lightly in a bit of vegetable oil (this makes them a bit less likely to fall apart believe it or not) but I had small flour tortillas for my guests as well (as you can see in the picture, John always has makes one of each). I also had some crumbled queso fresco, fresh cilantro and Jack's salsa (THE BEST) for folks to use for taco building.
Though you can make a lovely meal of the tacos alone, on the side I served some Mexican style rice and black beans and some sauteed onion and rainbow chard. *My sister is a vegetarian and Rick Bayless had a yummy recipe for tacos of spicy sauteed onions, greens, and queso fresco. She made her tacos with that and I sampled some on the side with my pork tacos. With some black beans for protein, I think she was a happy camper!
This recipe could easily serve 8-10 people. I ate it "chili style" the next day over rice garnished with some fresh sliced avocado, salsa and fresh cilantro. You could add a can of black beans for the last hour of slow cook time and have an amazing soup/stew for tailgating. It actually really is light yet perfectly satisfying if you go the tenderloin route.
Can't wait to sample more recipes from the book! I'll be sure to report back when I do. Happy New Year Everyone!!!

Tuesday, December 21, 2010

Stuffed Shells

When it comes to comfort food, one of the all time favorites in my family is Stuffed Shells. Where some Italian families specialize in spaghetti and meatballs, baked ziti, or lasagna- this is the Cobetto's go-to. Its perfect for a quiet Sunday dinner at home, or to feed a hungry crowd at a gathering. (Its vegetarian friendly too...) Ingredients: 1 package of large pasta shells 3-4 cups of your favorite jarred marinara or my "staple tomato sauce" *see recipe below 2 1/2 cups of ricotta cheese 1/4 cup of grated parmesan cheese 1/4 cup of mozzarella cheeese 3/4 cup of frozen chopped spinach (thaw and squeeze dry with papertowels) 1/3 teaspoon nutmeg 2 eggs - lightly beaten 1-2 cups of shredded mozzarella for sprinkling over the top Cook the pasta per the package directions, minus 2 minutes of cook time. (They'll continue to soften when they bake so I air on the al dente side when boiling.) I drain the pasta and then run it under cool water in the strainer to stop the cooking process. I then immediately separate the shells and set them in the baking dish I'm going to use so that they don't stick together. Next I assemble the filling-combine the cheeses with the spinach and the eggs- season the mixture with kosher salt, black pepper and the nutmeg. Its important that you squeeze as much water out of the spinach as possible to keep the filling light and fluffy. Line the bottom of a large baking dish with a scant cup of the sauce and then begin stuffing the shells. Fill the shells with a heaping tablespoon (like one you'd eat with) of the cheese mixture. It should be peaking out but not overflowing.
Arrange the shells in a single layer and then spoon more of the sauce over the top. I don't cover them entirely, maybe a tablespoon of sauce over each shell. Top with some additional mozzarella and/or parmesan cheese and cover with foil. If you want to cook them right away, bake at 350 degrees for 30 minutes. Remove the foil for the last 10-15 minutes or so to toast the cheese a little bit.
You can also keep store the unbaked shells in the refrigerator for up to 24 hours or in the freezer for up two months- (be sure you wrap well with plastic wrap and foil.) Add 15 minutes or so to the bake time if your shells are coming straight from the fridge. Another 15 minutes if frozen.
My Staple Tomato Sauce:
1 medium onion- finely diced (I pulse in the food processor)
3 large cloves of garlic- minced (or pulsed with onion in the processor)
2 teaspoons of dried oregano
1/2 teaspoon of dried thyme
1/2 teaspoon red pepper flakes
2- large (28 oz) cans of diced tomatoes and the juices (I like the Red Gold Brand)
2/3 cup water
1 tablespoon of sugar
1/4 cup fresh basil, sliced
Sautee with the onion in 3-4 tablespoons of good olive oil for 4-5 minutes until soft but not brown. Add the garlic and dried herbs - cooking one minute more. Add the tomatoes, water and sugar and simmer over medium or medium low heat for 30-40 minutes. Finish with the basil at the very end. (This makes a chunkier sauce. If you prefer you can use one can diced tomatoes and one can of sauce or you can puree the sauce to the desired consistency before serving.)
*If I'm making my own sauce for the shell recipe, I would do that first or even a day or two before. I like to keep a batch on hand in the freezer as well.

Monday, December 20, 2010

Bourbon Ball and Orange Ball Cookies

Orange Ball Cookies are one of the Lacy's Christmas favorites and they instantly became one of mine when I tried them. The simple, no bake recipe is fantastic just as it is but the method is something with which I've had fun experimenting. My Bourbon Ball variation is the perfect holiday gift for friends- especially here in Bourbon country! Ingredients: 4 cups vanilla wafer crumbs 2 cups confectioners' sugar 2 cups finely chopped pecans (I substituted lightly toasted chopped hazelnuts for 1/2 cup) 1 stick of butter melted Orange Ball Variation: 1 small container (approximately 1/2 cup) frozen orange juice concentrate, thawed Bourbon Ball Variation: 1/3- 1/2 cup decent quality Bourbon (I used Maker's Mark, my personal favorite). *Note: These have a pretty bold bourbon flavor to them. If you're not a big fan, you might go with another variation. Other Variation Ideas: Dark Rum, Kahlua/Espresso, half bourbon and half orange juice concentrate, Amaretto, etc. You could substitute hazelnuts, almonds, etc. for the pecans or substitute graham crackers or chocolate wafers for the vanilla wafers too. I use the food processor to chop the pecans and the cookies. You want to process the cookies into very fine crumbs- removing any large pieces. The pecans should also be fine per the below picture.

Combine all of the ingredients in a bowl and mix to form a dough. It should be moist enough to easily form into a ball. I use a small ice cream scoop to portion the dough so that the balls are all the same size- rolling them into balls in my hands. For the orange balls, roll the balls in additional confectioners' sugar and store in an airtight container in the fridge. For the bourbon balls, skip the sugar and let set up in the fridge for at least 4 hours before moving to the chocolate dipping step:

Melt approximately 1 1/2 cup of high quality chocolate in a double boiler (glass bowl siting atop a pan of simmering water) until smooth. I used Ghiradelli semi-sweet chocolate chips in this case. Coat the bourbon balls one at a time in the chocolate. I found that dropping it in and using a teaspoon to roll it around worked well. I then scooped it up and set it on a baking sheet lined with parchment paper to cool (I put them in the fridge for an hour when finished). You'd probably want to store these in the fridge until serving as well.

(You'll see that I set them on a wire rack to cool/set. DO NOT DO THIS. Set directly on parchment to avoid losing chunks of chocolate from the bottom after the chocolate has hardened. =) I had to redip them after the fact to recoat the bottoms.)
I put the balls into little plastic treat bags tied with ribbon to give to friends/family. I bought a Holiday stamp and some red ink at Michael's and made little labels for each. Any variation of these scrumptious little morsels would be great to enjoy at home any time of year or as a tasty gift!

Friday, December 17, 2010

Potato and Leek Soup

I've always wanted to try the classic French staple that is Potato and Leek Soup. It is beautifully simple yet elegant at the same time. (Not to mention a whole pot costs a whopping $5 or $6 to prepare. Certainly helps balance out all of the recent Christmas shopping!) I studied a few recipes online and learned quickly that they all say almost exactly the same thing... Ingredients: 3 tablespoons of butter 1 bunch- 3 large leeks, white and pale green parts only 2 large russet potatoes, peeled and cubed into one inch pieces 2 bay leaves 1 teaspoon of chopped fresh thyme 2 bay leaves 4 cups chicken stock 2 cups water If you've not cooked with leeks before, beware they are sandy, dirty little things. The best way to clean them is to cut the dark green tops off and then slice them in half lengthwise. Soak them in a bowl of cold water, scrubbing in between the layers with your fingers to be sure you get all of the dirt out. Pat them dry with papertowels and then slice into pieces about 1/4 of an inch thick Melt the butter over medium heat in a large heavy bottomed pot or dutch oven. Sautee the leeks for 5-7 minutes until wilted and tender. Meanwhile, peel and cube the potatoes and mince the fresh thyme leaves. Season the leeks with a pinch of kosher salt before adding the the thyme and bay leaves to the pot. Cook for one minute more until fragrant and then add the stock and water to the pot. Bring it to a gentle, simmering boil and let it go for anywhere from 20-30 minutes until the potatoes are absolutely fork tender.
Remove the bay leaves and puree using an immersion blender if you have one. (Transfer to the blender if you don't.) David Lebowitz warns that using a food processor could cause the potatoes to take on a gummy texture so avoid that method in this case.
The soup will likely need more salt if you use a low sodium stock so taste and season until you get it just right. Some use white pepper to avoid black flecks in the soup but that doesn't bother me. I cracked some black pepper in there as well.
I served the soup piping hot with a dollop of sour cream and a few snips of green onions. (I also made a rather elementary style "ham and cheese toast" with some dijon mustard, black forest ham and gruyere cheese to eat alongside the soup. I topped some fresh, lightly toasted, ciabatta bread with a drizzle of dijon, a slice of ham and some thin slices of gruyere. I then toasted it under the broiler for a minute before serving.
Perfectly hearty on a chilly winter night!

Monday, December 13, 2010

Roasted Vegetable Salad

I love roasted vegetables year round but especially in the winter. Squash, potatoes, asparagus, beets, brussels sprouts, broccoli... the options and combinations are endless. This salad is a great way to use up whatever veggies you have on hand in the fridge or to reinvent leftover roasted veggies for lunch the next day.
I had three fresh beets, approximately one cup of fresh brussels sprouts, half of a yellow bell pepper, one small sweet potato and the white ends of three very large green onions on hand in this case. I peeled/cleaned the veggies and diced them into 3/4 inch pieces- halving the brussels sprouts and green onion bulbs. I kept the beets in a separate bowl so they wouldn't stain everything ruby red. It is actually pretty that way too but I like to have a variation of colors.
I tossed the veggies with olive oil, kosher salt, black pepper and a pinch of dried thyme and roasted them for 25-30 minutes at 400 degrees until all of the veggies were golden brown and tender. I used two cookie sheets lined with tin foil and lightly sprayed with Pam for easy clean up. I wanted to be sure the vegetables weren't crowded so they would roast and caramelize without steaming.
I served them at room temperature over a bed of arugula drizzled generously with a quick homemade balsamic vinaigrette. I shaved some good parmesan cheese over the top as well- using a vegetable peeler to get nice wide ribbons.
Balsamic Vinaigrette:
3 tablespoons of olive oil
2 tablespoons of balsamic vinegar
1 teaspoon of Dijon mustard
a squeeze of honey
half of a garlic clove, grated with a rasp
sprinkle of kosher salt and pepper
This would be fantastic with goat cheese crumbles instead of parmesan, you could also add some oven roasted shrimp or left over rotisserie chicken for some protein.

Sunday, December 12, 2010

Roasted Shrimp with Feta

First let me say that I'm oh so happy with Ina Garten's newest cookbook "Barefoot Contessa: How Easy is That?" My friend Liz preordered it for me for my birthday and it was a fantastic surprise. I didn't even know she had a new one coming! This is the first recipe that I've tried and we're definitely off to a great start! I tweaked it a little bit based on the ingredients I had on hand but it was still fantastic. Roasted or baked shrimp with feta and tomatoes is a classic Greek dish that I've had out a few times out in restaurants- this was my first attempt at home. Cooks Illustrated also published an article this summer featuring a few iterations of the recipe. Its great served with rice or quinoa as I did in this case or as an appetizer served over grilled bread. Ingredients: 1 and 1/2 cups medium-diced fennel 1 tablespoon minced garlic 1/4 cup dry white wine 1 (14 1/2 ounce) can diced tomatoes 2 teaspoons tomato paste 1 teaspoon dried oregano 1 tablespoon Pernot (or Oozo if you want to be more traditional, I skipped it all together) 1 teaspoon kosher salt (I used a bit less seeing as the feta is quite salty) 1/2 teaspoon ground black pepper 1 pound of shrimp (16-20 per pound), peeled and deveined 5 ounces of good feta cheese, coarsely crumbled 1 cup fresh breadcrumbs (I used 2/3 cup panko instead) 3 tablespoons minced fresh parsley (I used 2 tablespoons of the fennel fronds instead) 1 teaspoon grated lemon zest 2 lemons Preheat the oven to 400 degree. I used a 12 inch heavy bottomed All Clad skillet. Ina recommends something oven proof so that you can do your saute and your roast in the same pan. Cook the fennel in a bit of olive oil over medium-low heat until tender- 8 to 10 minutes. Then add the garlic and cook one minute more. Next add the white wine and scrape all of the brown bits from the bottom of the pan as you stir it in. Cook it until most of the liquid has evaporated (2 minutes). Lastly add the tomatoes with the juices, tomato paste, oregano, salt and pepper to the skillet and simmer over medium low for 10-15 minutes to marry all of the flavors together- the liquid cooks down a bit. I added a splash of white wine to ensure we had lots of juices. Meanwhile, you make a breadcrumb topping. I used panko and I didn't have as much as Ina called for but it turned out to be plenty (and deliciously crunchy.) Toss the panko, the parsley (or fennel fronds-the green dill looking tops of the fennel), and the lemon zest in a bowl with a tablespoon of olive oil. When the sauce is done, lay the shrimp over the top and then sprinkle with the crumb mixture. Roast in the oven for 14-15 minutes or until the shrimp are just cooked through. Now how easy is that?? =) Squeeze lots of fresh lemon juice over the top (I used the juice of one whole lemon) and serve the shrimp over something that will soak up the juices, I used quinoa. I cook it per the package instructions using a blend of water and chicken stock (ratio 1/3 water to 2/3 chicken stock.)
One pound of shrimp wouldn't normally feed four but we easily made two meals of this- with a large arugula salad on the side, dressed with a balsamic vinaigrette.
Also, we paired a Veramonte Savignon Blanc with the meal and I think it was perfect. Very light and crispy- picking up the citrus notes and complimenting the zing of the feta. Food and Wine magazine featured it as one of the "best value" wines in the October wine issue this year. You can typically find it for $9 or so and its really fantastic. I like the screw cap too...
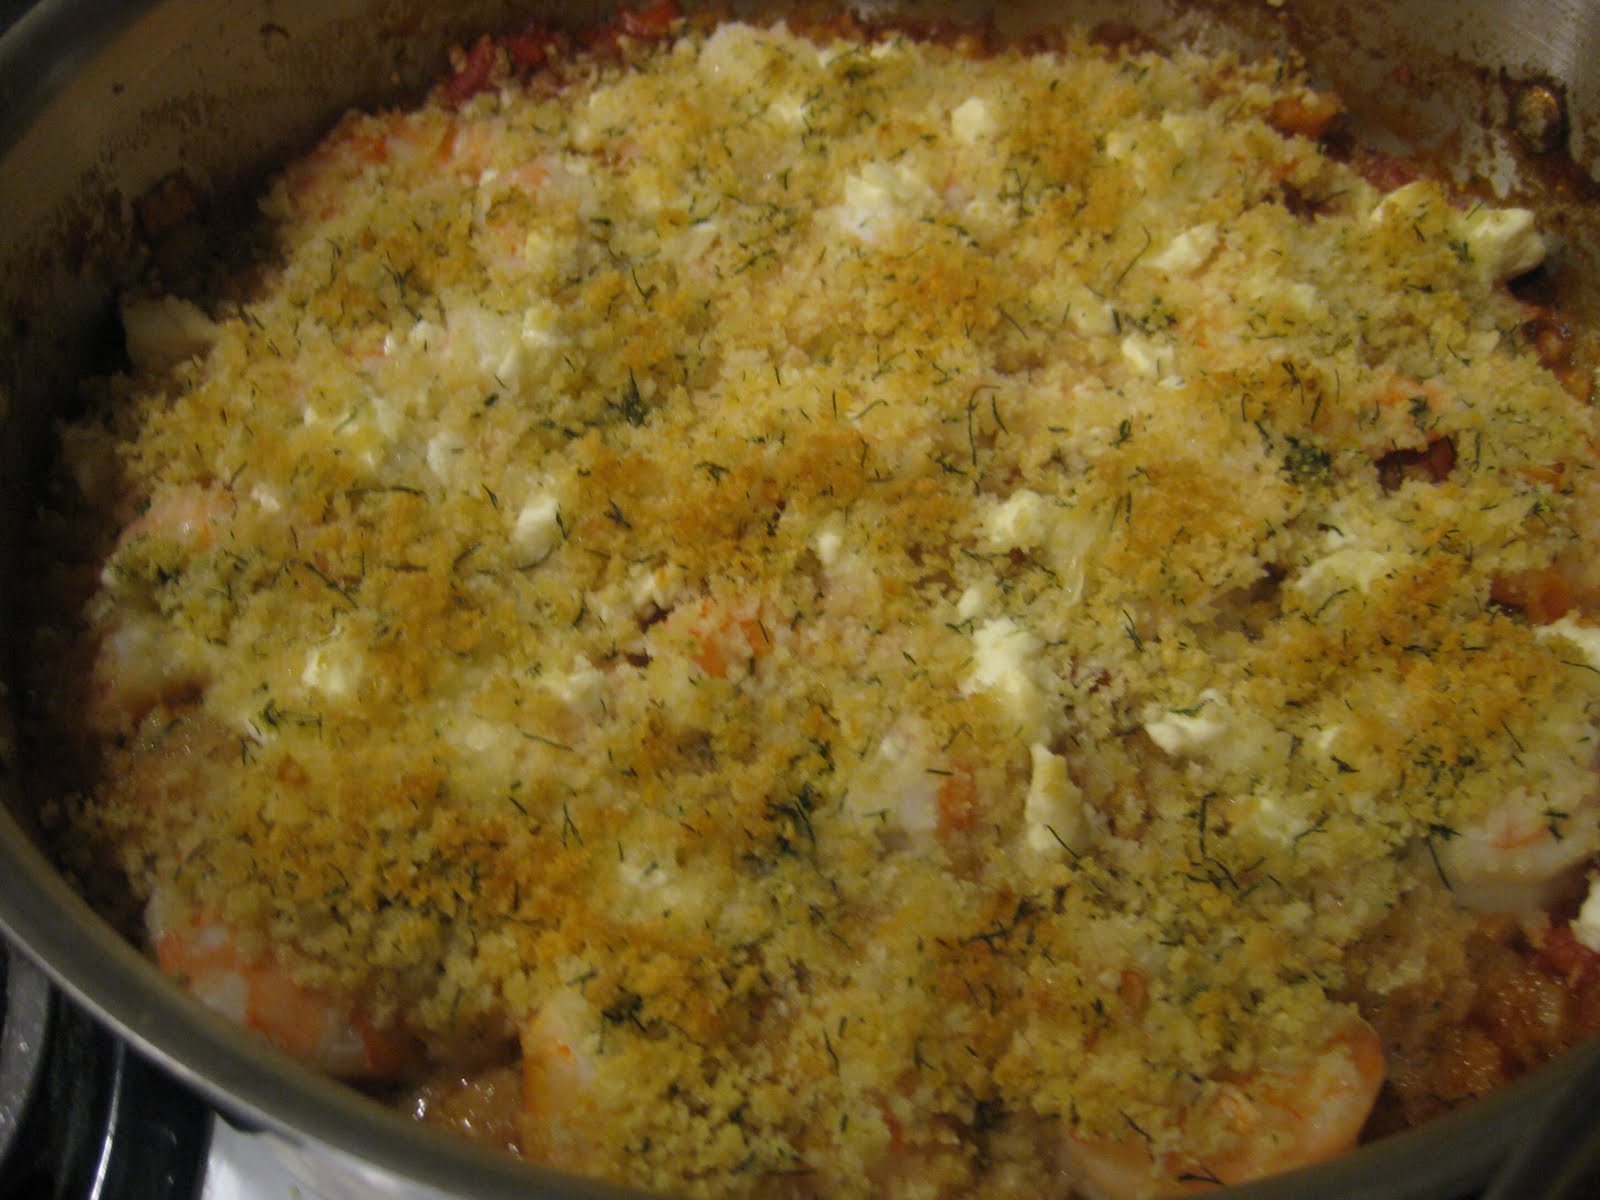
Thank you, Ina for another delicious addition to the repertoire- this one will definitely be a staple.

Friday, December 3, 2010

German Chocolate Cake

John's Birthday cake of choice varies slightly from year to year (he's actually more of a pie guy) but German Chocolate is always in the running. His mom passed down a fantastic recipe for moist and tender mild chocolate cake with an AMAZING coconut pecan icing. The icing of course is the star of the show so we cheat a little bit and start the cake from a boxed mix. You can use a German Chocolate mix or you can doctor up a yellow cake mix per below. Ingredients: 1 package yellow cake mix 1-4 ounce package vanilla instant pudding 4 ounces German sweet chocolate, melted and cooled 4 eggs 1 and 1/4 cup buttermilk 1/4 cup of vegetable oil Combine ingredients and beat in a standing or with a hand held mixer for four minutes at medium speed. Pour into two or three* greased and floured 9 inch cake pans. Bake at 350 degrees for 30 minutes or until a toothpick inserted into the center comes out clean. *I only have two 9 inch cake pans so I cut each cake in half (using a large serrated/bread knife) to create four layers versus three.

Coconut Pecan Filling/Icing: 1- 12 ounce can of evaporated milk 1 and 1/2 cups sugar 3/4 cup butter 4 egg yolks 1 and 1/2 teaspoon vanilla 1- 7 ounce package of shredded coconut (sweetened) 1 and 1/2 cups chopped pecans Whisk the first four ingredients together in a saucepan until combined. Cook the mixture over medium heat for 12-14 minutes or until thick. Stir constantly to avoid burning/sticking to the bottom of the sauce pan. Remove from heat and stir in the vanilla, coconut and pecans. Cool completely before frosting the cake. I transfer the mixture to a glass bowl and refrigerate to speed up the process.

When ready to assemble, I start with the first layer on my cake stand. I tuck rectangular pieces of parchment paper under the edges (just half an inch under the cake) to protect my cake stand. Once you're finished, you simply pull the paper out gently and your cake stand is mess free.

I put a modest amount of filling in between each layer, just enough to "glue" it together-saving lots for the outside of the cake. I'm not a pro at cake decorating by any stretch and I'm pleased to say that the coconut pecan icing is very forgiving. I start with a big mound on the top and gently spread outwards toward the edges. Then I go around the outside using a knife to apply and smooth the icing. It will be lumpy and rustic looking regardless so it takes some of the presentation pressure off.

(Apologies for the bad lighting in the below picture.) Store the cake in the refrigerator until you're close to ready to serve. I like to give it 8 hours or even overnight to set up in the fridge-the icing seeps into the cake a bit more. Set it out for 30 minutes or so at room temperature before slicing.

The icing is absolutely heavenly but also quite rich so a small slice will do you. Therefore this cake can definitely serve a crowd. (16 people or so easily)