Showing posts with label Budget. Show all posts

Sunday, April 29, 2012

Grown-Up Smokey Joes

As I've mentioned before, my mom is an amazing cook.  I grew up with homemade-all-the-way breakfast, lunch and dinner every day of the week.  (We actually got to go home for lunch all the way through 9th grade.)  I'm not exactly sure where I'd tried them- but I got on a Manwich kick somewhere along the line.  In middle school- I used to sneak cans of it into the grocery cart at the store with mom.  Its not that she would have had a problem with the Manwich mix per se, but semi-home-made cooking-from-a-can wasn't really her style.  Thus it was one of the dishes I mastered for myself early on.

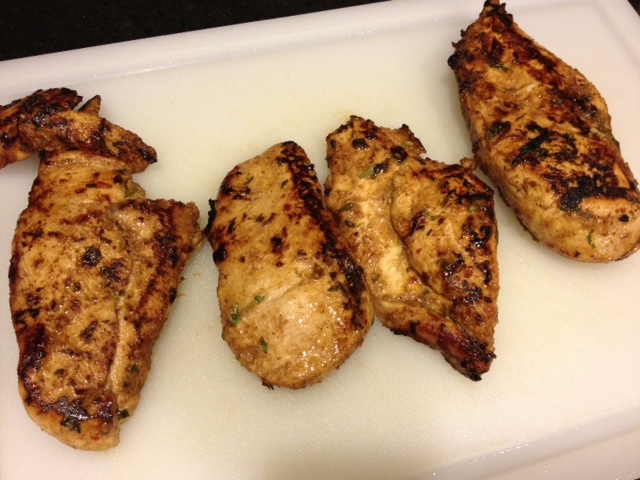
I recently saw Iron Chef Michael Symon make a grown-up version of a sloppy joe slider (sans canned mix) on the Cooking Channel and it brought back some memories.  This Southwest-style version kicked up with savory veggies and smokey chipotle peppers resembled a hearty chili in a way.  The sandwiches were delicious served with easy chile baked sweet potato chips on the side.


Makes 6 sandwichess

1 1/2 pounds ground beef  (I used ground round, Chef Symon used pork, turkey would be great too)
1 bell pepper
1 medium sweet onion
2 canned chipotle peppers in adobo, finely chopped
3 cloves of garlic
1 13 oz can tomato sauce
1/2 teaspoon cumin
1/4 teaspoon corriander
1/3 cup water
salt and pepper

fresh cilantro and avocado slices for garnish
6- soft sesame rolls or hamburger buns (or slider size rolls if you prefer)

Start by browning the ground beef/pork/turkey over medium high heat in a large skillet with a drizzle of olive oil. 

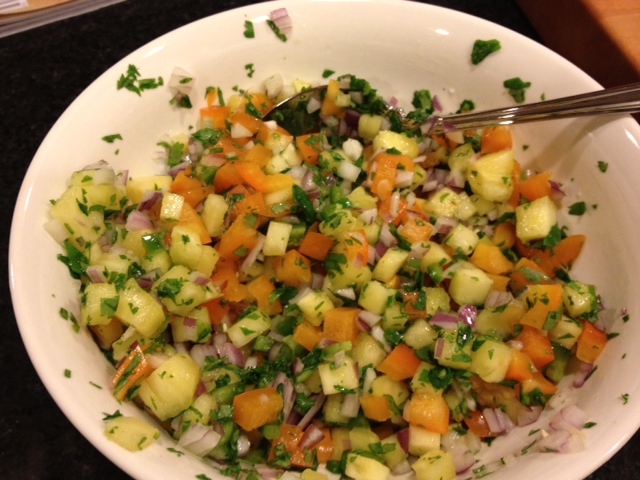
Meanwhile, roughly chop the onion, bell pepper and garlic and place in a food processor.  Pulse until everything resembles a fine dice. (Or finely dice everything by hand if you prefer.)


Saute the veggies in another drizzle of olive oil in a second skillet over medium heat for 5-6 minutes or until everything is tender.  Season lightly with salt and pepper.

Once the meat is golden brown, spoon off any unwanted grease in the bottom of the skillet and reduce the heat to medium-low.  Add the vegetable saute, the chipotle peppers, cumin, corriander, tomato sauce and water to the large skillet with the meat.  Season with more kosher salt and pepper to taste.


Cook everything together for 8-10 minutes to let all of the flavors marry together.  If it gets too thick, add more water to loosen it up.  Serve a generous scoop of the filling on slightly toasted buns. (You still want the bread to be very soft to avoid losing all of your filling out one side when you take a bite.)  Garnish with fresh cilantro and avocado slices if desired.

If you're interested to make the oven chips- I would actually get them in the oven before you start on the smokey joe filling because they take 30 minutes or so to bake...

Baked Sweet Potato Chips:   NOTE: this recipe serves 2 people generously

1 large sweet potato, peeled thinly sliced**
2 teaspoons olive oil
1/2 teaspoon chili powder
1/4 teaspoon cumin
kosher salt and pepper

Preheat the oven to 400 degrees.

**To slice the potatoes: I used my food processor's slicing blade since it was already out, a mandolin or slicing with a super sharp knife by hand would work too.  You want the slices to be no thicker than 1/8 inch in order to get them crispy.

Toss the potato slices in a bowl with olive oil, spices, salt and pepper so that they are evenly coated.  Then spread them into a single layer on two cookie sheets (lined with foil for easy clean up).  Use some non stick spray on either the pan or foil to ensure you can easily peel the chips off later.


Bake for 25-30 minutes, rotating the pans half way through to ensure they bake evenly.  They should be crispy with a few brown spots.  Watch closely toward the end, they can get too brown rather quickly. Taste to be sure you have enough salt.  Serve immediately.


Monday, March 5, 2012

Chicken Tacos with Pineapple Salsa

As the countdown to Spring begins - I'm already looking forward to warmer temps and grilling season thus my taste buds were craving something light, fresh and tropical this past week.  The secret to a great taco in my opinion is three fold:

1) a super flavorful marinade or spice rub
2) a buttery-toasty warm tortilla
3) lots of texture in the toppings

In this case I concocted a chile-garlic-citrus marinade, slicing the chicken breasts in half lengthwise to maximize the flavor and to reduce marinading time.  I warmed delicious organic corn tortillas in a buttered skillet just before filling them and I topped the tacos with a crunchy pineapple salsa and creamy avocado slices... so in my opinion they met all requirements.

Serves 4

3 boneless, skinless chicken breasts (Organic!), halved lengthwise so they are half their original thickness
10-12 small Corn or flour tortillas
2 ripe avocados, sliced and spritzed with lime juice to avoid browning
Fresh lime for garnish

Marinade:
1/4 cup olive oil
2 cloves of garlic, grated
zest and juice of 1 lime
juice of half an orange
1/2 teaspoon chile powder
1/2 teaspoon cumin
1/4 teaspoon ground coriander
1/2 teaspoon cayenne
1 tablespoon soy sauce
1 teaspoon brown sugar
1 heaping tablespoon of fresh cilantro, chopped

Combine all of the ingredients in a bowl.  Pour the marinade over the chicken in a ziplock bag.  Seal the bag well and massage the chicken so that it is evenly coated with the marinade.  Place in the fridge to marinade for at least 1 hour, up to 3 hours.  (This would also be great with shrimp!  Reduce the marinade time to 30-45 minutes max to avoid making ceviche out of them.)

Grill the chicken or as I did here- cook the chicken in a skillet over medium high heat until browned and cooked through- approx 3 minutes per side.  Let rest for 10 minutes before slicing thinly.


Salsa:
2/3 cup fresh pineapple, diced
1/4 cup bell pepper, diced
1/4 cup red onion, diced
1/2 a fresh jalepeno pepper, minced (more if you like it hot!)
2 tablespoons of cilantro, chopped
juice of half a lime
pinch of salt

Combine all of the ingredients in a bowl- cover and chill until ready to use.  Can be made a day before.


Using a griddle or a large skillet- melt some butter or vegetable oil over medium heat.  Toast the tortillas on one side for 1-2 minutes.  If using corn tortillas (my preference) the fat softens them, making them less likely to split apart when you pick them up.  If they are thin, I also recommend doubling them up to avoid breakage.


Fill the tortillas with a few strips of chicken, a tablespoon or so of salsa and a few slices of avocado.  Serve with additional lime wedges and hot sauce.  I like to serve black beans and rice on the side.  This time I actually made brown rice and lentils spiced with cumin and topped with caramelized onions which was a yummy (and healthy) compliment. 

Wednesday, February 29, 2012

Broccoli Quiche

To some, quiche might sound frou frou and girly, but a quiche done properly is actually decadent and rather hearty.  I love it because it is so versatile.  It works for breakfast, lunch or dinner, its an easy weeknight meal or a dish to impress company for brunch, and you can jazz it up with an infinite combination of mix-ins.  It is perfect for vegetarians or meatless Mondays.  Plus almost anything that comes in or on a buttery, flaky pastry crust is a winner in my book.

This broccoli variation has a nice savory little kick to it thus was great for dinner served with an arugula salad.


Ingredients:

3 cups of broccoli florets
1 garlic clove, thinly sliced
1/3 cup bell pepper, diced
pinch of red pepper flakes
8 eggs
1/2 cup half and half
1/2 cup creme fraiche (or sour cream)
1/2 cup (generous) good parmesan cheese
salt and pepper
1 pie crust (I used a store bought one that you simply unroll into the pie plate)

Preheat the oven to 400 degrees.

First- I lined a deep dish, 9 inch pie plate with the pie crust.  (You might need a 10 inch plate based on the volume if its shallow.)  I pressed the dough into the bottom and up the sides and then pricked it all over with a fork.  You can bake it as is although it tends to shrink and puff up a bit.  To get around that, I lined the dough with foil and then filled the shell with my "pie weights" which are actually dried beans that I keep in a jar for such purpose.  I baked the shell for 10 minutes with the weights and then another 10 minutes after removing the foil and the weights.  The shell looked cooked but not yet golden brown- it continues to cook once you fill it.  When the pie crust is done, turn the oven down to 365 degrees.  Yes that's right- half way between 350 and 375. 


Second- I prepared the veggies.  I warmed 1 tablespoon of olive oil over medium heat and then added the garlic to the pan- cooking for one minute until just barely looking golden around the edges.  Next I added a pinch of red pepper flakes and the diced bell pepper and cooked 1 minute before adding the broccoli. 


I tossed it all together to coat the vegetables with the garlic infused oil.  The broccoli turns bright green after about 1 minute- at which point I added 2 tablespoons of water to the pan and then covered it with a lid.  I let the broccoli steam for about 2 minutes- or until it was barely tender and still bright green.  It will continue to cook through in the oven.  I let this mixture cool for a few minutes.


Lastly-  I whisked together the egg mixture.  I combined the eggs, half and half, creme fraiche, a pinch of salt and a few grinds of pepper in a large bowl.  I then mixed in the cooled veggie mixture and the parmesan cheese before pouring it all into the prepared pie shell.


The quiche bakes for 30-35 minutes depending on the size of your dish.  You are aiming for the point when the filling barely jiggles when you move the pan and a knife inserted in the center comes out pretty clean.   Catching it when its JUST set ensures its light and custardy and perfect.


Serve the quiche warm or at room temperature.  It can be reheated in a 275 degree oven if need be.  I would say this quiche should serve 6-8 people however I should warn you, my husband ate a solid third of it himself in one sitting which I suppose means he liked it!   I know I did...

Sunday, January 22, 2012

Provencal Vegetable Soup with Pistou

An indulgent Holiday season followed by a work trip to food mecca Charleston, SC and then a three day weekend of excess in Las Vegas means that we have officially arrived at pocket-book-and-waistline-friendly-recipe month on Accidental Syrup.  I hesitate to preface this post this way because the recipe honestly is scrumptious.  While low fat and low cal its packed with hearty beans and vegetables and the bright flavors of garlic and herbs.  I googled "hearty soups" and stumbled across a fantastic sampling from Saveur magazine.  I thought a mix of vegetables would be particularly light and healthy (and as we know I lean French these days) so I jumped on the Soupe au Pistou.  (Note: pistou is in essence the French equivalent of pesto.)

The great thing about this recipe is that you could easily use whatever mix of veggies strikes your fancy.  I took a few liberties from Saveur's original recipe.

Ingredients for the soup:

2 ounces of pancetta or bacon, diced
1 large onion, chopped
2 large stalks of celery including the tops, diced
3 carrots, peeled and diced
3 garlic cloves, grated or minced
5 sprigs of fresh thyme, chopped
1/2 teaspoon red pepper flakes
2 bay leaves
1 zucchini, diced
1/2 a small head of green cabbage- halved again, cored and sliced into quarter inch strips (approx 4 generous cups total)
1- 28 oz can of diced tomatoes with juices (reserve one tablespoon of chunks for the pistou)
8-9 cups (or 2 cartons) chicken stock
2- 15 oz cans of cannellini beans, drained and rinsed

**Omit the pancetta/bacon and swap out vegetable stock for the chicken stock to make this vegetarian friendly.

Heat a large heavy bottom pot with a tablespoon of olive oil over medium heat. Add the pancetta/bacon and cook until crispy and golden brown.  Remove the bits from the pot with a slotted spoon (drain on a papertowel to the side) and add one more tablespoon of olive oil to the pot with the renderings.  Next add the onion, carrot and celery and cook for 5-7 minutes until the onions are soft but not brown.  Stir in the garlic, thyme, and red pepper flakes and cook one minute more.

Then add the cabbage, diced tomatoes, chicken stock and bay leaves.  Cook everything together over medium heat for 15-20 minutes.  Reduce the heat to medium-low, add the zucchini and beans and cook for another 15-20 minutes or until the cabbage is tender.  (I let mine simmer on low-low heat for a while longer until we were ready to eat.)

Meanwhile, you can make the pistou.  Measure all of the below ingredients directly into a food processor fitted with a metal blade (or a blender would work too.)

2 cups of fresh basil
1/2 cup of parmesan cheese (I used pecorino)  
3 tablespoons of olive oil
1 large clove of garlic
1/2 teaspoon salt
1/2 of a roma tomato, diced or a few of the diced tomatoes reserved from the soup

Pulse or blend until almost smooth (like a pesto).  Set aside.


Garnish each bowl of soup with a scant teaspoon of the pistou on the top (and a few of the crispy pancetta bits if you want to splurge a little.)  The smell of the garlic and the fresh basil wafts up at you as the pistou melts into the soup.  It really kicks what at first seems like a basic veggie soup up to another level.


I personally appreciate soup first and foremost as the perfect excuse for bread.  I made a delicious iteration of my Brown Butter Soda Bread from last year to accompany the soup.  I substituted fresh thyme for the rosemary and 1/2 cup of grated pecorino romano cheese for the black pepper.  I also used plain melted butter versus browned and dusted the tops of the dough with additional cheese after I brushed them with the egg wash. 


A big bowl of steamy soup and a warm slice of fresh bread is the perfect weeknight winter meal.  I froze two servings for a rainy day and we enthusiastically enjoyed left overs all week. 

Thursday, July 28, 2011

Pesto Zucchini Flatbread

Summer is in full swing here in Kentucky which means our gardens, farmer's markets and even Krogers are fully stocked with local delicious fruits and vegetables.  My mother's garden grows zucchini overnight or so it seems recently thus I'm fortunate to get a regular share of the bounty.  I have a couple of my favorite summer squash recipes to share this week.  First up: a super simple flatbread/pizza... a great option for a quick weeknight dinner or the perfect starter for a casual get together.

1 recipe of your favorite pizza dough (I used the Pillsbury thin crust dough in the can)
2 small/medium zucchini, sliced thinly (1/8 of an inch if you have a mandoline)
1/4 cup of fresh or prepared pesto
3 tablespoons of olive oil
1 generous cup of shredded Italian cheeses (I used a blend of provolone, parmesan, and asiago from Sam's. Any combination of your favorites will do.)
1 teaspoon of fresh thyme, chopped  (optional)
the zest of one lemon (optional)
salt and pepper

Preheat the oven to 425 degrees.

Unroll or flatten the pizza dough on a cookie sheet.  (I put a tablespoon or so of corn meal down first to make the crust extra crispy and to prevent sticking but its not entirely necessary.) 

Mix the olive oil and pesto together is a small bowl.  Drizzle, spread or brush the pesto mixture evenly over the dough.

Next spread the cheese over the pesto.

Lastly lay the zucchini over the top in rows, slightly overlapping, and season with a bit of salt and pepper.

Bake for 12-14 minutes until the edges are golden brown.  Peek under the crust to be sure its golden brown as well so that it doesn't get soggy.

Sprinkle the top with the fresh thyme and lemon zest before cutting the flatbread into squares.  I like to cut small 2 inch by 2 inch pieces to serve as an appetizer.  Serve warm from the oven or even at room temperature with your favorite crisp white wine, a Pinot Grigio would be perfect. 


Next up: a summer vegetable farro salad and my favorite zucchini bread.  So check back soon!

Friday, May 27, 2011

Frisee Salad with Poached Eggs and Bacon

I'm going to deviate from the light/healthy/summer dishes I promised you for a quick minute.  John and I celebrated our 4th Anniversary last weekend and we toasted the occasion with our favorite bottle of champagne.  French champagne of course goes perfectly with classic French bistro fare so I decided to recreate one of our favorite bistro dishes, a frisee salad tossed with an sherry orange vinaigrette, some toasted hazelnuts and topped with some crunchy bacon and a perfectly poached egg.

For 2 generous starter-size portions, you'll need:

2 super fresh eggs, poached
4-6 cups of frisee or a blend of baby greens and frisee
3 slices of thick, center cut bacon, sliced into half inch pieces
2 tablespoons of hazelnuts, coarsely chopped and lightly toasted
4-6 tablespoons of your favorite vinaigrette or see the recipe below

If you're thinking about closing your browser because you're afraid of egg poaching, I ask you to hear me out.  I've only poached eggs 3 or 4 times in my life up until now however I happened upon a simple, fool proof method (you can read about here) that will make these a regular item on the Lacy kitchen menu.

The eggs can be poached earlier in the day or just before serving- either way its best to let them cool on a papertowel lined plate for at least 20 minutes in the fridge.

The vinaigrette can also be made in advance:

1/2 teaspoon of orange zest
1 tablespoon of freshly squeezed orange juice
2 tablespoons of sherry vinegar
1 teaspoon of dijon mustard
1 teaspoon of honey
2 teaspoons of minced shallot
3 tablespoons of olive oil
salt and pepper

Combine all of the ingredients in a glass measuring cup.  Whisk well with a fork until emulsified (the oil and vinegar no longer separate.)

Fry the bacon in a skillet with a drizzle of olive oil until perfectly crispy and brown.  Remove with a slotted spoon and drain on a papertowel.

Toss the greens with the vinaigrette in a bowl before plating.  Sprinkle with the hazelnuts and bacon and then top with the poached egg.


The subtle orange flavor of the vinaigrette works very well with the toasted hazelnuts and the runny yolk of the egg creates a silky sauce that begs for a crusty piece of french bread for dipping.


As simple as it is to prepare, it would make for a great lunch or a quick weeknight dinner, but as we'll attest, it also stands up to a great bottle of champagne on a special occasion as well.  There is something about pairing rustic classic dishes at home with a super bottle of wine or champagne that makes me happy.

Along with the salad, we enjoyed a simple (and decadent) take on a croque monsieur.  I toasted thick slices of rustic whole wheat bread, topped them with a slice of prosciutto and a velvety cheese sauce made with a high quality French Comte (gruyere cheese).   I then put them under the broiler for a couple of minutes to toast the cheese.  Yummm....

Wednesday, March 16, 2011

Brown Butter Soda Bread

First let me say that while I tackle a lot of things as far as cooking and baking- I don't do bread. Anything that calls for yeast scares me to death. I definitely plan to address this fear later in my cooking life but I'm just not there yet. That said- I'm thrilled to share an EASY soda bread recipe courtesy of Bon Appetit that even I mastered on the first try.

Seeing as it is St. Patty's Day Eve, I wanted to make something festive to accompany my mom's corned beef and cabbage dinner. Epicurious.com had a slew of recipes for Irish Soda Bread to chose from- frankly soda bread can be heavy, dry and boring but I decided to give it a go based on the stellar reader reviews.
Ingredients: (Makes two loaves, serves 10-12 people)
1/4 cup (1/2 stick) of butter
3 1/2 cups flour (I used 1 1/2 cups white and 2 cups wheat flour)
1/2 cup old fashioned oats
1 tablespoon sugar
1 tablespoon fresh rosemary (I substituted dried)
2 teaspoons baking soda
1 teaspoon baking powder
1 teaspoon kosher salt
3/4 teaspoon of freshly cracked black pepper
1 3/4 cup buttermilk
1 egg white with a splash of water (beaten with a fork)
Preheat oven to 375 degrees.
Melt the butter in a sauce pan over medium heat. Swirl it around for 3-4 minutes until barely golden brown- remove from the heat and set aside.
Mix the flour through black pepper together in a large bowl.

Add the buttermilk and melted butter and stir together with a fork until evenly incorporated. Turn the dough out onto a well floured board or countertop. Knead briefly (I did exactly 7- as suggested- turning the dough, folding in half and pressing forward with the palms of my hands each time.) Form the dough into a ball - cut it in half with a large knife or pastry cutter - and then form the halves into two balls.
 
Place the dough 5 inches apart on a an ungreased baking sheet. Then brush the beaten egg white over the tops and sprinkle them with kosher salt and some extra black pepper.
Lastly, score an "x" into the tops wit a sharp knife for a rustic but official-bakery-looking presentation.
Bake for 40-45 minutes until golden brown.


Move to a rack and cool for 30 minutes before slicing. Serve warm with lots of butter (honey is good too) - if made ahead, reheat gently before serving.


My very first bread baking experience! This is really really yummy and honestly it took me less time than a batch of cookies. The outside is crunchy and the inside is suprisingly fluffy and moist. I can't wait to try some different variations of this recipe. You could add raisins and nuts, dried berries, various herbs or even cheeses to this. Mini loaves would be festive too.

Thursday, March 3, 2011

Hominy Grill Chocolate Pudding

I'm hooked on Food TV's "The Best Thing I Ever Ate Show" lately. Favorite episodes include Best things Garlic and of course Best things Chocolate... I jumped on the opportunity to try Hominy Grill's (one of our favorite Charleston, SC haunts) Chocolate Pudding recipe per Alton Brown's glowing reccomendation. Fortunately for me (and John) someone had posted it online This baked pudding is rich, decadent and perfect in its simplicity.

Recipe makes 6 portions

8 ounces of good quality bittersweet chocolate
1/2 cup sugar
6 egg yolks
4 cups heavy cream (I used whole milk)
1 teaspoon vanilla extract
1/2 teaspoon salt

Chop the chocolate and set it aside in a large glass bowl. Whisk 1/4 cup of the sugar in another glass bowl with the egg yolks. Mix the remaining sugar, milk/cream and vanilla in a sauce pan and bring to a gentle boil. Add a cup or so of the warm cream mixture to the bowl with the egg yolks and whisk well.

Pour the remaining cream over the chocolate and stir until smooth and melted. Add the egg mixture and salt to the chocolate bowl and mix well. Cover tightly with plastic wrap and refrigerate until cool. (I let it go over night.) When ready to cook- preheat the oven to 300 degrees. Pour the chocolate into 6 ramekins (that hold 2/3 cup each).

Place the ramekins into a large baking dish or roasting pan and fill the dish with water so that it reaches half way up the ramekins. Bake for one hour and then let cool at room temperature for 30 minutes before refrigerating for another three hours. Serve with some freshly whipped cream, shaved chocolate or fresh berries.


Delicious with a glass of a big red wine. These are also a great make ahead dessert as they keep for 2-3 days in the fridge. Thank you Hominy Grill for sharing!

Thursday, February 17, 2011

Potato Gnocchi

John and I celebrated Valentine's Day together in the kitchen cooking dinner, with some music and a great bottle of wine... much more fun than fighting the crowds at the overpriced fix prix restaurants for sure. For a special occasion, we tend to start with the wine and work backwards to the menu. In this case it was Miner 's Gibson Ranch Sangiovese from California- one of my very favorites of all time. Its hard to find but I assure you worth the hunt (or the expense of having the good people of Miner Family Vineyards mail it to your doorstep.)

From the Sangiovese we arrived at pasta, specifically a rich bolognese, and we decided homemade potato gnocchi would make for a fun and interactive Valentine's Day project.

Potato Gnocchi (recipe courtesy of Michael Chiarello)

Serves 3-4 people

2 large russet potatoes
4 eggs yolks
1/2 cup of freshly grated parmesan cheese
1/4 teaspoon of nutmeg
1/2 teaspoon kosher salt
1/4 teaspoon freshly cracked pepper
1 cup of all purpose flour (a bit more for dusting)

Scrub and dry the potatoes. Pierce the potatoes to the center 6-8 times with a pairing knife and then bake at 350 degrees for one hour. When they are cool enough to handle, cut them in half and scoop the flesh out into a bowl. Press the potato through a ricer into another bowl. (If you don't have a ricer you can pick one up at Walmart or Target for $16-$18).

Measure two heaping cups of the riced potatoes (careful not to pack the potatoes down, you want them light and fluffy) onto a large board or clean countertop dusted lightly with flour. Mound the potatoes, forming a well in the center and then add the egg yolks, cheese, salt, pepper and nutmeg to the center.


Mix the yolks into the potatoes using your fingers until everything is incorporated. Then sprinkle half a cup of the flour and press it into the potato mixture using your knuckles. Fold the dough over itself and press down again. Sprinkle more of the flour over the dough, folding and pressing until the dough looks cohesive. Resist the temptation to knead the dough like bread.


We didn't use the full cup of flour but if the dough gets too dry, you can add a splash of water. John halved the dough and rolled it into two long snake like ropes, about an inch thick.


He then cut the ropes into half inch pieces using a knife.

You could cook them just like this but rolling them down the tines of a fork gives them ridges that help the sauce hang onto the dumplings.

Once they were rolled, we placed the gnocchi in a single layer on a cookie sheet lined with a clean kitchen towel. We dusted them lightly with flour to ensure that they didn't stick together. We let them rest and dry for 30 minutes before we boiled them. The gnocchi could also be frozen after a few hours of drying as well.

Fresh gnocchi cook up in no time so once we have everything else for the meal ready, we boiled them (in two batches) in a large pot of salted water for 3 minutes or until they floated to the top of the water. Give the water a strong stir before dumping the gnocchi in- the moving water keeps them from sinking into a pile at the bottom of the pot. You don't want them to stick together. As soon as they start floating to the top, I scooped them out with a strainer into a colander in the sink.

As soon as both batches had cooked, we poured all but 1/4 cup or so of the cooking water out. We then added the gnocchi back to the pot (with the remainign cooking liquid) and spooned in a few generous scoops of fresh sauce - tossing it gently together before serving. (Topped with fresh parmesan of course.)
Fresh gnocchi would be great with a simple marinara sauce, a pesto cream sauce, or maybe gorgonzola cream sauce. I think the ticket is to keep it simple so that you can really appreicate the pasta.


I tell you these gnocchi (prepared primarily by John while I was making the sauce) were delectable- light, fluffy and flavorful. Avoiding over handling the dough ensures they are tender and fishing them out of the cooking water the very second that they float to the surface prevents them from getting mushy. AND this bowl of pasta paired perfectly with our special bottle of wine. (As did the homemade chocolate pudding! Check back soon for that recipe!)

Friday, January 21, 2011

Beef Bourguignon

John and I have the travel bug lately and we're working on preliminary plans for a trip to France, hopefully in the fall. Nothing sounds better on a frigid, snowy winter day than a rich, rib-sticking beef stew (ideally in a cozy Brasserie in Paris, but in this case, home was going to have to do.) French Food at Home is a great show on the Cooking Channel. People are often intimidated by the idea of cooking French Food but she makes it very approachable. I was virtually drooling on the remote when she made this dish so I decided to give it a try. I adapted the recipe to cut it in roughly in half which served 4 people generously. (Note, this takes about three hours to cook slowly in the oven, active cooking time is only 40 mins or so. Definitely a Saturday or Sunday meal.) Ingredients: 2 pounds boneless stew meat cut into large chunks, I used a sirloin tip roast 1 cup of baby carrots (or 1-2 carrots peeled and cut into pieces) 1 small onion, quartered 3 cloves of garlic, crushed 3 tablespoons of flour 1/2 bottle of dry red wine, I used a Bordeaux 2 1/2 cups beef stock 2 bay leaves 4 sprigs of fresh parsley, whole including stems 4 sprigs of fresh thyme, whole 3 slices of bacon, sliced thinly into lardons 20 pearl onions, I used frozen 1- 8oz package of cremini (baby bella) mushrooms, quartered Preheat the oven to 325. You want the rack in the bottom third of the oven so that a dutch oven will fit. Cut the sirloin roast into large pieces, 2-3 inch squares, and then seasoned it with kosher salt and black pepper. I browned the meat in some olive oil over medium high heat in a large dutch oven (you need one with a lid for baking.) I cooked the pieces in two batches to avoid crowding them. I cooked the beef for 2-3 minutes on all sides until it was brown. As soon as it gives way easily when you try to pick it up, its done. If its clinging to the pot, give it a minute more.
Next, I removed the beef from the pan, turned the heat down to medium and added the carrots and the quartered onion. (You'll strain these out later which is why you don't have to cut them up.) I cooked them for 3-4 minutes until golden before adding the garlic cloves, cooking one minute longer. div>Next, I sprinkled the flour over the vegetables- tossing to coat. This helps to thicken the sauce as the stew cooks. Lastly, I added the liquids and fresh herbs to the pot- scraping all of the brown bits from the bottom of the pot as they deglazed it. The beef pieces are tucked down into the liquid and then the covered pot goes into the oven for about 2 hours. I let mine go closer to 2 and a 1/2 hours. The meat should be falling-apart-tender and your kitchen smells mouth-wateringly delicious.
I wish this picture wasn't so hazy but you can see the richness that develops as the vegetables flavor the cooking liquid that then slowly braises the meat.
During the last 30 minutes of cooking time, I prepared what Laura refers to as the traditional French garnish for this dish. I first crisped the bacon lardons in a pan, rendering all of the fat. I strained the bacon pieces out and set aside for later. I then browned the pearl onions (I set them out to thaw a bit first) in the bacon fat until they were golden, 6-7 minutes.
I strained the onions out into a large glass bowl and then browned the mushrooms for 5-6 minutes. (To get nicely toasted mushrooms, use a large skillet so they aren't crowded and don't stir them too often.) I added a tablespoon of butter to the bacon fat as they browned.
When they were brown and tender, I poured the mushrooms into the bowl with the onions and set aside. At this point, you carefully transfer (using tongs) the chunks of beef from the pot to the bowl with the onions and mushrooms. You then strain the cooking liquid from the pot into another large bowl. The carrots are probably super mushy which is why Laura removes them- mine weren't too bad so I actually kept some of them in. You want to remove the onions, herbs, garlic skins, etc.
My sauce had thickened to my liking- however as Laura suggests in her recipe- you can transfer the liquid back to the pot and boil down to a thicker sauce if you prefer. You then add the beef and garnish back into the pot with the liquid. You can serve immediately or reheat to serve later. This keeps well for a day in the fridge. I served the stew over some buttermilk whipped potatoes, garnished with some freshly chopped parsley and the crispy bacon lardons. I did a quick saute of haricot verts (thin French green beans) and garlic in some butter as well. Make sure you have a crusty French baguette to help soak up the delicious sauce. I can't wait to try the real thing a Paris some day soon! Bon Appetit!

Friday, December 17, 2010

Potato and Leek Soup

I've always wanted to try the classic French staple that is Potato and Leek Soup. It is beautifully simple yet elegant at the same time. (Not to mention a whole pot costs a whopping $5 or $6 to prepare. Certainly helps balance out all of the recent Christmas shopping!) I studied a few recipes online and learned quickly that they all say almost exactly the same thing... Ingredients: 3 tablespoons of butter 1 bunch- 3 large leeks, white and pale green parts only 2 large russet potatoes, peeled and cubed into one inch pieces 2 bay leaves 1 teaspoon of chopped fresh thyme 2 bay leaves 4 cups chicken stock 2 cups water If you've not cooked with leeks before, beware they are sandy, dirty little things. The best way to clean them is to cut the dark green tops off and then slice them in half lengthwise. Soak them in a bowl of cold water, scrubbing in between the layers with your fingers to be sure you get all of the dirt out. Pat them dry with papertowels and then slice into pieces about 1/4 of an inch thick Melt the butter over medium heat in a large heavy bottomed pot or dutch oven. Sautee the leeks for 5-7 minutes until wilted and tender. Meanwhile, peel and cube the potatoes and mince the fresh thyme leaves. Season the leeks with a pinch of kosher salt before adding the the thyme and bay leaves to the pot. Cook for one minute more until fragrant and then add the stock and water to the pot. Bring it to a gentle, simmering boil and let it go for anywhere from 20-30 minutes until the potatoes are absolutely fork tender.
Remove the bay leaves and puree using an immersion blender if you have one. (Transfer to the blender if you don't.) David Lebowitz warns that using a food processor could cause the potatoes to take on a gummy texture so avoid that method in this case.
The soup will likely need more salt if you use a low sodium stock so taste and season until you get it just right. Some use white pepper to avoid black flecks in the soup but that doesn't bother me. I cracked some black pepper in there as well.
I served the soup piping hot with a dollop of sour cream and a few snips of green onions. (I also made a rather elementary style "ham and cheese toast" with some dijon mustard, black forest ham and gruyere cheese to eat alongside the soup. I topped some fresh, lightly toasted, ciabatta bread with a drizzle of dijon, a slice of ham and some thin slices of gruyere. I then toasted it under the broiler for a minute before serving.
Perfectly hearty on a chilly winter night!

Tuesday, November 23, 2010

Truffled Oven Fries with Parmesan

For John's birthday dinner this week, I made his his favorite french bistro meal. Seared filets topped with Roquefort cheese, truffled oven fries, and sauteed spinach. Of course the fries (or pommes frites) are typically deep fried (if you're in the right place, they are fried in duck fat...yummmmy) but I decided to try a baked variation. I am pleased to say that the Birthday Boy declared it a success!
Ingredients: (serves 2)
1 large russet potato
2 tablespoons of olive oil
1/2 teaspoon of dried, crushed rosemary generous pinch kosher salt and black pepper
2 tablespoons of finely grated parmesan cheese
1 teaspoon of black truffle oil
1 tablespoon of chopped fresh parsley
First I peeled the potato and cut it into sticks roughly a quarter of an inch thick. (I sliced the whole potato lengthwise into 1/4 inch slices, then I sliced each of those into 1/4 inch sticks and then cut those in half.) I soaked the potatoes in a bowl of cool water until I was ready to bake them.
I then drained the potatoes well and then spread them out on some papertowels to remove more of the moisture- blotting the top with another papertowel. I wanted to be sure they would get crispy so I attempted to get them as dry as possible.
I then tossed the potatoes with the olive oil, rosemary, salt and pepper in a bowl before spreading them into a single layer on a large rimmed baking sheet. (You want to spread them out the best you can so they brown on all sides, If you double the recipe, you'll definitely want to bake them on two baking sheets to give them ample room.) I baked them at 425 degrees for about 15 minutes and then, using a metal spatula, I flipped them oven and put them back in the oven for another 10-15 minutes. Watch for them to reach your desired level of brown and crunchiness.
As soon as they came out of the oven, I tossed them in a bowl with the cheese, truffle oil and parsley. Serve right away while they are nice and hot.
*If you're not familiar with truffle oil, it is absolutely heavenly. I picked up a small can of it at the grocery store for $12 and a little goes a long way. Its a worthwhile splurge and a great way to kick up a recipe for a special occasion!!!