Tuesday, August 23, 2011

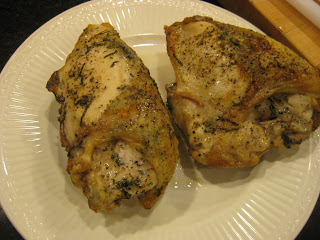
Garlic and Herb Roasted Chicken and Summer Vegetables

I am a sucker for roasted chicken, I'll admit.  In my opinion it is one of the most delicious, timeless and versatile dishes there is.  Roasting a whole chicken is ideal for a family or if you're looking for left overs to make into soup. I've found when cooking for two on a weeknight, I often scale back to roasting just the chicken breast pieces.  This ultra moist and flavorful method of rubbing softened butter studded with fresh garlic and herbs under the skin gives this roasted chicken a little something extra special (and decadent.)  Added bonus: the price of chicken on the bone is significantly less than the boring boneless, skinless variety.  Ironically they don't charge a premium for the added flavor (or calories).


Serves 3-4 (in our case 2 for dinner and left overs for lunch the next day)

3 split chicken breasts on the bone, with skin
3 tablespoons of softened/room temperature butter
2 garlic cloves, minced
1/2 teaspoon of fresh rosemary, chopped
1/2 teaspoon of fresh thyme, (I like lemon thyme) chopped
zest of one lemon
1 teaspoon of kosher salt
fresh cracked pepper
olive oil for drizzling

Preheat oven to 350 degrees.

Line a baking sheet or roasting pan with foil for easy cleanup.  Pat the chicken dry with a papertowel and place on the pan.  Mash the butter, garlic, herbs, lemon zest and half the salt together in a small bowl. 


Using a small spatula (or your fingers), spread the herbed butter up under the skin of each chicken breast.  Drizzle the outer skin with olive oil to help it crisp and season with the remaining salt and lots of fresh cracked pepper.  Bake the chicken in the center of the oven for 35-40 minutes or until the internal temperature reaches 165 degrees.  If its not as golden brown as you like, put it under the broiler for an extra minute or two at the end.


Meanwhile, prepare your veggies of choice for roasting.  I found some beautiful baby eggplants and zucchini at the farm stand and supplemented those with red bell peppers and cherry tomatoes from my garden (well pots really) and half a red onion from the fridge.


Clean the vegetables and cut them all into a rough one inch dice.  (Keep the tomatoes to the side for now.) Toss the vegetables with some olive oil, some fresh rosemary and thyme if you have extra and some salt and pepper.  Spread on a baking sheet (lined with nonstick sprayed foil) and roast in the oven below the chicken for 25 minutes (or until tender).  Take them out after 15 minutes and toss them around so they'll brown evenly.  Add the cherry tomatoes to the pan for the last 10 minutes.  I tossed the vegetables with some fresh basil just before serving.


Let the chicken rest 10 minutes before removing it from the bone (run a knife along the bone to free the whole breast) and slicing it into pieces.  You can serve the skin or easily remove it.  It has great flavor but so does the chicken at this point as the garlic-herb butter has slowly basted it while cooking.


Serve the chicken (you'll find you don't need a whole breast for each person- slicing it before serving allows you to take just what you want) with a generous scoop of roasted vegetables and a piece of toasted french bread.   I keep a bottle of reduced balsamic syrup in the pantry to which I am currently addicted.  I like to drizzle it over the roasted vegetables here - although a splash of regular balsamic vinegar would be good too.  Simple but delicious...and even better yet with a big glass of red wine.

Monday, August 22, 2011

Peach and Blueberry Hand Pies

I recently saw a tasty looking recipe for peach hand pies in a local newspaper.  As a fan of most everything in the pie, tart, crisp and crumble family, I was very excited to try my hand at this portable version of a personal pie.   Just a warning, the recipe requires two hours total "chilling" time so plan accordingly. I promise you, the end result is very much worth the wait!


Makes 6 individual pies

Pastry Ingredients:
1 1/4 cups all purpose flour
1/4 teaspoon salt
1 stick (8 tablespoons) of unsalted butter, cut into small pieces
1/4 cup sour cream (I used plain greek yogurt instead)
2 teaspoons of lemon juice
1/4 cup ice water

Mix the flour and salt in bowl.  Place the butter cubes in a second bowl and put both bowls in the freezer for one hour.  Next mix the yogurt, lemon juice and ice water in another small bowl.  When cooled, transfer the flour and the butter from the freezer to the food processor fitted with the metal blade.  Pulse the butter and flour together until the butter is reduced to pieces so tiny you almost can't distinguish them.


Add the yogurt, lemon juice and water and pulse in quick spurts until the mixture clumps together to form a ball of dough.  Turn the dough out onto a sheet of plastic wrap and form it into a disk.  Wrap it up and refrigerate the dough for 1 solid hour.  (Don't skimp.)


In the meantime, you can prepare the filling:

2 large peaches, peeled and sliced into half inch pieces
3/4 cup fresh blueberries
2 tablespoons of flour
3 tablespoons of sugar
1/2 teaspoon of bourbon, amaretto, vanilla or lemon juice- your choice

Toss everything together gently in a bowl.  Next make a simple Cinnamon Sugar for dusting over the outside of the pies.  Mix together 3 tablespoons of sugar, 1 teaspoon of cinnamon, and 1/4 teaspoon of nutmeg.  You'll also want an egg wash to help the pies brown and the cinnamon sugar to adhere.  (Beat one egg in a small bowl with 2 tablespoons of water.)

After the dough has chilled, cut the disc in half to roll out the pie shells.  Work with one half at a time, put the second half back in the fridge.  Roll the dough out on a floured surface to 1/8 inch thickness, flipping it over every so often to ensure it doesn't stick.  You can make the pies as large or small as you like.  I used a cereal bowl as a guide to cutting out three, 5 inch circles from the first sheet of dough.  (Tracing the bowl with a paring knife.)  I was able to fit two circles with the first roll, then I rerolled the scraps to make the third circle. 

Transfer the circles to a baking sheet covered with parchment paper.  Spoon 1/4-1/3 cup of the fruit filling into the center of each circle and fold in half, using a bit of the egg wash to help the dough stick together if needed.  Crimp the edges with a fork to seal the pie.


Brush the pies with egg wash and sprinkle generously with cinnamon sugar before placing the pan back in the fridge for at least 30 minutes.  Making sure the dough is cold when it hits the oven ensures the crust stays nice and flaky.  Repeat with the second portion of dough.

Once chilled, bake the pies at 375 degrees for 20 minutes or until golden brown.  Don't be alarmed if blueberry juice oozes out a bit.  I baked three pies to a pan to ensure they had plenty of room for such oozage.  Let the pies cool for 10 minutes before removing from the pan.  Serve warm with a scoop of ice cream or whipped cream (I spiked mine with a little extra amaretto.)  They truly are best fresh out of the oven. I tried reheating them the next day and its just not the same.. If serving guests, I would recommend assembling them a few hours ahead, keeping them in the fridge, and baking them while you eat dinner.


The dough is flaky and yet still a bit chewy at the same time.  The warmth and crunch of the cinnamon crust is the perfect compliment to the perfectly sweet gooey filling. I love that the pie is served in a tidy little personal package.  I always find it hard to serve fruit pie elegantly because the filling starts to ooze out from under the top crust as soon as you cut it.  Transfer to the plate is always messy affair as well.  Hand pies are most definitely a fun twist.  I can't wait to try apple or pear hand pies as we get into fall!

Tuesday, August 16, 2011

Chiles Rellenos with Corn and Okra Succotash

I'd been oogling this recipe ever since I first saw it in Food and Wine magazine last summer.  Tim Love of Lonesome Dove restaurant in Fort Worth, TX did a tex-mex/bbq menu for the Fourth of July that looked absolutely heavenly.  John and I had some friends over for dinner last weekend and seeing as one was from Austin and one went to school in Dallas, we decided on a tex-mex theme.  I served these chiles rellenos alongside Pork Tacos al Pastor, a pitcher (or two) of strong margaritas and a Pat Green and Robert Earl Keen playlist...

Serves 6-8

10 poblano chiles
5 slices of bacon, sliced into half inch pieces
4 ears of corn, kernels cut off
1/2 medium red onion, cut into small dice
1/2 red bell pepper, cut into small dice
4 cloves of garlic, minced or grated
1/2 pound okra, sliced into 1/2 inch pieces (about 2 cups)
1 bay leaf
1/2 teaspoon chile powder
1/2 teaspoon cumin
1/2 teaspoon dried oregano
1 cup of chicken stock
2 cups of Monterey Jack cheese, shredded

I took a few short cuts from Tim Love's original recipe.  He grills the peppers first before removing the skins, seeds and and cores.  He later cooks the stuffed peppers in a cast iron pot on the grill whereas I started with raw peppers and cooked them in foil packets directly on the grill.  Frankly they came out great so I'm sticking with my method.

I made a slit from the core of of the pepper all the way down.  I then used a pairing knife to cut the inner core and seeds out.  NOTE: Poblanos are typically pretty mild but I had a few firey ones in this batch.  If you don't love heat, you'll want to cut the inner white ribs out as well to be safe.


To make the filling, I first cut the kernels off of the ears of fresh corn and set aside.  Next I started the bacon in some olive oil in a dutch oven (you want something with a lid) over medium heat.   While the bacon rendered, I cleaned and prepped the okra, onion, bell pepper, and garlic.  As soon as the bacon started to brown, I added the onion and pepper to the pot and cooked for 3-4 minutes.

Next I added the corn and okra, cooking another 4 minutes.  Lastly I added the garlic and spices, tossing everything together to cook for 1 minute before pouring in the chicken stock and seasoning with salt and pepper.

I turned the heat down to medium-low and covered the pot- letting everything cook together for another 6-7 minutes until the juices thickened into a sauce and the okra was just tender.

I made tin foil "boats" to fit about 5 peppers each. Working directly in the foil, I spooned corn filling into each pepper.  You want them full but not overflowing.  I then topped each pepper generously with cheese, tucking it down into the pepper so it wouldn't melt off while cooking.  I used a second sheet of tin foil sprayed with Pam to cover the packet.

John grilled the packets for roughly 10-15 minutes- I would guess at around 350 degrees.  You want the peppers to steam until tender and the filling and cheese to warm through and melt.  You could technically do this in the oven too but you'd lose the smoky flavor you get from the grill.

Once the peppers are done, you can keep them warm in a low oven until serving.  These would make a great vegetarian entree with some black beans, rice or avocado on the side.  Or you can serve them as a veggie and starch side-in-one as we did alongside your favorite tacos or enchilladas.  Either way, make sure you have a cold beverage and maybe some sour cream to cool you (and your mouth) down on a hot summer night.

Sunday, August 7, 2011

Dulce de Leche Layer Bars

Magic Cookie Bars, Seven Layer Bars, Hello Dolly's... all the same delicious childhood favorite just called by different names.  They still hold a special place in my repertoire as one of the very first things I learned to bake.  This new grown-up version is made slightly more sophisticated - yet equally as decadent and addictive - with the addition of a gooey dulce de leche center. 

Makes 16 bars

Ingredients:

1 1/2 cups of graham cracker crumbs
1 teaspoon of cinnamon
7 tablespoons of butter
12 ounces of semi sweet chocolate chips
1 cup of slivered almonds
1 1/2 cups of sweetened shredded coconut
1- 14 ounce can can of dulce de leche*
1- 14 ounce can of sweetened condensed milk

*Look for dulce de leche in the latin foods section of your grocery store.  You can make it from scratch by essentially caramelizing a can of sweetened condensed milk if you can't find it.

Preheat oven to 350 degrees.  Cut the butter into pieces and place in the bottom of a 9 x 9 square pan or baking dish.  Once the oven is hot, put the pan into the oven to melt the butter- takes roughly 4 minutes.  Meanwhile mix the cinnamon into the graham cracker crumbs.  Sprinkle the crumb mixture over the melted butter and press down to form a crust in the bottom of the pan.

Next sprinkle half of the coconut, chocolate, and almonds over the crust.  Then spoon the dulce de leche evenly over the top.  The dulce de leche was thicker in consistency than I expected.  I transferred it to a bowl and microwaved it for one minute or two minutes (stirring every 30 seconds or so) to make it a bit more pliable. 


Next, repeat the layers with the remaining coconut, chocolate chips, and almonds.  Lastly drizzle the sweetened condensed milk over the top as evenly as possible.  Bake for 30-35 minutes or until the top is golden brown.  Let cool completely before cutting into bars or sampling.  I was not so patient and burned my mouth with hot caramel which I'm still paying for a day later...


They are delicious but very rich so small bars will go a long way.  The caramel and cinnamon gives them a little hint of something new and different from the bars you remember.  The almonds add a great toasty crunch in contrast to the smooth chocolate and sticky dulce de leche.  I bet you can't eat just one!

Friday, August 5, 2011

Halibut with Tomato Jam

TGITS... Thank goodness its (finally) Tomato Season!!  There is nothing better than fresh Kentucky tomatoes in the summer.  I find I always have a few sitting on counter whether they are from my own patio plants, the vegetable stand down the road or a generous neighbor.  This quick and easy savory "jam" was the perfect summer accoutrement for a weeknight pan seared halibut this week.  It would be equally as excellent over grilled chicken, pork or beef as well.


I pan seared the halibut first* and then cooked the jam right in the same pan while the fish rested.  (I am a stickler for hot food but I don't fret as much in the summer.  Meals like this are every bit as delicious at room temperature.)

Savory Tomato Jam Ingredients:     serves two generously

1 tablespoon of olive oil
2 roma tomatoes, diced (any tomato would work, barely 1 cup diced)
1 large shallot, finely chopped
2 large garlic cloves, grated or minced
2 tablespoons of balsamic vinegar
2 sprigs of fresh thyme
1 tablespoon of fresh parsley, chopped
1 teaspoon of honey
zest of half a lemon
salt and pepper

Heat the olive oil over medium heat in non stick pan.  Saute the shallot for 1 minute before adding the garlic and fresh thyme.  Saute for 1 minute longer.  Add the tomatoes, balsamic vinegar and honey- cook for 5 minutes or until the majority of the liquid has evaporated and the tomatoes have started to break down.

Finish with the fresh parsley, lemon zest, and salt and pepper to taste. 

I generously spooned the jam over the halibut and served it with some roasted veggies (brussels sprouts, onion and golden beets)- and a small arugula salad dressed simply with lemon juice and olive oil.  

The balsamic and tomato juices reduce to create a lovely sweet flavor while the herbs and lemon zest give it an earthy freshness. It would be great as a bruschetta topping (maybe with some goat cheese) over grilled bread too!   For a quick and simple weeknight meal on the porch- I have to say it was a beautiful and more importantly delicious plate...


*To cook the halibut... I heated one tablespoon of olive oil in a non stick pan over medium high heat.  I seasoned the fish with salt and pepper and then cooked for roughly 3 minutes per side.  The filets were roughly 1 inch thick in this case.   The fish should flake easily and be just opaque in the center.  I placed the fish on a plate tented with foil which probably cooked it a bit more while I made the jam.

Wednesday, August 3, 2011

Zucchini Bread

If you've ever tried to grow zucchini or squash, you know that from time to time you find a ginormous one on the plant that managed to escape your previous attempt at a harvest.  These ones lose some of their flavor and delicate texture once they hit the 12 inch mark but they are perfect for shredding into zucchini bread.  You can do this by hand using a grater if you're looking for an upper body work out or a food processor fitted with a grater blade will do the trick in a matter of seconds.  


I found that one massive zucchini equated to roughly 4 1/2 cups shredded which was more than I needed for one recipe so I made another half recipe in a smaller loaf pan as well.


Ingredients:  makes one large loaf

2 cups of whole wheat flour (white would work too)
2 teaspoons of cinnamon
1 teaspoon of baking soda
1/4 teaspoon of baking powder
1/4 teaspoon of kosher salt
1 cup of sugar
1 cup of brown sugar
3/4 cup of vegetable oil*
3 large eggs
1 teaspoon of vanilla
3 cups of grated zucchini
1/2 cup of chopped walnuts or pecans (optional)

*The second time I made this, I did 1/2 cup low fat buttermilk and 1/4 cup vegetable oil to lighten it up and it was equally as moist and delicious.

Preheat the oven to 350 degrees.  Measure the dry ingredients (flour through salt) into a bowl and stir together with a whisk.


Beat sugar, oil, eggs and vanilla in the mixer or by hand in another large bowl.  Mix in the zucchini and then the dry ingredients.  Mix gently until just combined (Add the nuts last if you use them.)

Bake for 1 hour and 15 minutes or until a toothpick inserted into the center comes out clean.  Let cool on a wire rack for 10 minutes before turning the loaf out onto the rack to cool the rest of the way.  Once cooled completely, wrap in foil or plastic wrap until you're ready to serve.  It keeps at room temperature for a couple of days or for a few months in the freezer (air tight). 

The top gets nice and crunchy while the inside stays perfectly moist and tender.  You can't help but sample a piece while its still warm...  Even it if means showing up to your grandmother's house with a partial loaf, oops.   =)


You'll note I didn't title this recipe Whole Wheat Zucchini Bread...  That would likely give people the impression that we're dealing with dense, cardboard-like "healthy" tasting bread which is just not the case here.  The original recipe calls for white flour but I assure you the whole wheat flour gives you the nutrition boost yet still yields the tender texture.  The recipe also calls for half shredded sweet potato instead of all zucchini which would also be delicious and would pack in some additional vitamins and minerals too.