Showing posts with label Fish and Shellfish. Show all posts

Friday, August 5, 2011

Halibut with Tomato Jam

TGITS... Thank goodness its (finally) Tomato Season!!  There is nothing better than fresh Kentucky tomatoes in the summer.  I find I always have a few sitting on counter whether they are from my own patio plants, the vegetable stand down the road or a generous neighbor.  This quick and easy savory "jam" was the perfect summer accoutrement for a weeknight pan seared halibut this week.  It would be equally as excellent over grilled chicken, pork or beef as well.


I pan seared the halibut first* and then cooked the jam right in the same pan while the fish rested.  (I am a stickler for hot food but I don't fret as much in the summer.  Meals like this are every bit as delicious at room temperature.)

Savory Tomato Jam Ingredients:     serves two generously

1 tablespoon of olive oil
2 roma tomatoes, diced (any tomato would work, barely 1 cup diced)
1 large shallot, finely chopped
2 large garlic cloves, grated or minced
2 tablespoons of balsamic vinegar
2 sprigs of fresh thyme
1 tablespoon of fresh parsley, chopped
1 teaspoon of honey
zest of half a lemon
salt and pepper

Heat the olive oil over medium heat in non stick pan.  Saute the shallot for 1 minute before adding the garlic and fresh thyme.  Saute for 1 minute longer.  Add the tomatoes, balsamic vinegar and honey- cook for 5 minutes or until the majority of the liquid has evaporated and the tomatoes have started to break down.

Finish with the fresh parsley, lemon zest, and salt and pepper to taste. 

I generously spooned the jam over the halibut and served it with some roasted veggies (brussels sprouts, onion and golden beets)- and a small arugula salad dressed simply with lemon juice and olive oil.  

The balsamic and tomato juices reduce to create a lovely sweet flavor while the herbs and lemon zest give it an earthy freshness. It would be great as a bruschetta topping (maybe with some goat cheese) over grilled bread too!   For a quick and simple weeknight meal on the porch- I have to say it was a beautiful and more importantly delicious plate...


*To cook the halibut... I heated one tablespoon of olive oil in a non stick pan over medium high heat.  I seasoned the fish with salt and pepper and then cooked for roughly 3 minutes per side.  The filets were roughly 1 inch thick in this case.   The fish should flake easily and be just opaque in the center.  I placed the fish on a plate tented with foil which probably cooked it a bit more while I made the jam.

Sunday, July 17, 2011

Leek and Asparagus Risotto with Seared Scallops and Meyer Lemon

If I had to proclaim a "specialty" in the kitchen, it would likely be risotto.  It is a family favorite therefore I've had plenty of practice to refine my method.  Risotto is incredibly versatile- you can dress it up in a number of different ways.  It is wonderfully rustic and simple all by itself- a delicious vegetarian entree idea, however it also makes for an elegant accompaniment to your favorite seafood or protein.  I made this particular combination with friends a few months back and again for Father's Day. 
Serves 6 as a main course.

Ingredients:

18 large scallops
1 1/2 cups of Arborio rice
3 large leeks, white and pale green parts only
1 bunch of asparagus, tough ends removed
1 meyer lemon (regular lemon if you can't find one)
3 cloves of garlic, minced or grated
2/3 cup of grated parmesan cheese
1/4 cup of fresh basil, chopped
3 tablespoons of olive oil
2 tablespoons of butter
1/2 cup of white wine
6-8 cups chicken stock or broth

Prep ahead of time or before you start the cooking process:
*Pat the scallops dry with a paper towel
*Clean the asparagus and cut into half inch pieces
*Remove dark green parts of leeks, halve lengthwise and slice into half inch pieces.  Rinse well in bowl of water to remove any sand.  Dry on a paper towel.
*Zest and juice one meyer lemon.

The process of cooking the risotto takes 20-30 minutes.  Constant stirring is the trick to keeping it creamy so be prepared to man the stove for the last 30 minutes before serving (the scallops can be done first) or have a few friends handy to help stir and pour while you work on the scallops. 

Heat a skillet over medium-high/high heat.  Season the scallops with salt and pepper.  Sear them in a few tablespoons of olive oil for roughly 3 minutes a side.  The trick to perfectly seared scallops is to leave them alone.  Avoid the temptation to flip them or shuffle them around the pan.  This allows the sugars to caramelize creating a sweet and golden crust.  Remove from the pan and set on a plate tented with foil to keep them warm.
Look at these beautifully fresh scallops! They smelled so sweet and delicious that we sampled one "carpaccio" style with a drizzle of meyer lemon juice and a bit of zest. Yummm....


When you are ready to start the risotto, start with the olive oil in a large heavy bottomed sauce pan or cast iron pot over medium heat.  Add the leeks and saute 4-5 minutes until soft and translucent.  Next add the garlic and the rice and saute another 2 minutes until the rice looks almost translucent and barely golden.  (Don't let the garlic burn.) Then add the white wine and stir until almost entirely dissolved.


Now you begin with the chicken stock.  Some people will say you should warm the stock on the stove before you begin to add it but I've found that as long as its room temperature (and not cold) it works fine as is.  You add the stock 1/2 or 2/3 of a cup at a time, stirring constantly over medium heat.  As soon as the liquid looks almost totally absorbed, you add more stock.  You continue this until the rice is cooked and the mixture is creamy.

I added the asparagus as soon as the rice was getting close to tender.  When the rice and asparagus were just cooked through, I added the cheese, butter, lemon zest and basil with one more healthy splash of stock.  I removed the pan from the heat at this time.  (Once you've gently stirred it all together, check the consistency once more. You want it to appear a bit looser than you think it should be- add more stock if needed.  It will continue to set up as you serve it.)


My other important secret to luxuriously creamy risotto is serving it immediately- if you let it sit too long, the starches seize up and it becomes sticky.

Serve the risotto in a rimmed soup bowl and top with the scallops.  Drizzle some of the meyer lemon juice over the top.  You could garnish with some more fresh basil as well.  (Note my Scallops didn't get as brown as I would have liked in this case.)

For 45 minutes to an hour of effort, this meal is definitely a stunner.  Serve with your favorite side salad and a crisp white wine.  For Father's Day we celebrated with a bottle of Duckhorn Savignon Blanc from California which was just perfect.

Other delicious risotto ideas:
Mascarpone and porcini mushroom
Artichoke hearts and parmesan
Gorgonzola and crispy pancetta
Sun dried tomato and goat cheese

Once you've mastered the technique, you can experiment with the mix-ins to create dozens of great recipes.

Monday, June 13, 2011

Red Curry Noodles with Shrimp

I adore Thai food and I find when dining out, I'm torn to decide between the noodle dishes that I love (pad thai, pad see ew, etc) and the red and green curries which I also love.  (This problem is solved when John and I are together and we can share both.)  I decided to marry the two delicious categories together into this quick and easy Thai inspired curry noodle dish.  You could easily mix this up using chicken, beef or any combination of veggies you like.  Its amazing to me how many of the formerly "exotic" ingredients can  be found in almost any neighborhood grocery store now a days- just look for the "ethnic" section and all of these basic Thai fixins will be lined up together.

Ingredients:

1 lb of shrimp- peeled and deveined
1/2 of a large yellow onion, sliced
1/2 of a bell pepper, sliced into strips
1 cup of frozen or fresh green beans (thawed)
3 cloves of garlic
1 teaspoon of grated ginger (I use the jarred one you can find in the produce section)
1 tablespoon of Thai Red Curry Paste (a heaping one if you like heat)
1 tablespoon of Thai Fish Sauce
1 can (14 ounces) of Lite or Regular Coconut Milk
1/2 cup chicken stock
1 tablespoon of brown sugar
1 package of Thai Rice Noodles
1/4 cup freshly sliced basil


First I cleaned the shrimp and sauteed them over medium heat in a pan with a drizzle of olive oil until just cooked through- about 2 minutes per side.  I seasoned them well with salt and pepper and set aside.

Second, I put a pot of salted water for my noodles on the stove to boil.  You want the water to be ready to go but its best if you wait and cook the noodles at the very last second.  The rice noodles need only 2-3 minutes of cook time and overcooking them is disastrous.  (Mush city!)

Next I cooked the onion over medium heat in another drizzle of oil for 4-5 minutes until soft- seasoning with a pinch of salt.  (I prepped the bell pepper and green beans in the meantime.)  I then added the garlic, ginger and curry paste and cooked one minute longer- stirring to coat the onions. 


Next I added the coconut milk and stock to the pan (bumping the heat up to medium high), followed by the brown sugar and the fish sauce- whisking to combine.  I let the mixture come to a gentle boil for 2-3 minutes to reduce slightly before adding the veggies and shrimp.  Everything cooks together for another  two minutes to take on the flavors of the sauce- you want the veggies to be slightly crisp and to avoid overcooking the shrimp.
 **This is a good time to put the noodles in the boiling water to cook- watching carefully to cook only 2-3 minutes.  Take them out as soon as they are tender.


Strain the noodles, toss them back in the pot you cooked them in and pour the shrimp curry mixture and the fresh basil over top- tossing gently to coat.   Serve immediately with some extra fresh basil and an icy cold beer or an off dry white wine (a Gewürztraminer or Voignier would be delicious).  You'll get your spicy coconutty curry AND your noodle fix all in one.  This would serve 4 people or makes great left overs the following day.

Tuesday, May 3, 2011

Tuna Melt Panini

A love a classic tuna salad or tuna melt sandwich for lunch. (Who doesn't?) It takes me back to my childhood when Mom would make lunch for us during the week. However this recipe... "is not yo mama's tuna sandwich" as they say. Cheap, fast and healthy (kinda), this is quickly becoming a dinner staple at the Lacy house. I have started to collect the Annual Food and Wine Magazine cookbooks that come out at the end of each year and I found an intriguing recipe for this Italian-flavored tuna panini. They season plain old canned tuna with a basil- balsamic vinaigrette instead of any mayonnaise and the flavors are so much more exciting. The fresh tuna salad is then pressed and toasted between buttered ciabatta bread with melty mozzarella and a tangy crispy pickle slice... to die for! Tuna Salad: (serves 2 to 3 people) 12 ounces of canned Albacore tuna 1 large shallot (or 1/4 cup red onion), minced 1/4 cup good quality olive oil (I went a little lighter) 1 generous tablespoon of balsamic vinegar (I added a bit more) 1 tablespoon of freshly sliced basil 1/2 teaspoon of crushed red pepper flakes salt and pepper Drain the canned tuna well and transfer to a medium to large glass bowl. Add the remaining ingredients and blend together with fork. For each sandwich you'll need: 1 ciabatta roll sliced in half (or a ciabatta loaf cut into individual sandwich pieces) 2 large dill pickle slices (I like Claussen) 1-2 slices of mozzarella cheese a schmear of dijon mustard If you have a panini press (on my wish list)- that would of course work great. If not, you can use the griddle or skillet method as I did. Assemble the sandwiches and then melt one tablespoon of butter in a large skillet over medium high heat. Place the sandwiches in the skillet and then use a large cast iron skillet/pot/some combination of heavy things on top of the sandwiches to give them a good press. I lined the bottom of the pot/skillet touching the food with foil first. Grill for 3-4 minutes per side until toasty brown. Add an additional tablespoon of butter when you flip the sandwiches over.
I served the sandwiches hot with a simple arugula and parmesan salad on the side. (Dressed with just some fresh lemon juice and olive oil.) Truly truly yummy I tell you. **If you don't like tuna- you could use some shredded chicken breast in its place.

Monday, February 21, 2011

Mussels with White Wine and Fennel

This post is for my fellow Top Chef fans out there. It is my absolute favorite show on television and the current Top Chef All Stars season on Bravo is getting incredibly exciting as we near the finale. One of the highlights for me this year was the Mafioso-style Italian cook off challenge at Rao's restaurant in New York. Not only were the characters great fun to watch, all of the dishes looked mouth wateringly delicious. Spoiler alert for any ti-vo'ers reading.... I was thrilled to find Antonia's winning mussel recipe online. You can actually watch Chef Rick Moonen prepare them live at hulu.com. These mussels are super simple and absolutely fantastic. Don't forget some fresh crusty bread to serve on the side. Serves 2 1 tablespoon olive oil 1 pound of fresh black mussels 1 cup of thinly sliced fennel 1 large shallot, sliced (I added this) 1 clove of garlic, minced or grated (I upped to 3 cloves) 1/2 teaspoon red pepper flakes 1 to 1 1/2 cups of dry white wine 2 sprigs of fresh thyme, leaves removed from stems 4 fresh basil leaves, sliced (I used 1/4 cup freshly chopped parsley) 1 tablespoon of butter (I upped it to 3 tablespoons) I found some beautiful mussels at Fresh Market. However, they handed them to me tied up in a plastic bag which I imagined was suffocating them so I promptly ripped an air hole for the little guys. When I got them home, I rinsed the mussels under cold water and carefully picked through them- discarding any broken ones or shells that were open (which means they are dead), tapping them first to see if they'd close up. You also need to "remove the beards" which I've always thought sounds creepy. Essentially you are looking for a little piece of fuzz sticking out of each shell...if you find it, pull it off. If you're not going to prepare them immediately, you can store them in a bowl of cold water in the fridge for a couple of hours. I started with the olive oil over medium high heat in a heavy dutch oven (a large skillet would work too, something with a lid.) I sauteed the fennel and shallot in the oil for 3-5 minutes until soft and tender but not brown- adding the garlic, red pepper flakes and thyme and cooking one minute longer. Next, I added the drained mussels to the pot, tossing them together with the veggies before adding the white wine. I covered the mussels with a lid (you're still medium high heat) and steamed everything together for 3-4 minutes until all of the mussel shells had opened and the meat had cooked through.

Note: I actually doubled this recipe to serve four- so don't let the above picture mislead you.

I removed the pot from the heat and added the fresh parsley and butter before serving hot. The butter melts into the wine creating a luxurious sauce for the mussels and dipping bath for some warm crusty bread.

Yummmm... mussels are one of my all time favorite dishes. I've had them all over the world and I can see why Antonia took the prize with this particular recipe! (Even though I was kinda rooting for Fabio.) The dish pairs well with a crisp and dry Pinot Grigio, Albarino or Savingnon Blanc.

Friday, January 14, 2011

Pan Seared Salmon with Roasted Ratatouille

I might need to change the name of my blog to "Deliberately Roasted Vegetables" here soon seeing as it seems that's all I write about lately... but I'm not bored with them yet so I hope you're no either. It seems everyone is in "healthy eating" mode with the start of the New Year and this is a satisfying way to work in some heart healthy protein and a whole bunch of veggies. I promise you won't miss the carbs but a big slice of whole grain garlic toast rubbed with garlic and sprinkled with olive oil would fix you right up if you did. Roasted Ratatouille: (serves 4) 1 small/medium sized eggplant- sliced and cut into 3/4 inch pieces 2 medium sized zucchini squashes- cut into 3/4 inch pieces 1 cup of grape or cherry tomatoes- whole 1 bulb of fresh fennel- halved lengthwise and sliced into half inch slices 4 large cloves of garlic- thinly sliced 3-4 tablespoons of olive oil 1 1/2 teaspoons of balsamic vinegar 8 sprigs of fresh thyme- leaves removed from stems 6 large leaves of fresh basil- sliced thinly 1 tablespoon of the fennel fronds- roughly chopped 1 generous teaspoon of kosher salt and some black pepper Preheat the oven to 400 degrees. Place two large baking/cookie sheets in the oven. Meanwhile, toss the eggplant, zucchini and fennel in a bowl with the olive oil, thyme, salt and pepper. NOTE: I actually did the eggplant in a separate bowl so that it wouldn't hog the olive oil from the other veggies. Remove the cookie sheets from the oven and spray lightly with Pam before spreading the veggies out. I put the eggplant on one and the zucchini and fennel on the other. The hot pan ensures that you get a nice brown crust and reduces the cooking time slightly. I think you need two pans to give the vegetables plenty of room to caramelize nicely. Next, toss the tomatoes in one of the bowls with a drizzle of oil and the sliced garlic. After 15 minutes I removed the pans from the oven and stirred/flipped the vegetables and added the tomatoes and garlic to the pan with the zucchini and fennel. I cooked it for another 10-15 minutes until the zucchini was tender and the tomatoes had softened. A benefit to cooking the eggplant on its own pan is to ensure it doesn't sop up the juices of the other vegetables and become soggy. Once the vegetables had all cooked through, I tossed them in a large bowl with the balsamic, basil and fennel fronds. (I gave the tomatoes a little squish on the baking sheet first to break the skins, creating a "sauce" for the mixture. I also picked out a few of the skins that had come loose.)
I let the veggies hang out while I seared the salmon. I sprinkled the skinless filets with salt and pepper and then seared them in a skillet - with a drizzle of olive oil- over medium high heat for 3-4 minutes per side until toasty and barely cooked through. They will continue to cook once you take them off the heat so air on the medium rare side to avoid it getting tough.
I served the salmon over/beside a heaping scoop of the ratatouille e voila! A snap to throw together on a weeknight or something worthy of a great bottle of pinot noir to share with company.

Sunday, December 12, 2010

Roasted Shrimp with Feta

First let me say that I'm oh so happy with Ina Garten's newest cookbook "Barefoot Contessa: How Easy is That?" My friend Liz preordered it for me for my birthday and it was a fantastic surprise. I didn't even know she had a new one coming! This is the first recipe that I've tried and we're definitely off to a great start! I tweaked it a little bit based on the ingredients I had on hand but it was still fantastic. Roasted or baked shrimp with feta and tomatoes is a classic Greek dish that I've had out a few times out in restaurants- this was my first attempt at home. Cooks Illustrated also published an article this summer featuring a few iterations of the recipe. Its great served with rice or quinoa as I did in this case or as an appetizer served over grilled bread. Ingredients: 1 and 1/2 cups medium-diced fennel 1 tablespoon minced garlic 1/4 cup dry white wine 1 (14 1/2 ounce) can diced tomatoes 2 teaspoons tomato paste 1 teaspoon dried oregano 1 tablespoon Pernot (or Oozo if you want to be more traditional, I skipped it all together) 1 teaspoon kosher salt (I used a bit less seeing as the feta is quite salty) 1/2 teaspoon ground black pepper 1 pound of shrimp (16-20 per pound), peeled and deveined 5 ounces of good feta cheese, coarsely crumbled 1 cup fresh breadcrumbs (I used 2/3 cup panko instead) 3 tablespoons minced fresh parsley (I used 2 tablespoons of the fennel fronds instead) 1 teaspoon grated lemon zest 2 lemons Preheat the oven to 400 degree. I used a 12 inch heavy bottomed All Clad skillet. Ina recommends something oven proof so that you can do your saute and your roast in the same pan. Cook the fennel in a bit of olive oil over medium-low heat until tender- 8 to 10 minutes. Then add the garlic and cook one minute more. Next add the white wine and scrape all of the brown bits from the bottom of the pan as you stir it in. Cook it until most of the liquid has evaporated (2 minutes). Lastly add the tomatoes with the juices, tomato paste, oregano, salt and pepper to the skillet and simmer over medium low for 10-15 minutes to marry all of the flavors together- the liquid cooks down a bit. I added a splash of white wine to ensure we had lots of juices. Meanwhile, you make a breadcrumb topping. I used panko and I didn't have as much as Ina called for but it turned out to be plenty (and deliciously crunchy.) Toss the panko, the parsley (or fennel fronds-the green dill looking tops of the fennel), and the lemon zest in a bowl with a tablespoon of olive oil. When the sauce is done, lay the shrimp over the top and then sprinkle with the crumb mixture. Roast in the oven for 14-15 minutes or until the shrimp are just cooked through. Now how easy is that?? =) Squeeze lots of fresh lemon juice over the top (I used the juice of one whole lemon) and serve the shrimp over something that will soak up the juices, I used quinoa. I cook it per the package instructions using a blend of water and chicken stock (ratio 1/3 water to 2/3 chicken stock.)
One pound of shrimp wouldn't normally feed four but we easily made two meals of this- with a large arugula salad on the side, dressed with a balsamic vinaigrette.
Also, we paired a Veramonte Savignon Blanc with the meal and I think it was perfect. Very light and crispy- picking up the citrus notes and complimenting the zing of the feta. Food and Wine magazine featured it as one of the "best value" wines in the October wine issue this year. You can typically find it for $9 or so and its really fantastic. I like the screw cap too...
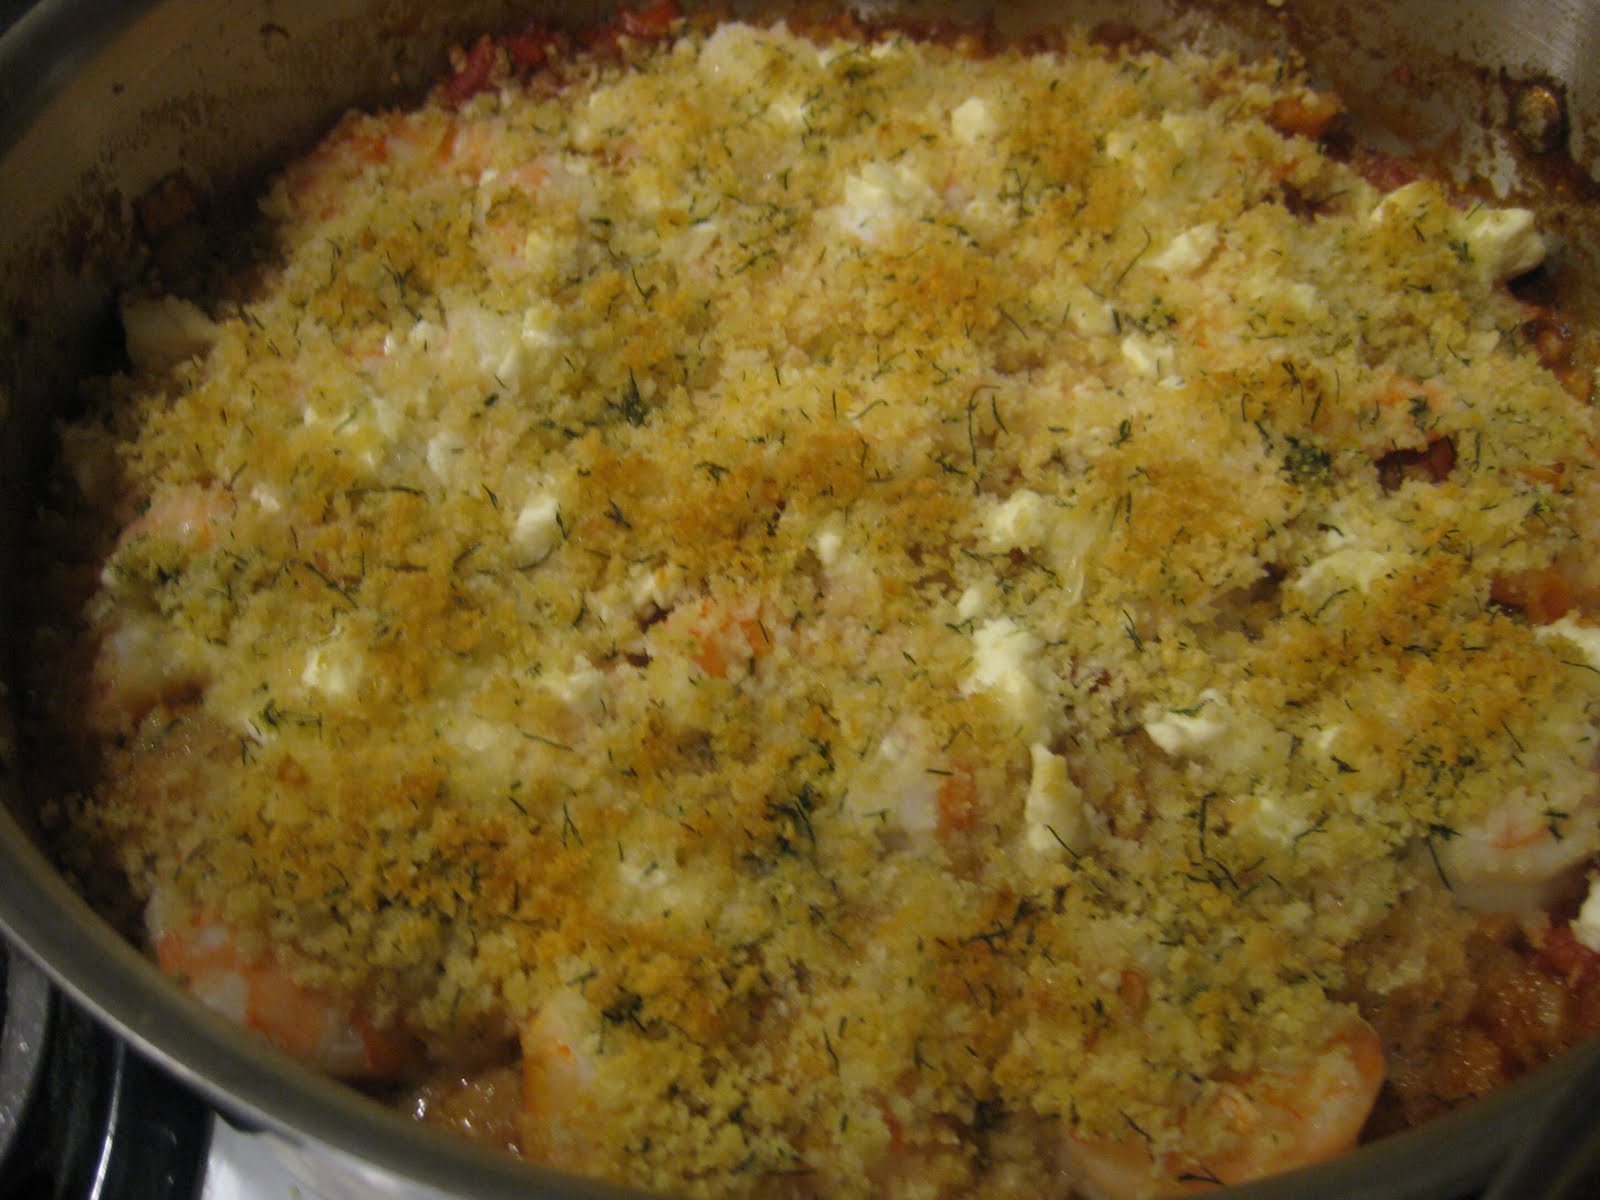
Thank you, Ina for another delicious addition to the repertoire- this one will definitely be a staple.

Friday, July 2, 2010

Oven Roasted Halibut with Carrots and Beets

Halibut is one of my very favorite fishes. I've been working to find the very best cooking preparation. I would venture to say its not quite as forgiving as something like Salmon. If you over cook it or cook it unevenly the texture changes dramatically to tough and almost fibrous. Fortunately, this last dish came out very very well. (If I do say so myself...) I found beautiful Halibut fillets (1 and 1/2 inches thick) at Whole Foods- I purchased approx 1/2 or 2/3 of a pound for the two of us. Seeing as I was spending $17/lb on the fish for a weeknight dinner, I made a simply medley of roasted root vegetables on the side. It is very inexpensive but still delicious. I chose baby carrots, red beets and vidalia onion. I LOVE beets and red ones give the roasted vegetables a beautiful ruby red color. Preheat oven to 425 degrees. Roasted Carrots and Beets: 1 generous cup of carrots (if baby carrots, cut in half- if larger, cut into 1/2 inch pieces) 3 medium/large red beets (peeled and diced into 1/2 inch pieces) 1 small vidalia onion (diced into 1/2 inch pieces) While its a little putsy to cut the veggies into smaller pieces, you make up the time while cooking. Cutting them roughly the same size also ensures everything cooks evenly which is important. I would also recommend wearing plastic gloves to peel and dice the beets as the red does stain your hands a bit. If you don't have them, I sometimes use a paper towel to hold the beets. I actually set the beets aside in a separate bowl from the carrots and onions to avoid everything turning immediately red. I made a quick dressing for the veggies: 1/4 cup olive oil 2 tablespoons of balsamic vinegar the juice of half an orange 1 tablespoon of honey 1/2 teaspoon of dried thyme 1 teaspoon kosher salt 1/2 teaspoon pepper I mixed it together in a liquid measuring cup and then poured 2/3 of the mixture over the carrots and onions in one bowl, tossing everything to coat with the dressing. I then tossed the beets with most of the remaining dressing (save just a tiny bit) before transferring everything to a large baking sheet sprayed lightly with Pam. Into the oven they go for 20 minutes. In the meantime I rubbed the halibut fillets with the last drops of the dressing and seasoned with kosher salt and pepper. I set them out at room temperature while the vegetables were roasting so that they would cook evenly through. At the 20 minute mark, I first shuffled the vegetables about the baking sheet with a spatula and then pushed them toward the sides to make a small space in the middle of the pan for the halibut. I placed the filets on the baking sheet (you get a nice sizzle seeing as the pan is already hot from the oven) and roasted everything together for another 10-12 minutes until the fish was perfectly tender. The fish should be barely firm to the touch and will flake easily when pierced with a fork. You can test a corner to be sure its just right. Yummm..... The dish was surprisingly light yet roasting the vegetables lends a heartiness to the meal.
I actually forgot to serve it with dinner but I enjoyed the left over roasted vegetables for lunch the following day with crumbled goat cheese over the top. Its an absolutely fantastic combo.

Friday, June 25, 2010

Grilled Thai Salmon and Vegetables with Coconut Rice

My Mom found this recipe in Bon Appetite magazine years ago and its been a favorite ever since. This was Dad's request for Father's Day dinner (we did actually have a meal before we enjoyed the Coconut Cream Pie).
My earlier Father's Day Pie post was a little long winded so I'll keep this one short and sweet. I'll let you refer to the recipe at Epicurious.com for the specifics. I found some beautiful Wild King Salmon at Fresh Market and had them cut into four pieces, approx 1/3 pound each. You make a spice rub and coat the salmon on all sides. (Mom removed the salmon skin to allow for more spice-coated surface.) We coated them and then set back in the fridge until we were ready to grill. The salmon is grilled no more than 3-4 minutes per side for medium. (You could pan sear it also.)
Meanwhile you prepare a mixture of vegetables, we used two bell peppers (sliced into strips), some cremini mushrooms (half a package), and one bunch of green onions sliced into one inch pieces on a bias. The vegetables are sauteed in sesame oil with ginger and garlic. We didn't have any Bok Choy handy but I absolutely love it and would definitely add it next time.
The Coconut Rice is AMAZING. Most think of Rice as a backdrop on the plate but it really adds great flavor to this dish. You can't have a Thai meal without an element of coconut milk. (I think Mom omits the oil.)
Lastly but most important, is the dressing/sauce served over top the dish. It is a heavenly yet simple combination of sesame oil, soy, rice vinegar, ginger, sugar and cilantro. (Mom doubles the cilantro.) You spoon this over the vegetables and the fish just before serving. Be sure to bring extra to the table.
The preparation is relatively quick yet the interesting flavors and the beautiful presentation makes for a great entertaining menu. I was so glad Dad suggested it because it's been years since I'd made it. It was the perfect refresher course preparing it with Mom this time. This might be a summer staple at the Lacy house this year.
With dinner we sampled two different white wines. It was opressively hot and humid last weekend. I would have loved a Pinot Noir with this dish however a cool, crisp white sounded most refreshing. We started with a Francis Coppola Diamond Pinot Grigio (a relatively new addition to the Coppola collection from Monterey) which was delicious though very very light. We also tried the Simi Savignon Blanc from Sonoma which I felt stood up a bit better to the food with stronger fruit flavors and a bit more acidity.

Tuesday, June 1, 2010

Orzo Pasta Salad with Roasted Shrimp

As most of you know, John and I are in the process of moving from Charleston, SC to Lexington, KY. We closed on the sale of our home here last week and we are enjoying a much needed week of vacation at the beach (Isle of Palms) with my family before we close on our new home on Friday. If you've ever moved, let alone orchestrated the sale and purchase of a home at the same time, surely you can understand the lack of blog posts as of late. As we get settled in next week, I assure you the pace will pick right back up! Two weeks ago now a group of us hosted a baby shower for our friend Luci. I volunteered to plan the menu for the Saturday brunch (approx 20 guests.) As much as I love to cook, when you're hosting, its important that you avoid putting in so much work on the front end of the event that you're frazzled by the time you get there. I'm a proponent of supplementing store bought or catered fare with a few fantastic homemade items to keep it manageable. I decided on the following:
Local Caterer:
Bite-sized Ham Biscuits
Assorted Tea Sandwiches (pimento cheese, chicken salad, and open faced cucumber and cream cheese)
Fruit Tray with Lemon Cream Dipping Sauce
Homemade:
Cheese Wafers
Tomato Pie
Orzo Pasta Salad with Roasted Shrimp
I was able to prepare all three items the day before the shower which was key. The pies were re-warmed just before serving (I'll save this recipe for another day soon) and the salad tasted even better the next day. I watched Ina Garten make this salad (recipe found here) years ago and I'd always wanted to try it. I made a larger portion (approx 1.5 times the recipe) to accommodate a group of 20 women as a side dish for the luncheon- however we had lots of left overs.
Orzo Pasta Salad with Roasted Shrimp adapted from Ina Garten, Barefoot Contessa
1 and a half packages of Orzo Pasta
Medium/Large Shrimp (3 lbs peeled and de-veined)
Juice of 4-5 lemons (approx 3/4 cup juice)
A generous 2/3 cup good Olive Oil
1 bunch of Scallions- green and white parts, chopped
1 and a half Hothouse/English Cucumber- peeled and diced into cubes (not quite one inch)
One half of a medium/large Red Onion- diced
1 pound (generous) good quality Feta cheese- diced into cubes
1 cup chopped fresh Dill
3/4 cup chopped fresh Mint
Preheat oven to 400 degrees. Cook the orzo pasta per package instructions. I always cut one minute from the cook time for al dente. While the pasta cooks, whisk together the lemon juice, olive oil, 2 teaspoons of salt and 1 teaspoon of black pepper in the bottom of a large bowl. Drain the pasta well and then toss with the dressing in the bowl. Dressing the pasta while its warm allows the pasta to soak up the flavors and it keeps the pasta from clumping together as it cools.
Toss the shrimp with a generous drizzle of olive oil, 1 teaspoon kosher salt and black pepper directly on a large baking sheet. I actually moved half of the shrimp to a second baking sheet to ensure that I could spread them out well. I've found that you get the best caramelization if they aren't touching each other on the pan. Roast the shrimp in the oven for 5-6 minutes or until they are slightly firm to the touch. (I had one pan on the top rack and the other on the bottom rack in the oven so I switched them half way through the cook time.)
While the shrimp cool on the baking sheets (20 minutes or so), chop/dice/cube the remaining ingredients and toss into the bowl with the orzo. Finally add the shrimp and gently toss everything together. I transferred the salad to an extra large tupperware container and refrigerated overnight. I kept it refrigerated up until just before the guests were to arrive to ensure it was still cool and the shrimp stayed fresh.
It was a lovely Spring/Summer dish and it comes together fairly quickly. It would be a delicious for a picnic lunch all by itself or as an impressive side dish for a cook out. I think it worked perfectly with the menu. It dressed things up a bit from the standard tea or luncheon fare while saving all of the oogling for the mom-to-be and the darling baby clothes and gifts. For dessert we had an adorable AND delicious cake (topped with two little baby shoes made of fondant)courtesy of a friend of a friend and to sip on we had Prosecco and Pellegrino with assorted juices to mix in (orange, cramberry, etc). All in all I think it was a great event!

Tuesday, April 20, 2010

Grouper Puttanesca

If you're familiar with pasta puttanesca, you know that it has a briny, savory sauce made of tomatoes, olives, capers, onions and such. Many years ago I saw Giada De Laurentiis make a fish dish with a similar combination of cooked vegetables. I can't seem to find her recipe anywhere but I've adapted it a few times into my own since- it comes out a bit differently each time. I found some beautiful, wild-caught grouper at Whole Foods. I purchased a whole filet, approx one inch thick - weighing not quite 1.5 pounds and cut it into three pieces. (My brother in-law Nate was joining us for dinner.) I drizzled it very lightly with olive oil, seasoned it with kosher salt and pepper and placed in a glass baking dish sprayed with Pam.

Meanwhile I prepared a tomato-based vegetable concoction to serve with the fish: 1 medium yellow onion- thinly sliced 1 medium fennel bulb- top removed and thinly sliced 1 teaspoon of honey 4 cloves of garlic- minced 1/2 teaspoon dried thyme 1/2 cup white wine zest and juice of half a lemon 1 large can of petite diced tomatoes- with the juice 1 tablespoon of capers- drained 1/4 cup of pitted calamata olives- barely chopped 1-2 tablespoons of fennel frawns (the top of the fennel, looks like dill) - chopped I started with some olive oil in large saute pan over medium high heat. I cooked the onion, fennel and honey for 8-10 minutes or until tender and beginning to caramelize. I then added a pinch of kosher salt, some black pepper, the garlic and thyme and cooked 1-2 mins more.

In the meantime, I broiled the grouper in the oven for approximately 8-10 minutes until golden brown on the top and barely firm to the touch. (Its better to slightly under cook it because it continues to cook for a minute or two in the tomato mixture before serving.) Next I deglazed the onion and fennel pan with the white wine, zest and lemon juice and cooked for 2-3 minutes until the liquid had mostly evaporated. I lowered the heat to medium-low and added the can of tomatoes (not quite the whole thing, about 3/4 of the can) and cooked for 15-20 minutes or so, stirring frequently, until most of the liquid had evaporated. At the very end, I added the capers, olives, and chopped fennel frawns-mixing gently- turning the heat down to a low/simmer. While the sauce was simmering, I quickly sauteed some french green beans in a saucepan with some minced garlic (1-2 cloves), olive oil, salt and pepper- covering with a lid for a few minutes- using the steam to cook them through.
Just before serving I tucked the fish filets into the vegetable mixture, covering them completely to let the sauce flavor the fish. I then plated the fish with a generous heap of the mixture on top. (Though it actually might make for a nicer presentation if you served this in a shallow bowl- setting the fish filet on top of a bed of the veggies. I'll try that next time.)
The sauce would be delicious served over pasta, chicken, just about anything- though it really goes perfectly with a flaky white fish. It packs a ton of flavor into VERY little fat and calories too. The green beans were very tasty with this however a simple green salad would work too.
Nate and I sipped a glass of Shoo Fly Buzz Cut white wine featured in a recent post and it was very nice with the meal. John had a light French Pinot Noir that worked well too. I think you could go either way, playing off either the white fish or the tangy tomato sauce.

Wednesday, March 10, 2010

Chipotle Shrimp Tacos with Apple-Cucumber Salsa

I'm finally recovering fromthe shock of losing Gourmet magazine this year and I've really warmed to my monthly edition of Food and Wine magazine. (I'm getting Bon Appetit as well, in place of Gourmet, which is also great.) I find that the articles are extremely interesting and well written- I actually end up reading it cover to cover instead of just skimming through to the recipes. The March issue featured tons of healthy ethnic dishes which all look delicious. Everyone is trying to shed a few winter pounds right about now and as the weather warms, lighter, fresher foods are working their way back into the meal rotation. I particularly loved the "Mexican Favorites Made Healthy" section this month. I immediately dog-eared the Chipotle Rubbed Salmon Tacos with Apple-Cucumber Salsa recipe. When it came time to give it a try however, the salmon didn't look fantastic at the store so we successfully substituted shrimp instead. I made a few changes to the recipe and it made two generous servings (4 tacos). Shrimp Taco Ingredients: 3/4 pound medium-large shrimp (peeled and deveined) 1 1/2 tsp chipotle chili powder 1 tsp orange zest 1 1/2 tsp sugar 1 hass avocado (mashed just before serving) 4 taco-size flour tortillas (not the tiny fajita size, not the burrito size, somewhere in between) 2 tablespoons sour cream juice of half a lime Apple-Cucumber Salsa: 1/2 granny smith apple (diced) 1/4 of an English cucumber (diced) 2 green onions, green and white parts (thinly sliced) 1/3 of a yellow bell pepper (diced) 1 tablespoon white wine vinegar 3/4 tsp sugar one tablespoon chopped fresh cilantro Preheat the oven to 400 degrees. After cleaning the shrimp, I tossed them with a drizzle of olive oil and a mixture of the chipotle chili powder, sugar, and orange zest. The sugar is there to balance out some heat and the orange zest really stood out to me while I was eating as another layer of flavor. I then placed them in a baking dish and set aside while I prepared the salsa. You simply dice the fruit/veggies, dress with the vinegar, sugar, cilantro (omit if you're not a fan) and toss it all together in a bowl. You might be skeptical about the cucumber and apple combination but I agree with Deborah Schneider, the recipe's author, that the crunch factor is absolutely excellent and the flavors work really well to cool your mouth down from the heat of the chipotle. The shrimp roast quickly (6-8 minutes) in the oven. (I decided to roast the shrimp versus cook them in a skillet on the stove because I wanted to avoid any "seafood" smells while we are showing our house. Perhaps I'm a bit paranoid but better safe than to repel a potential buyer with potent food smells of any kind.) I wrapped the tortillas in tin foil and placed them in the oven to warm at the same time. Meanwhile, I mixed the sour cream and lime juice in a small bowl to make a tangy crema for drizzling over the tacos as well. The shrimp are finished when they are no longer translucent and somewhat firm to the touch- careful not to over do it or they become rubbery. I quickly mashed the avocado in a small bowl and then shmeared it inside each of the four tortillas. I then divided the shrimp amongst the four tacos and topped them generously with the salsa mixture- lastly drizzling with the lime crema.
As I mentioned, the chipolte definitely kicks in some serious heat but the cool crunchy salsa and the sour cream work nicely to balance it out. The recipe called also for some shredded cabbage which would have been a nice touch-but I accidentally left it off of the grocery list. Definitely a great recipe as the weather gets warmer! I'm excited to try them with the salmon next time too.

Thursday, February 18, 2010

Crab Cake Salad with Roasted Sweet Potatoes

I made a warm crab and artichoke dip to take over to Stuart and Lee's house for Valentine's day on Sunday night, so Monday night, I made another special belated Valentine's Day dinner for John with the remaining half pound of lump crab meat. I posted my family's infamous crab cake recipe last year however this time I stepped out of the box a little bit with a few extra ingredients. We had a DECADENT weekend of eating so I was thinking that a salad for dinner seemed appropriate (even though this was definitely more exciting than your average dinner salad.) I started the roasted sweet potatoes first knowing they'd take 30-40 minutes to cook at 425 degrees. I peeled and cubed two potatoes into a bowl. Over the top I added: 2-3 tablespoons olive oil 1 tablespoon balsamic vinegar 1 tsp honey 1/2 tsp kosher salt 1/4 tsp cracked black pepper I tossed it all together and poured onto a baking sheet coated with cooking spray to keep them from sticking. They went into the 425 degree oven, timer set for 20 minutes. 20 minutes in, I flipped them over with a spatula and then they went back in for another 15 or so until tender and golden brown. While the potatoes were toasting, I assembled the crab cakes: 1/2 lb lump crab meat (gently pick through for bits of shell) 1 teaspoon of mayonnaise 1/2 tsp dijon mustard juice of half a lemon 1/2 tsp old bay seasoning dash of Texas Pete 1 egg white 1/4 cup panko bread crumbs (more for coating) 1/3 of a red bell pepper, finely diced 1/2 shallot, finely diced 1 tsp capers, drained cracked black pepper pinch of kosher salt I whisked together the mayo through egg white in the bottom of a bowl. I then added the crab meat and let it marinate a few minutes while I quickly sauteed the bell pepper and shallot in a skillet with a drizzle of olive oil. (Over medium heat for 3 or 4 mins, until tender.) I let them cool a minute and then tossed into the bowl with the rest of the mixture- lastly adding the capers and panko crumbs. I tossed it all together VERY GENTLY to avoid breaking apart the crab. I divided the mixture into four cakes, patted them together and then coated in some additional panko crumbs to hold them together. (NOTE: At first it may seem that they don't want to bind together but the extra panko coating really helps them hold the shape.)
I browned the cakes in a little bit of olive oil and butter in a non stick skillet over medium heat for about 4-5 minutes per side. (Mine got a little browner than I would have liked this time.) You want a golden brown outside and for them to be heated all the way through the inside.
Lemony Dijon Vinaigrette to drizzle over the top of the salad:
Juice of half a lemon
1 tablespoon white wine vinegar
1 tsp (not quite) dijon mustard
small squeeze of honey
2 tablespoons olive oil
salt and pepper
Whisk together well until emulsified (oil no longer separates to the top).
Though everything was finished cooking at approximately the same time, I served the salad closer to room temperature. I arranged a generous pile of mixed baby greens and arugula on the plate. (I first tossed the greens with about half the vinaigrette in a bowl.) I placed two crab cakes on top and a few little piles of the roasted potatoes around the outside. I drizzled the remaining vinaigrette over the top to be sure the crab cakes and potatoes had a little extra zing too.
I really enjoyed the sweet potatoes, mixing a little bit of winter in with what might have otherwise felt like a summery dish. And in keeping with the almost-healthy-with-a-hint-of-decadence theme, my sweet hubby brought me some Valentine's Day Chocolate covered strawberries from GODIVA for dessert!