Showing posts with label Summer. Show all posts

Wednesday, July 18, 2012

Lemon Blueberry Scones

Another great breakfast, brunch or snack recipe to share...  This was my very first scone baking experience and I must say they are surprisingly simple, fast, and delicious.  Scones are essentially lightly sweetened biscuits as far as how they are made.  You can jazz them up with your favorite flavors or mix-ins.  I particularly loved the tangy-sweet lemon glaze on these.  This is a Tyler Florence Recipe courtesy of footv.com. 
Makes somewhere between 10 and 24 scones depending on your shape/size preference

Scones:

2 cups flour (I used white-wheat)
1 tablespoon baking powder
1/2 teaspoon salt
2 tablespoons sugar
5 tablespoons unsalted butter, COLD, cut into small chunks
1 cup fresh blueberries
1 cup heavy cream, plus more for brushing the scones

Preheat oven to 400 degrees.  Combine dry ingredients in a bowl.  Add the cubed butter and work into the flour mixture using a pastry cutter or two forks.  A pastry cutter makes this super easy- I highly reccomend you pick one up at Walmart for $3 if you don't have one.


Once the butter has been cut up into tiny pieces and incorporated- you're done.  The mixture should resemble course sand.  Next gently fold in the blueberries with a spoon- taking care not to mash them up much or you'll have purple scones. 

Lastly- make a well in the center and add the heavy cream.  Stir gently to combine.  Turn the dough out onto a clean countertop or cutting board dusted with flour and form the dough into a rectangle about 1 inch thick x 2-3 inches wide. 


At this point you can use a dough scraper or large knife to cut the scone into any shape you like.  I made 3 x 3 inch squares and then cut them in half at a diagonal to make mini triangles.  This is a bit tricky and I found I ended up slicing through the blueberries but as long as you use a large, sharp knife, its not too messy.

Note: You want to work fairly quickly- don't overhandle the dough. The key to super flaky scones is making sure the butter is still cold when they hit the oven.

Place the scones on an ungreased cookie sheet and brush the tops with more heavy cream.  If you want to forego the glaze- a healthy dusting of raw or turninado sugar over the top would be a great alternative.

Bake the scones for 15-20 minues until lightly golden brown.  Meanwhile, you can prepare the glaze.


Lemon Glaze:
1/2 cup freshly squeezed lemon juice
2 cups confectioners' sugar, sifted
1 tablespoon unsalted butter
1 lemon, zest finely grated

I did the glaze in the microwave but a double boiler works too.. Combine the all ingredients in a glass bowl and stir to combine.  Microwave for 30 seconds- then whisk again until smooth.  The glaze will thicken as it sits.  I have found that the thicker it is when you coat the scones- the better.  It should almost be difficult to spread over the top so it barely slides over the edges to coat the scone.  If its too thin- you'll lose most of it as it drains right off the sides.
 
Let the scones cool completely - at least 20-30 minutes - before glazing.  I set them on a cooling rack over a foil lined baking sheet to catch the run off glaze.  Yon can either dunk the tops right into the glaze or spoon the glaze over the scones- whichever you prefer. 


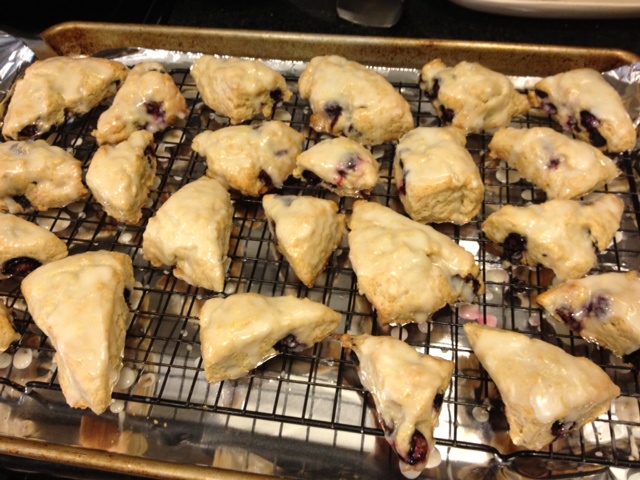
Let the scones set for 45 minutes or so for the glaze to harden.  I think these are best served the day of while the edges are still crisp and the insides light and fluffy.  Placing them in an airtight container caused them to soften a bit under the glaze.
 
These would be delicous with any fresh summer berry or substitute dried fruit year round.  Spice them up with cinnamon, nuts or even chocolate chips.
 

Sunday, June 3, 2012

Scallops and Tomatoes with Lemon Herb Butter Sauce

SIMPLE, summer-y and delicious, this impressive scallop dish was the first course of our five year Anniversary dinner at home this year.  The real celebration was a week on the beach in Charleston with family- where we were married- the week prior but we were home Sunday evening May 20th for our actual anniversary.  We enjoyed a toast of our favorite champagne and made dinner together, it was perfect...

Serves 2

6-8 large sea scallops
1 cup assorted cherry/grape/colorful tomatoes, halved or quartered
1 small shallot, minced
1/3 cup white wine
juice and zest of 1large lemon- meyer if you can get it
2 tablespoons of butter
2 teaspoons chopped fresh herbs (dill, thyme, parsley, chives, etc.)
2 generous handfuls of baby arugula

Heat a generous drizzle of olive oil in a skillet over medium-high heat.  Sear the scallops until golden brown, roughly 2 minutes per side.  Do not disturb the scallops once you place them in the pan.  Moving them around prevents the caramelizing sugar from forming the golden crust on the scallops.

Cut one scallop in half to ensure they are cooked though (should not be translucent in the center).  When done- remove the scallops from the pan and set aside.

Wipe the skillet clean with a paper towel and add another small drizzle of olive oil and the shallots.  Cook over medium-high heat until tender but not yet brown- 2 minutes.  Add the white wine.  Zest the lemon into the pan and squeeze most but not all of the juice in as well.  Save a squeeze or so of lemon juice to dress the greens. 

Cook the sauce for 1 minute until reduced a bit and then add the tomatoes- cooking another 2 minutes longer.  Remove from the heat and add the butter, herbs, a pinch of salt and some black pepper- swirling the pan to melt the butter into the sauce.

Toss the arugula in a separate bowl with a drizzle of olive oil, the remaining meyer lemon juice, salt and pepper. 

Plate the scallops next to the greens- spoon the tomatoes and sauce over top of the scallops.  Serve warm (doesn't have to be piping hot) with a crisp white wine or champagne.


Looks even better on our beautiful wedding china!

Tuesday, August 23, 2011

Garlic and Herb Roasted Chicken and Summer Vegetables

I am a sucker for roasted chicken, I'll admit.  In my opinion it is one of the most delicious, timeless and versatile dishes there is.  Roasting a whole chicken is ideal for a family or if you're looking for left overs to make into soup. I've found when cooking for two on a weeknight, I often scale back to roasting just the chicken breast pieces.  This ultra moist and flavorful method of rubbing softened butter studded with fresh garlic and herbs under the skin gives this roasted chicken a little something extra special (and decadent.)  Added bonus: the price of chicken on the bone is significantly less than the boring boneless, skinless variety.  Ironically they don't charge a premium for the added flavor (or calories).


Serves 3-4 (in our case 2 for dinner and left overs for lunch the next day)

3 split chicken breasts on the bone, with skin
3 tablespoons of softened/room temperature butter
2 garlic cloves, minced
1/2 teaspoon of fresh rosemary, chopped
1/2 teaspoon of fresh thyme, (I like lemon thyme) chopped
zest of one lemon
1 teaspoon of kosher salt
fresh cracked pepper
olive oil for drizzling

Preheat oven to 350 degrees.

Line a baking sheet or roasting pan with foil for easy cleanup.  Pat the chicken dry with a papertowel and place on the pan.  Mash the butter, garlic, herbs, lemon zest and half the salt together in a small bowl. 


Using a small spatula (or your fingers), spread the herbed butter up under the skin of each chicken breast.  Drizzle the outer skin with olive oil to help it crisp and season with the remaining salt and lots of fresh cracked pepper.  Bake the chicken in the center of the oven for 35-40 minutes or until the internal temperature reaches 165 degrees.  If its not as golden brown as you like, put it under the broiler for an extra minute or two at the end.


Meanwhile, prepare your veggies of choice for roasting.  I found some beautiful baby eggplants and zucchini at the farm stand and supplemented those with red bell peppers and cherry tomatoes from my garden (well pots really) and half a red onion from the fridge.


Clean the vegetables and cut them all into a rough one inch dice.  (Keep the tomatoes to the side for now.) Toss the vegetables with some olive oil, some fresh rosemary and thyme if you have extra and some salt and pepper.  Spread on a baking sheet (lined with nonstick sprayed foil) and roast in the oven below the chicken for 25 minutes (or until tender).  Take them out after 15 minutes and toss them around so they'll brown evenly.  Add the cherry tomatoes to the pan for the last 10 minutes.  I tossed the vegetables with some fresh basil just before serving.


Let the chicken rest 10 minutes before removing it from the bone (run a knife along the bone to free the whole breast) and slicing it into pieces.  You can serve the skin or easily remove it.  It has great flavor but so does the chicken at this point as the garlic-herb butter has slowly basted it while cooking.


Serve the chicken (you'll find you don't need a whole breast for each person- slicing it before serving allows you to take just what you want) with a generous scoop of roasted vegetables and a piece of toasted french bread.   I keep a bottle of reduced balsamic syrup in the pantry to which I am currently addicted.  I like to drizzle it over the roasted vegetables here - although a splash of regular balsamic vinegar would be good too.  Simple but delicious...and even better yet with a big glass of red wine.

Monday, August 22, 2011

Peach and Blueberry Hand Pies

I recently saw a tasty looking recipe for peach hand pies in a local newspaper.  As a fan of most everything in the pie, tart, crisp and crumble family, I was very excited to try my hand at this portable version of a personal pie.   Just a warning, the recipe requires two hours total "chilling" time so plan accordingly. I promise you, the end result is very much worth the wait!


Makes 6 individual pies

Pastry Ingredients:
1 1/4 cups all purpose flour
1/4 teaspoon salt
1 stick (8 tablespoons) of unsalted butter, cut into small pieces
1/4 cup sour cream (I used plain greek yogurt instead)
2 teaspoons of lemon juice
1/4 cup ice water

Mix the flour and salt in bowl.  Place the butter cubes in a second bowl and put both bowls in the freezer for one hour.  Next mix the yogurt, lemon juice and ice water in another small bowl.  When cooled, transfer the flour and the butter from the freezer to the food processor fitted with the metal blade.  Pulse the butter and flour together until the butter is reduced to pieces so tiny you almost can't distinguish them.


Add the yogurt, lemon juice and water and pulse in quick spurts until the mixture clumps together to form a ball of dough.  Turn the dough out onto a sheet of plastic wrap and form it into a disk.  Wrap it up and refrigerate the dough for 1 solid hour.  (Don't skimp.)


In the meantime, you can prepare the filling:

2 large peaches, peeled and sliced into half inch pieces
3/4 cup fresh blueberries
2 tablespoons of flour
3 tablespoons of sugar
1/2 teaspoon of bourbon, amaretto, vanilla or lemon juice- your choice

Toss everything together gently in a bowl.  Next make a simple Cinnamon Sugar for dusting over the outside of the pies.  Mix together 3 tablespoons of sugar, 1 teaspoon of cinnamon, and 1/4 teaspoon of nutmeg.  You'll also want an egg wash to help the pies brown and the cinnamon sugar to adhere.  (Beat one egg in a small bowl with 2 tablespoons of water.)

After the dough has chilled, cut the disc in half to roll out the pie shells.  Work with one half at a time, put the second half back in the fridge.  Roll the dough out on a floured surface to 1/8 inch thickness, flipping it over every so often to ensure it doesn't stick.  You can make the pies as large or small as you like.  I used a cereal bowl as a guide to cutting out three, 5 inch circles from the first sheet of dough.  (Tracing the bowl with a paring knife.)  I was able to fit two circles with the first roll, then I rerolled the scraps to make the third circle. 

Transfer the circles to a baking sheet covered with parchment paper.  Spoon 1/4-1/3 cup of the fruit filling into the center of each circle and fold in half, using a bit of the egg wash to help the dough stick together if needed.  Crimp the edges with a fork to seal the pie.


Brush the pies with egg wash and sprinkle generously with cinnamon sugar before placing the pan back in the fridge for at least 30 minutes.  Making sure the dough is cold when it hits the oven ensures the crust stays nice and flaky.  Repeat with the second portion of dough.

Once chilled, bake the pies at 375 degrees for 20 minutes or until golden brown.  Don't be alarmed if blueberry juice oozes out a bit.  I baked three pies to a pan to ensure they had plenty of room for such oozage.  Let the pies cool for 10 minutes before removing from the pan.  Serve warm with a scoop of ice cream or whipped cream (I spiked mine with a little extra amaretto.)  They truly are best fresh out of the oven. I tried reheating them the next day and its just not the same.. If serving guests, I would recommend assembling them a few hours ahead, keeping them in the fridge, and baking them while you eat dinner.


The dough is flaky and yet still a bit chewy at the same time.  The warmth and crunch of the cinnamon crust is the perfect compliment to the perfectly sweet gooey filling. I love that the pie is served in a tidy little personal package.  I always find it hard to serve fruit pie elegantly because the filling starts to ooze out from under the top crust as soon as you cut it.  Transfer to the plate is always messy affair as well.  Hand pies are most definitely a fun twist.  I can't wait to try apple or pear hand pies as we get into fall!

Tuesday, August 16, 2011

Chiles Rellenos with Corn and Okra Succotash

I'd been oogling this recipe ever since I first saw it in Food and Wine magazine last summer.  Tim Love of Lonesome Dove restaurant in Fort Worth, TX did a tex-mex/bbq menu for the Fourth of July that looked absolutely heavenly.  John and I had some friends over for dinner last weekend and seeing as one was from Austin and one went to school in Dallas, we decided on a tex-mex theme.  I served these chiles rellenos alongside Pork Tacos al Pastor, a pitcher (or two) of strong margaritas and a Pat Green and Robert Earl Keen playlist...

Serves 6-8

10 poblano chiles
5 slices of bacon, sliced into half inch pieces
4 ears of corn, kernels cut off
1/2 medium red onion, cut into small dice
1/2 red bell pepper, cut into small dice
4 cloves of garlic, minced or grated
1/2 pound okra, sliced into 1/2 inch pieces (about 2 cups)
1 bay leaf
1/2 teaspoon chile powder
1/2 teaspoon cumin
1/2 teaspoon dried oregano
1 cup of chicken stock
2 cups of Monterey Jack cheese, shredded

I took a few short cuts from Tim Love's original recipe.  He grills the peppers first before removing the skins, seeds and and cores.  He later cooks the stuffed peppers in a cast iron pot on the grill whereas I started with raw peppers and cooked them in foil packets directly on the grill.  Frankly they came out great so I'm sticking with my method.

I made a slit from the core of of the pepper all the way down.  I then used a pairing knife to cut the inner core and seeds out.  NOTE: Poblanos are typically pretty mild but I had a few firey ones in this batch.  If you don't love heat, you'll want to cut the inner white ribs out as well to be safe.


To make the filling, I first cut the kernels off of the ears of fresh corn and set aside.  Next I started the bacon in some olive oil in a dutch oven (you want something with a lid) over medium heat.   While the bacon rendered, I cleaned and prepped the okra, onion, bell pepper, and garlic.  As soon as the bacon started to brown, I added the onion and pepper to the pot and cooked for 3-4 minutes.

Next I added the corn and okra, cooking another 4 minutes.  Lastly I added the garlic and spices, tossing everything together to cook for 1 minute before pouring in the chicken stock and seasoning with salt and pepper.

I turned the heat down to medium-low and covered the pot- letting everything cook together for another 6-7 minutes until the juices thickened into a sauce and the okra was just tender.

I made tin foil "boats" to fit about 5 peppers each. Working directly in the foil, I spooned corn filling into each pepper.  You want them full but not overflowing.  I then topped each pepper generously with cheese, tucking it down into the pepper so it wouldn't melt off while cooking.  I used a second sheet of tin foil sprayed with Pam to cover the packet.

John grilled the packets for roughly 10-15 minutes- I would guess at around 350 degrees.  You want the peppers to steam until tender and the filling and cheese to warm through and melt.  You could technically do this in the oven too but you'd lose the smoky flavor you get from the grill.

Once the peppers are done, you can keep them warm in a low oven until serving.  These would make a great vegetarian entree with some black beans, rice or avocado on the side.  Or you can serve them as a veggie and starch side-in-one as we did alongside your favorite tacos or enchilladas.  Either way, make sure you have a cold beverage and maybe some sour cream to cool you (and your mouth) down on a hot summer night.

Friday, August 5, 2011

Halibut with Tomato Jam

TGITS... Thank goodness its (finally) Tomato Season!!  There is nothing better than fresh Kentucky tomatoes in the summer.  I find I always have a few sitting on counter whether they are from my own patio plants, the vegetable stand down the road or a generous neighbor.  This quick and easy savory "jam" was the perfect summer accoutrement for a weeknight pan seared halibut this week.  It would be equally as excellent over grilled chicken, pork or beef as well.


I pan seared the halibut first* and then cooked the jam right in the same pan while the fish rested.  (I am a stickler for hot food but I don't fret as much in the summer.  Meals like this are every bit as delicious at room temperature.)

Savory Tomato Jam Ingredients:     serves two generously

1 tablespoon of olive oil
2 roma tomatoes, diced (any tomato would work, barely 1 cup diced)
1 large shallot, finely chopped
2 large garlic cloves, grated or minced
2 tablespoons of balsamic vinegar
2 sprigs of fresh thyme
1 tablespoon of fresh parsley, chopped
1 teaspoon of honey
zest of half a lemon
salt and pepper

Heat the olive oil over medium heat in non stick pan.  Saute the shallot for 1 minute before adding the garlic and fresh thyme.  Saute for 1 minute longer.  Add the tomatoes, balsamic vinegar and honey- cook for 5 minutes or until the majority of the liquid has evaporated and the tomatoes have started to break down.

Finish with the fresh parsley, lemon zest, and salt and pepper to taste. 

I generously spooned the jam over the halibut and served it with some roasted veggies (brussels sprouts, onion and golden beets)- and a small arugula salad dressed simply with lemon juice and olive oil.  

The balsamic and tomato juices reduce to create a lovely sweet flavor while the herbs and lemon zest give it an earthy freshness. It would be great as a bruschetta topping (maybe with some goat cheese) over grilled bread too!   For a quick and simple weeknight meal on the porch- I have to say it was a beautiful and more importantly delicious plate...


*To cook the halibut... I heated one tablespoon of olive oil in a non stick pan over medium high heat.  I seasoned the fish with salt and pepper and then cooked for roughly 3 minutes per side.  The filets were roughly 1 inch thick in this case.   The fish should flake easily and be just opaque in the center.  I placed the fish on a plate tented with foil which probably cooked it a bit more while I made the jam.

Wednesday, August 3, 2011

Zucchini Bread

If you've ever tried to grow zucchini or squash, you know that from time to time you find a ginormous one on the plant that managed to escape your previous attempt at a harvest.  These ones lose some of their flavor and delicate texture once they hit the 12 inch mark but they are perfect for shredding into zucchini bread.  You can do this by hand using a grater if you're looking for an upper body work out or a food processor fitted with a grater blade will do the trick in a matter of seconds.  


I found that one massive zucchini equated to roughly 4 1/2 cups shredded which was more than I needed for one recipe so I made another half recipe in a smaller loaf pan as well.


Ingredients:  makes one large loaf

2 cups of whole wheat flour (white would work too)
2 teaspoons of cinnamon
1 teaspoon of baking soda
1/4 teaspoon of baking powder
1/4 teaspoon of kosher salt
1 cup of sugar
1 cup of brown sugar
3/4 cup of vegetable oil*
3 large eggs
1 teaspoon of vanilla
3 cups of grated zucchini
1/2 cup of chopped walnuts or pecans (optional)

*The second time I made this, I did 1/2 cup low fat buttermilk and 1/4 cup vegetable oil to lighten it up and it was equally as moist and delicious.

Preheat the oven to 350 degrees.  Measure the dry ingredients (flour through salt) into a bowl and stir together with a whisk.


Beat sugar, oil, eggs and vanilla in the mixer or by hand in another large bowl.  Mix in the zucchini and then the dry ingredients.  Mix gently until just combined (Add the nuts last if you use them.)

Bake for 1 hour and 15 minutes or until a toothpick inserted into the center comes out clean.  Let cool on a wire rack for 10 minutes before turning the loaf out onto the rack to cool the rest of the way.  Once cooled completely, wrap in foil or plastic wrap until you're ready to serve.  It keeps at room temperature for a couple of days or for a few months in the freezer (air tight). 

The top gets nice and crunchy while the inside stays perfectly moist and tender.  You can't help but sample a piece while its still warm...  Even it if means showing up to your grandmother's house with a partial loaf, oops.   =)


You'll note I didn't title this recipe Whole Wheat Zucchini Bread...  That would likely give people the impression that we're dealing with dense, cardboard-like "healthy" tasting bread which is just not the case here.  The original recipe calls for white flour but I assure you the whole wheat flour gives you the nutrition boost yet still yields the tender texture.  The recipe also calls for half shredded sweet potato instead of all zucchini which would also be delicious and would pack in some additional vitamins and minerals too.

Thursday, July 28, 2011

Summer Vegetable Farro Salad

Farro is my favorite food discovery of 2011.  A dear friend of ours gave me a package of organic Italian farro months ago and it wasn't until recently that I gave it a try and it is absolutely habit forming.  From my quick research, Farro is the Italian name for this whole grain also known as spelt or dinkel commonly grown in Germany and Switzerland.  Cooked it its whole form, it has a rich toasty flavor and a wonderfully hearty texture.  You can serve it warm as a starch it would be delicious in soups, and most recently I've enjoyed it at room temperature as a salad with any combination of veggies or seasonings.

Serves 6 as a side

1 and 1/2 cups of dried Farro*
1 small zucchini, diced
1/2 of a red onion, diced
1/2 of a large yellow bell pepper, diced
2 cloves of garlic, grated or minced
1 medium tomato, diced (I give it a gentle squeeze to remove some of the seeds and juice before dicing)
1 teaspoon of fresh thyme, chopped
1 tablespoon of fresh parsley, chopped
2 tablespoons of fresh basil, sliced thinly
zest of one lemon
2-3 tablespoons of balsamic vinegar
2-3 tablespoons of olive oil
crumbled feta or goat cheese as a garnish

*Refer to the package instruction but it will likely suggest that you soak the grain in water for a minimum of 8 hours before cooking it.  I put it in a bowl with water after breakfast and just let it sit out on the counter until its time to make dinner...

When you are ready to cook the farro, drain it well and transfer it to a sauce pan with 3 cups of fresh water and a hefty pinch of salt.  (You could cook it in stock for more flavor.)  Bring to a boil over high heat.  Then cover the pan and reduce the heat to low, and let it simmer for 30 minutes or until tender.  (Again check your package instructions and follow those if they are different.)  Don't worry if at the end of 30 minutes the water isn't completely absorbed or evaporated just drain the farro in a colander when its tender.  It should still have some texture but no crunch.


While the farro is cooking, saute the zucchini, pepper, and onion in a skillet over medium high heat with a drizzle of olive oil for 3 minutes or until barely soft.  I like the veggies to maintain a little bit of their crunch.  Add salt, pepper, the garlic and fresh thyme and cook one more minute.  Remove the veggies from the heat and let them cool.

Transfer the drained farro, the sauteed veggies, the tomato and fresh herbs to a mixing bowl.  Lastly season with the lemon zest, balsamic vinegar, olive oil and some salt and pepper before tossing it all together.  Taste and it add more of the seasonings if you like.


The salad is a great side dish for grilling or stands alone as a perfectly light but hearty lunch topped with some feta or goat cheese crumbles. It keeps well for a number of days in the fridge.  I tell you its a delicious (and healthy) alternative to a boring cous cous or pasta salad any day .  Give it a try!

Thursday, June 30, 2011

Chocolate Health Bar Trifle

With the Fourth of July weekend only a few days away, I have a great cookout dessert recipe to share.  I actually made this for our Memorial Day BBQ and it was a hit.  If you don't have a trifle bowl yet, I suggest you add it to your wish list.  Trifles (layered pudding like desserts) are super simple to put together but the presentation is elegant.  This recipe serve 10-12 people and can be made the day before which makes it perfect for entertaining.

Ingredients:

1 store bought chocolate angel food cake, cut into one inch cubes
1 recipe of chocolate custard* (or one box prepared chocolate pudding)
2 cups of heavy whipping cream
3 tablespoons of powdered sugar
2 tablespoons of Kahlua
3 Heath Bars- coarsely chopped

*Chocolate Custard:

3/4 cups sugar
1 tablespoons of flour
1 tablespoons of cornstarch
3 tablespoons of cocoa powder
1/4 teaspoon of salt
1 1/2 cups 2% or whole milk
2 eggs
1 teaspoon of vanilla
1 tablespoon of butter

Combine the dry ingredients in a sauce pan.  Whisk in the milk and eggs.  Cook the mixture over medium, stirring constantly, until gently bubbling and thick.  (4-5 minutes).  Remove from heat and stir in the vanilla and butter.  Transfer to a glass bowl, cover with plastic wrap (touching the top of the custard), and refrigerate until cool.  At least one hour, up to overnight.

Prepare the custard or the instant pudding.  Whip the cream with the powdered sugar and Kahlua. 


Cube the angel food cake and chop the Heath Bars.  Now you are ready to assemble..


Start with a layer of cubed cake in the bottom of the trifle dish or a large glass bowl.  Next spoon a layer of chocolate custard or pudding (about a third of it) over the cake, following by a layer of Kahlua whipped cream and a layer of chopped candy bar.  Repeat 3-4 times until you've used up all the ingredients.  You want to end with whipped cream and chopped Heath bar.


Cover with plastic wrap and refrigerate until ready to serve.  It is best if you let it sit at least 3-4 hours.  The cake soaks up some of the custard and cream. 

A few other yummy trifle ideas:

Angel Food Cake with Lemon Curd, whipped cream, fresh Strawberries, Blueberries and Raspberries
Almond Pound Cake with Grand Marnier whipped cream, sweetened mascarpone cheese and macerated strawberries
Chocolate Angel Food Cake with Vanilla pudding, banana slices and chopped Reece's Cups

Monday, February 7, 2011

Strawberries and Cream Crepes

I have some great Valentine's Day desserts to share this week in preparation for your romantic dinners at home. First up- my Mom's strawberry crepes. This is a great make-ahead recipe for an impressive dinner party, a brunch gathering, or a quiet night at home with a special someone. The strawberry cream filling is absolutely amazing but you can mix it up with variations such as my Nutella banana crepe below. (I like to eat left overs the next morning with some melted butter and maple syrup!) The recipes here for the crepes and the filling below serves up to 8 people. The crepe batter itself is assembled in the blender and requires an hour to rest before you cook them. I used an Alton Brown recipe featured on foodtv.com- adding some sugar per the sweet variation. When it comes time to cook them, I use a small to medium sized non stick skillet over medium/medium high heat. It might take one or two to get the hang of it but you'll hit stride from there. I find that brushing the pan with a small amount of melted butter every second or third crepe is all that you need to keep it from sticking. I pour directly from the blender into the pan, maybe a scant 1/8 of a cup per crepe. Pour and then immediately swirl the batter so that it coats the whole pan. It should be just enough batter to barely cover. As Alton suggests, cook the first side for about 30 seconds, and then flip to cook the underside for about 10 second. You can then slide them out of the pan onto a board to cool before stacking on a plate. Once completely cooled, cover tightly with plastic wrap and refrigerate until ready to serve. (They keep well for a day or two.)
The Strawberries and Cream Filling 8 ounces of cream cheese- softened (the third less fat variety works great)
8 ounces of sour cream- (light is also fine here)
1 cup of powdered sugar
1 teaspoon of vanilla
1/2 teaspoon of lemon juice
At the last minute:
1 cup of whipping cream
3 tablespoons of powdered sugar
2 pints of fresh strawberries, sliced Mix together with a hand or standing mixer until well blended and lump free. You can refrigerate the mixture at this point until ready to serve or even over night. When ready to assemble, set the filling out to soften while you whip the cream with a three tablespoons of powdered sugar until light and fluffy. You could add a splash of Cointreau or Framboise for a little extra something special. I fold about half of the whipped cream into the cream cheese filling along with all but one cup of the sliced strawberries. (Save those for garnish.) Working directly on the dessert plate, put a heaping spoonful of the filling down the center of the crepe and roll it up, tucking the seam side down. I typically serve two per person (though plan on a few extra!)- topping them with some of the extra whipped cream, a few sliced strawberries - and perhaps a dusting of powdered sugar.
They are like sweet fluffy pillows of yumminess. Delicous served with a glass of champagne or sparkling wine. Another one of my all time favorite crepe variation entails simply a generous schmear of Nutella and some sliced bananas- maybe some toasted chopped hazelnuts if you want to get fancy. Another dessert stunner but also great for breakfast if you're a sweets-a-holic like me.

Friday, January 14, 2011

Pan Seared Salmon with Roasted Ratatouille

I might need to change the name of my blog to "Deliberately Roasted Vegetables" here soon seeing as it seems that's all I write about lately... but I'm not bored with them yet so I hope you're no either. It seems everyone is in "healthy eating" mode with the start of the New Year and this is a satisfying way to work in some heart healthy protein and a whole bunch of veggies. I promise you won't miss the carbs but a big slice of whole grain garlic toast rubbed with garlic and sprinkled with olive oil would fix you right up if you did. Roasted Ratatouille: (serves 4) 1 small/medium sized eggplant- sliced and cut into 3/4 inch pieces 2 medium sized zucchini squashes- cut into 3/4 inch pieces 1 cup of grape or cherry tomatoes- whole 1 bulb of fresh fennel- halved lengthwise and sliced into half inch slices 4 large cloves of garlic- thinly sliced 3-4 tablespoons of olive oil 1 1/2 teaspoons of balsamic vinegar 8 sprigs of fresh thyme- leaves removed from stems 6 large leaves of fresh basil- sliced thinly 1 tablespoon of the fennel fronds- roughly chopped 1 generous teaspoon of kosher salt and some black pepper Preheat the oven to 400 degrees. Place two large baking/cookie sheets in the oven. Meanwhile, toss the eggplant, zucchini and fennel in a bowl with the olive oil, thyme, salt and pepper. NOTE: I actually did the eggplant in a separate bowl so that it wouldn't hog the olive oil from the other veggies. Remove the cookie sheets from the oven and spray lightly with Pam before spreading the veggies out. I put the eggplant on one and the zucchini and fennel on the other. The hot pan ensures that you get a nice brown crust and reduces the cooking time slightly. I think you need two pans to give the vegetables plenty of room to caramelize nicely. Next, toss the tomatoes in one of the bowls with a drizzle of oil and the sliced garlic. After 15 minutes I removed the pans from the oven and stirred/flipped the vegetables and added the tomatoes and garlic to the pan with the zucchini and fennel. I cooked it for another 10-15 minutes until the zucchini was tender and the tomatoes had softened. A benefit to cooking the eggplant on its own pan is to ensure it doesn't sop up the juices of the other vegetables and become soggy. Once the vegetables had all cooked through, I tossed them in a large bowl with the balsamic, basil and fennel fronds. (I gave the tomatoes a little squish on the baking sheet first to break the skins, creating a "sauce" for the mixture. I also picked out a few of the skins that had come loose.)
I let the veggies hang out while I seared the salmon. I sprinkled the skinless filets with salt and pepper and then seared them in a skillet - with a drizzle of olive oil- over medium high heat for 3-4 minutes per side until toasty and barely cooked through. They will continue to cook once you take them off the heat so air on the medium rare side to avoid it getting tough.
I served the salmon over/beside a heaping scoop of the ratatouille e voila! A snap to throw together on a weeknight or something worthy of a great bottle of pinot noir to share with company.

Tuesday, September 21, 2010

Lime Tart with Blackberries

While waiving goodbye to summer, I decided to squeeze one last seasonal/berry dessert in while enjoying the lingering warm weather. I found a recipe for a Lime Tart with Blackberries and Blueberries in the June issue of Bon Appetit magazine. I adapted it slightly based on the time and ingredients available to me for an impromptu dinner party... Fresh Lime Curd:

3 large eggs

3 large egg yolks

1 cup sugar

3/4 cup freshly squeezed lime juice

6 Tablespoons (3/4 stick) butter, cut into pieces

Whisk the eggs, sugar and lime juice together in a saucepan until well blended. Cook over medium low heat- stirring constantly- until the mixture thickens into a custard. I was on medium-low heat for 7-8 minutes. I would recommend you start on low, if it takes much longer, gradually increase the heat until it starts to thicken.

Remove the curd from the heat and strained it into a large glass bowl to remove any clumps. Add the butter, let set for a minute until softened and then whisk until smooth. Cover it with plastic wrap so that it is laying directly on top of the lime curd and refrigerate for 3-4 hours. (Can be made the day ahead.)

I decided to roll with a simple graham cracker crust, reminiscent of a key lime pie. It might not be quite as elegant as a pastry crust but I love the contrasting crispy-crumbly texture with the smooth and creamy curd.

Graham Cracker Crust:

1 and 1/2 sleeves of Graham Crackers (I used low fat)

1/4 cup of brown sugar

2/3 of a stick of unsalted butter- melted in the microwave

Break the graham crackers by hand into the food processor and then pulse until they are broken down into even crumbs. Then add the brown sugar and melted butter, pulsing until evenly incorporated. (It should clump together like wet sand when you pinch it.) Spread the crumbs into a 9 inch tart pan with a removable bottom (sprayed lightly with non stick spray) and then press into the bottom and up the sides using a metal measuring cup.

Bake the crust at 350 degrees for 10 minutes or until lightly golden brown. As soon as you can smell it toasting, its done.

I let the crust rest until just before my dinner guest were to arrive. I then filled it with the lime curd and arranged fresh blackberries over the top. I started with a ring around the outside of the tart and then worked inward, creating concentric circles. (Bon Appetit adds a heap of blueberries in the center as well as a jam glaze for some additional wow factor.)

I stored the tart in the fridge until it was ready to serve. I then removed the tart from the pan (pushing the bottom up and over the edges) and sliced into 8 generous pieces. Hint: Use a very large knife so that you can simply press down to cut versus dragging a knife through the tart. It keeps the filling and berries in place for a cleaner presentation.)

This was the perfect light (kind of) and fresh ending to my dinner menu of Oven Barbeque Shrimp and Grits with Baked Jalepeno Cheddar Grits.

*As I was just linking back to this recipe posted last summer- I saw that I served a Fresh Berry and Lemon Curd trifle with it! Honest to goodness, I'd forgotten. I can say again that it works very well wtih this menu- the freshness and tang of the citrus and berries cuts through the richness of the meal.

Friday, September 10, 2010

Summer Tomato Bruschetta

I realize I've gone bonkers with summer tomato recipes lately, but its for good reason. Kentucky tomatoes are A.M.A.Z.I.N.G. and this is my first summer as a resident here... so I'm like a kid in a candy store... This bruschetta recipe is the perfect appetizer (casual yet elegant) or even a quick and easy lunch. The tomato mixture can be prepared in advance and stored in the fridge for up to 24 hours. Use any kind of tomato you like (grape, cherry, red, yellow, heirloom, etc.) the fresher, the better. Summer Tomato Bruschetta: 2 red roma tomatoes, diced 2 yellow roma tomatoes, diced 1 clove of garlic- grated with a rasp 1-2 tablespoons of good quality olive oil 5 large basil leaves, thinly sliced 1/2 teaspoon of kosher salt a few grinds of pepper Balsamic Glaze for drizzling* *You can find balsamic glaze at Whole Foods, Fresh Market, and Harris Teeter for sure. It is GREAT stuff. Its excellent drizzled over hummus, grilled chicken or fish, or over any type of tomato salad. If you don't have it, add 1 tablespoon of balsamic vinegar and a small squeeze of honey to your tomato mixture instead. Gently fold all of the ingredients together in a bowl. Again you can set it aside or refrigerate until ready to serve. (You might wait and add the basil at the very last minute.) In this case I used ciabatta bread sliced in half horizontally. I used roughly 2/3 of the loaf as an appetizer for 4 people... we definitely ate it all. You could also use baguette rounds or slices of your favorite artisan bread. I will say using a thicker bread like a ciabatta made for messy eating. The tomatoes had a tendency to fall off the bread as you took a bite. A thinner slice might be ideal. I put the bread, cut side up, on a baking sheet and broiled it in the oven for 2 minutes (watching carefully not to burn) until just golden brown. Broiling gives you a toasty outside and a soft inside- however if you prefer to dry the bread out a bit for a crunchier toast, bake at 375 or 400 degrees for 15-20 minutes. (I've used the store bought bruschetta toasts before and they are pretty tasty as well.) If you're not shy about garlic, you could rub the toasted bread down with another clove of fresh garlic to give it extra zing. Otherwise, slice the bread into squares and spoon the tomatoes over the top. After the bruschetta is plated (at the very last minute), drizzle with the balsamic glaze. Buon Appetito!

Saturday, July 24, 2010

Stuffed Zucchini

It seems everywhere you go in Lexington this time of year, friends and neighbors are eager to share fresh summer vegetables with you. Unfortunately, my garden hasn't produced much of anything yet because I got such a late start- so I've been grateful to enjoy the surplus of others. My mom gave me a beautiful zucchini the other day- it must have been 10 or 11 inches long- absolutely perfect for this recipe. I sliced the zucchini length wise and gently carved out the seeds with a spoon, leaving a shell barely one half inch thick. I then pricked the flesh all over with a fork to help it cook all the way through while baking. You also use two or three smaller zucchini if you like- the grocery store rarely carries the giant variety. I preheat the oven to 375 degrees... The secret to the sauce is fresh local summer tomatoes. You could use any kind you like- grape, cherry, red, yellow, Roma, etc. I find that the large tomatoes such as Better Boys have tougher skins that should really be removed. Simple Summer Tomato Sauce: 2 tablespoons of olive oil 1/2 of a sweet onion, diced (you'll use the other half in the filling so you can dice the whole onion) 2 cloves of garlic, minced (you'll use two more in the filling so go ahead and mince 4) 1/2 teaspoon dried thyme 1 teaspoon tomato paste 1 cup of grape tomatoes, halved 1 large tomato, peeled and crushed by hand 1/4 cup water 1 teaspoon of sugar salt and pepper to taste 5 or 6 fresh basil leaves, sliced thinly I started the olive oil and onion in a saucepan over medium heat, sauteed for 3-4 minutes until the onions were translucent, and then I added the garlic, thyme and tomato paste. I cooked the mixture for one minute, stirring well, before adding the tomatoes, sugar and water. Lastly I seasoned the sauce with salt and pepper and let it simmer over medium-low heat for 10-12 minutes, stirring occasionally. (I actually didn't add the basil until just before serving to maximize the flavor.) While the sauce was simmering away, I made the filling which consisted of the following: 1/2 pound sweet Italian sausage (casings removed if using links) 1/2 of a small sweet onion, diced (approx 1/2 cup) 1/2 of a bell pepper, diced 1/2 cup Cremini (baby portabella) Mushrooms, roughly chopped 2 cloves of garlic, minced 1/2 teaspoon of dried thyme 1/2 teaspoon crushed red pepper flakes 2 cloves of garlic, minced salt and pepper to taste I started with a generous drizzle of olive oil in a skillet over medium heat and then added the onions. I sauteed the onions for two minutes before adding the bell pepper, and a minute or two later the sausage. I cooked it all together for 7 or 8 minutes, breaking the sausage up with a spoon as it browned. As soon as the sausage was approaching cooked through, I added the remaining ingredients and cooked for two more minutes.
I spooned the filling into the zucchini, packing it in to fit as much as possible. I then spooned some of the sauce over the top (maybe one third of it) and sprinkled over a mixture of grated Italian cheeses. (Next time I would actually mix 1/3 of the sauce into the filling before stuffing the zucchini versus spooning it over the top. I think it would have helped to bind it all together a bit better.)
I then poured 2/3 cup white wine into the dish, covered the dish with tin foil and put it into the oven for 30 minutes. After 30 minutes, I removed the foil, spooned some of the wine and juices from the dish over the top of the zucchini and cooked 10 minutes longer, letting the cheese get nice and toasty brown.
I served the zucchini over a bed of the sauce with a green salad on the side. It would also be good with a side of pasta. You could double the sauce recipe in that case. It really was tasty- (though missing a big crusty piece of garlic toast). The zucchini was perfectly tender and the filling was hearty and flavorful. The extra sauce on the plate added a big punch of freshness without making it soggy (a danger if the sauce is served over the top.)
You could also use the same preparation (filling and sauce) for stuffed baby eggplant or stuffed bell peppers. Its hard to go wrong with this combination... yum.